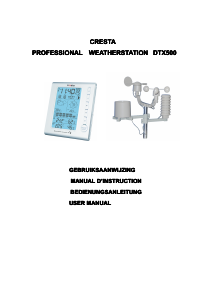
FULL LAST NEW FIRST
Navigating between Different Modes
There are 7 modes available on the main console unit, and each one displays a different category of
data. When display is in a certain mode, its corresponding icon will start flashing.
To navigate between the different modes from the main console unit, press to cycle through the
modes in a clockwise direction or to cycle through the modes in an anti-clockwise direction.
To navigate between the different modes from the remote control, press the corresponding button(s),
or press to cycle through the modes in a clockwise direction or to cycle through the
modes in an anti-clockwise direction.
Clock and Alarm Mode
- Radio Controlled clock showing current time and calendar
- Single alarm, weekday alarm and pre-alarm
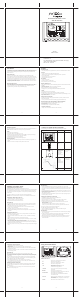
Pressure and Weather Forecast Mode
- Current pressure, trend, and history bar-chart
- Weather forecast
- Moon phase
Weather Forecast
History Bar-chart for
Pressure/ Temperature/
Humidity
Pressure and Weather
Forecast Mode icon
Pressure Trend
History selection for
Pressure and Moon Phase
Moon Phase
Local Pressure/
Sea Level Pressure
Battery Status
Single Alarm
Weekly Alarm
Time/Date Display
Radio Controlled
Clock Signal Status
Clock Module icon
Weekday/City/Second/
Year/UTC time Display
Sunrise/Sunset Mode
- Sunrise and sunset times
- Longitude and Latitude of local area
Temperature and Humidity Mode
- Temperature and humidity trend and readings for indoor and selected channel
- Comfort level
- Dew point
- Temperature alerts
Sunrise time/
Latitude
Sunset time/ Longitude
Sunrise/ Sunset Icon
Indoor Humidity Trend
Sensor Battery Status
Channel Humidity Trend
Indoor Temp. Trend
Indoor Temp.
Channel Temp..
Dew-point Temperature
Temperature and Humidity
Mode Icon
Min/max display
Temp. Alert
Channel Temp. Trend
Channel and
Reception status
Cycling Displayl
Indoor Humidity
Comfort Level
Channel Humidity
Rain Mode
- Precipitation amount for last hour, last 24 hour, yesterday, last week and last month
- Rainfall alert
Sensor Battery Status
Rain Statistic
Rain Rate Display
Rain Alert
Rainfall
Rain Icon
Wind Mode
- Wind Chill
- Temperature at place of anemometer
- Wind direction
- Wind speed
- Wind gust
- Alert for wind speed and wind gust speed
Customizing your Weather Station
To fully customize the weather station to your local settings and personal preferences, the following
settings are required. Please refer to the appropriate sections for detailed instructions.
Required:
-Setting Pressure Parameters during Initial Start-Up (Pressure and Weather Forecast Mode)
-Setting up the Time, Date and Language (Clock and Alarm Mode)
-Setting up the Location Data (Sunrise/Sunset Mode )
Optional:
-Setting up the Time Alarms (Clock and Alarm Mode)
-Setting up the Temperature Alerts (Temperature and Humidity Mode)
-Setting up the Daily Rainfall Alerts (Rain Mode)
-Setting up the Wind Alerts (Winds Mode)
Sensor Battery Status
Wind Speed/ Gust/
Max. Wind speed/
Max. Gust/
Wind Alert/ Gust Alert
Wind icon
Wind Direction in
Compass Points/
Bearing
Wind Direction
Compass Points/
Beatings
Using the Different Weather Modes
Pressure and Weather Forecast Mode
This part of the display indicates the current pressure, sea level pressure, weather forecast, moon
phase and pressure trend.
A number of historical statistics can also be viewed, such as the sea-level pressure values for the last
24 hours, moon phase for the previous and next 39 days, as well as a pressure/ temperature/
humidity history bar-chart.
Pressure values may be displayed inHg, hPa/mBar or mmHg, and altitude values may be displayed
in meters or feet.
Accessing Pressure and Weather Forecast Mode
From the main console unit: Press or until the weather forecast icon on the upper
left of the display starts flashing.
Setting Pressure Parameters during Initial Start-Up
During the initial start-up of the main console unit, all functions in Pressure and Weather Forecast
mode will be locked until the pressure settings are configured.
1. Choose Pressure Units:
The unit icon [inHg\ or [mmHg\ or [hPa/mBar\ should be flashing. Press or to
select pressure unit as inHg, hPa/mBar or mmHg
Press SET to confirm your selection.
2. Choose Altitude Units:
Press or to select altitude unit as feet or meters.
Press SET to confirm your selection.
3. Set Altitude:
Press or to adjust value. Press and hold either button for fast advance.
Press SET to confirm your selection.
4. Upon completion the display will be returned to Pressure and Weather Forecast Mode.
Note: After initial start-up the altitude cannot be adjusted again until the main console unit is
restarted.
Viewing Pressure and Altitude Data
In Pressure and Weather Forecast Mode, each press of SET rotates display between:
- Sea level pressure
- Local pressure
- Local altitude
Setting the Sea Level Pressure
1. In Pressure and Weather Forecast Mode, press SET until the sea level pressure is displayed.
2. Press and hold SET. The Sea Level Pressure display should be flashing.
3. Set Sea Level Pressure:
Press or to adjust value. Press and hold either button for fast advance.
Press SET to confirm your selection.
4. Upon completion the display will be returned to Pressure and Weather Forecast Mode.
Setting the Pressure and Altitude Units
1. In Pressure and Weather Forecast Mode, press SET until local pressure is displayed.
2. Press and hold MEMORY. The pressure unit should be flashing.
3. Set Local Pressure Units:
Press or to adjust value.
Press SET to confirm your selection.
4. Set Altitude Units:
Press or to adjust value.
Press SET to confirm your selection.
5. Set Sea-Level Pressure Units:
Press or to adjust value.
Press MEMORY to confirm your selection.
6. Upon completion the display will be returned to Pressure and Weather Forecast Mode.
Viewing the Sea Level Pressure History
1. In all modes, pressing HISTORY will toggle the sea level pressure display.
2. When sea level pressure is displayed, press HISTORY repeatedly to view sea level pressure data
for each of the last 24 hours.
3. If no buttons are pressed for 5s, the display automatically returns to Pressure and Weather
Forecast Mode.
Viewing the Pressure/ Temperature/ Humidity Bar-Charts
The bar-chart on the display can be configured to display the history data for sea-level pressure,
temperature or humidity for channel 1.
In Pressure and Weather Forecast Mode, press and hold ALARM/CHART,
between:
to toggle the bar-chart
- Sea-level pressure ([PRESSURE\ should be displayed)
- Temperature (Thermometer icon and [CH1\ should be displayed)
- Humidity (RH icon and [CH1\ should be displayed)
Viewing Moon Phase History and Forecast
1. In Pressure and Weather Forecast Mode, press MEMORY.
2. [+ 0 days\ should be flashing.
3. View Moon Phase History / Forecast:
Press or to choose number of days forward (+ days) or backward (- days) from
current date. Press and hold either button for fast advance.
The corresponding moon phase will be shown.
4. To exit, press MEMORY.
Otherwise, if no buttons are pressed for 5s the display automatically returns to Pressure and
Weather Forecast Mode.
Understanding the Weather Forecast Display
sutatS tsaceroF rehtaeWyalpsiD
Understanding the Moon Phase Diagram
Sunny
Partly Cloudy
Cloudy
Rain
Unstable Weather
Snow
Clock and Alarm Mode
The main console unit can be configured to display the time, calendar or UTC time. There are three
time alarms available on the console unit:
Single alarm: activated once at specified time
Weekday alarm: activated everyday from Monday to Friday at specified time
Pre-alarm: activated at specified time interval (30 min) ahead of weekday alarm, if channel 1
temperature falling to +2 ÀC or below.
The snooze duration for the above alarms can also be programmed (0-15 min).
Accessing Clock and Alarm Mode
From the main console unit: Press or until the clock icon beside the time/date display
starts flashing.
Setting up the Time, Date and Language
1. In Clock and Alarm Mode, press and hold SET to enter clock and calendar setup.
2. The day of week should start flashing in the display.
Set Language:
Press or to select language for day of week: English, German, French, Italian, Spanish or
Dutch
3. Select City Code:
Press or to select city code for your local area. Refer to P.59 for a list of available codes.
Press SET to confirm your selection.
4. (if USR was chosen for city code) Set Minute for Latitude:
You will be asked to enter your latitude in minutes (À).
Press or to adjust value. Press and hold either button for fast advance.
Press SET to confirm your selection. Repeat above procedure to set seconds for latitude, minutes
for longitude and seconds for longitude.
5. (if USR was chosen for city code) Set Time Zone:
Press or to adjust value in resolution of 30 min. Press and hold either button for fast
advance. Press SET to confirm your selection.
6. (if USR was chosen for city code or city is in a DST zone)
Set Daylight Saving Time Option:
Press or to turn DST option on or off. Press and hold either button for fast advance.
Press SET to confirm your selection.
7. Repeat the above instructions to set year, month, day, calendar display format (day/month or
month/day), time display format (12 hr/ 24 hr), local hour and local minutes.
8. Upon completion the display will return to normal Clock and Alarm Mode.
Note: Press and hold SET anytime during the setup to return to normal Clock and Alarm Mode. All
settings made will be discarded.
Rotating between Different Clock/Calendar Displays
In Clock and Alarm Mode, each press of SET rotates clock display between:
-Hour: Minute: Weekday
-Hour: Minute for UTC (Coordinated Universal Time)
-Hour: Minute: City
-Hour: Minute: Second
-Month: Day: Year (or Day: Month Year depending on settings)
Activating/Deactivating the Time Alarms
1. In Clock and Alarm Mode, each press of ALARM/CHART rotates clock display between:
-Weekday Alarm Time (displays OFF if weekday alarm deactivated)
- Single Alarm Time (displays OFF if single alarm deactivated)
- Pre-Alarm Time (displays OFF if pre-alarm deactivated)
2. When the above alarms are displayed, pressing or will activate/deactivate the corresponding
alarm.
Note: Press SET anytime during alarm selection mode to return to normal clock display.
Setting up the Time Alarms
1. In Clock and Alarm Mode, press ALARM/CHART to select alarm which you wish to configure.
2. Press and hold ALARM/CHART until hour starts flashing in the display
3. Set Alarm Hour:
Press or to adjust value. Press and hold either button for fast advance.
Press ALARM/CHART to confirm your selection.
4. Set Alarm Minutes:
Press or to adjust value. Press and hold either button for fast advance.
Press ALARM/CHART to confirm your selection.
5. Set Duration of Snooze Function (all three alarms share same snooze time duration):
Press or to adjust value. Press and hold either button for fast advance.
Press ALARM/CHART to confirm your selection.
6. Upon completion the display will be returned to the alarm selection screen.
Note: Pre-alarm cannot be activated if weekday alarm or single alarm is not enabled.
Disabling/Entering Snooze when Time Alarms are Activated
To Enter Snooze:
Press SNOOZE to enable snooze function.
Note: Alarm will automatically enter snooze mode if no key is pressed after the alarm sounds for 2
minutes. This will occur for a maximum of three times.
To Disable Alarm(s):
Press ALARM/CHART to disable the alarm (s).
Note: For weekday alarm, pressing ALARM/CHART will only disable the alarm for the current
day. The alarm will be activated again the next day (if it falls within Monday to Friday).
Activating/Deactivating Radio Clock Reception
The main console unit synchronizes the time and date with radio clock broadcasts to maintain
atomic clock precision.
To turn this function on/off:
Press and hold .
If RC reception is activated, a triangular tower icon will start flashing beside the clock icon.
If RC reception is deactivated, the triangular tower icon will disappear.
htgnertS noitpeceR CRnocI
Undefined data
Reception failed for 24 hours
Weak signal, but can be decoded
Strong signal
Note: The radio controlled signal for time (DCF 77) is transmitted from the central atomic clock in
Frankfurt/Main in short intervals. It has a reception range of approx. 1500 km. Obstructions such as
concrete walls can reduce the signal range.
Sunrise/Sunset Mode
The main console unit computes the sunrise and sunset times from the user-configured location data.
This includes the longitude, latitude, time zone and DST (Daylight Saving Time). Choosing a
suitable city code for your area will automatically generate the correct values for the location data.
Should you wish to input your own location data or if a suitable city code could not be found,
choose [USR\ as the city code during setup.
A searching function is also available, which allows the sunrise/sunset times for different dates to be
viewed.
(Blinks)
Accessing Sunrise/Sunset Mode
From the main console unit: Press or until the sunrise and sunset icons on the
lower left of the display start flashing.
Setting up the Location Data
1. In Sunrise/Sunset Mode, press and hold SET to enter location data setup.
2. The city code in the Time and Alarm display should start flashing.
Set City Info:
Press or to select city code for your local area. The corresponding longitude and latitude
will be shown along with the city.
Should you wish to input your own geographical coordinates, choose [USR\ as the city code
Press SET to confirm your selection.
3. If [USR\ was chosen, you will be asked to input your geographical coordinates.
Set Degree of Latitude:
Press or to adjust value. Press and hold either button for fast advance.
Press SET to confirm your selection.
4. Repeat above procedure to set minute of latitude, degree of longitude, minute of longitude, time
zone of the city, and DST selection.
5. Upon completion the display will be returned to Sunrise/Sunset Mode.
Note: Press and hold SET anytime during the setup to return to normal Clock and Alarm Mode. All
settings made will be discarded.
Viewing the Location Data
In Sunrise/Sunset Mode, each press of SET rotates display between:
-Time and sunrise/ sunset Times
-Calendar and sunrise/ sunset Times
-Calendar and longitude/ latitude
Viewing Sunrise/Sunset Times for Different Dates
1. In Sunrise/Sunset Mode, press MEMORY.
2. The date should be flashing.
Press or to adjust date. Press and hold either button for fast advance.
The corresponding sunrise and sunset times will be displayed for the selected date.
3. Press MEMORY or SET to return display to Sunrise/Sunset Mode.
Understanding the Sunrise/Sunset Display
The sunrise time being displayed differs during the morning and the afternoon/night.
From 12 am to 12 pm: The sunrise time for the current day will be displayed.
From 12 pm to pm: The sunrise time for the next day will be displayed. [NEXT DAY\ icon will
be displayed above the sunrise time.
41
42
43
44
45
46
47
48
49
50


Praat mee over dit product
Laat hier weten wat jij vindt van de Cresta PWS720 Professional Weerstation. Als je een vraag hebt, lees dan eerst zorgvuldig de handleiding door. Een handleiding aanvragen kan via ons contactformulier.