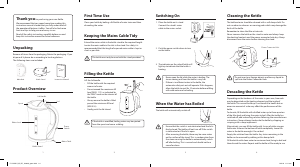
Handleiding Currys Essentials C17JKW10 Waterkoker
Handleiding voor je Currys Essentials C17JKW10 Waterkoker nodig? Hieronder kun je de handleiding gratis bekijken en downloaden als PDF in het Nederlands en/of Engels. Dit product heeft 5 veelgestelde vragen, 0 comments en heeft 0 stemmen. Is dit niet de handleiding die je zoekt, neem dan contact met ons op.
Is je product kapot en biedt de handleiding geen oplossing meer? Dan kun je voor reparatie gratis terecht bij Repair Café.
Handleiding
Loading…


Loading…
Beoordeling
Laat ons weten wat je van de Currys Essentials C17JKW10 Waterkoker vindt door een beoordeling achter te laten. Wil je je ervaringen met dit product delen of een vraag stellen? Laat dan een bericht achter onderaan de pagina.Meer over deze handleiding
We begrijpen dat het prettig is om een papieren handleiding te hebben voor je Currys Essentials C17JKW10 Waterkoker. Je kunt de handleiding bij ons altijd downloaden en daarna zelf printen. Indien je graag een originele handleiding wilt hebben, raden we je aan contact op te nemen met Currys Essentials. Zij kunnen wellicht nog voorzien in een originele handleiding. Zoek je de handleiding van Currys Essentials C17JKW10 Waterkoker in een andere taal? Kies op de homepage je taal naar keuze en zoek daarna op het modelnummer om te zien of we deze beschikbaar hebben.
Specificaties
| Merk | Currys Essentials |
| Model | C17JKW10 |
| Categorie | Waterkokers |
| Bestandstype | |
| Bestandsgrootte | 1.62 MB |
Alle handleidingen voor Currys Essentials Waterkokers
Meer handleidingen voor Waterkokers
Veelgestelde vragen over Currys Essentials C17JKW10 Waterkoker
Ons supportteam zoekt dagelijks naar nuttige productinformatie en antwoorden op veelgestelde vragen. Als er onverhoopt toch een onjuistheid tussen onze veelgestelde vragen staat, laat het ons dan weten via het contactformulier.
Waarvoor dient de fijne zeef in mijn waterkoker? Geverifieerd
Deze is bedoeld om losse kalkaanslag op te vangen die na enige tijd gevormd kan zijn.
Ik vind dit nuttig (401) Lees meerDe waterkoker slaat niet af en blijft het doorkoken, wat moet ik doen? Geverifieerd
In veel gevallen is het deksel van de waterkoker niet goed gesloten. Wanneer er warmte kan ontsnappen zal de waterkoker door blijven koken. Als het probleem niet oplost, neem dan contact op met de fabrikant of een reparateur.
Ik vind dit nuttig (265) Lees meerKan ik ook minder dan de minimum-hoeveelheid water koken? Geverifieerd
Nee. Wanneer er minder dan de minimum-hoeveelheid water wordt gekookt, kan het zijn dat de temperatuursensor niet goed werkt. Hierdoor kan het voorkomen dat de waterkoker niet afslaat en dit kan gevaarlijke situaties opleveren.
Ik vind dit nuttig (116) Lees meerIs het efficiënt om een waterkoker te vullen met heet water uit de kraan? Geverifieerd
Nee. Om warm water uit een kraan te krijgen moet vaak eerst koud water weglopen dat dan verloren gaat. Ook vullen de leidingen zich met een zelfde hoeveelheid warm water dat vervolgens niet gebruikt wordt en afkoelt, waardoor er energie verloren gaat. Het is dus beter de waterkoker te vullen met koud water.
Ik vind dit nuttig (75) Lees meerKan ik ook meer dan de maximum-hoeveelheid water koken? Geverifieerd
Nee. Wanneer er meer dan de maximum-hoeveelheid water wordt gekookt, kan het zijn dat de waterkoker overloopt. Dit kan mogelijk gevaarlijke situaties opleveren.
Ik vind dit nuttig (69) Lees meer
Praat mee over dit product
Laat hier weten wat jij vindt van de Currys Essentials C17JKW10 Waterkoker. Als je een vraag hebt, lees dan eerst zorgvuldig de handleiding door. Een handleiding aanvragen kan via ons contactformulier.