
Estimated period
< 50%
50%-75%
> 75%
Completed 100%
# of Flash
1
2
3
Charge indicator OFF
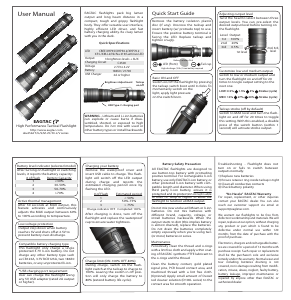
High Performance Tactical Flashlight
http://www.eagtac.com
sku4564 T/G/S/M-25/30-L/V series
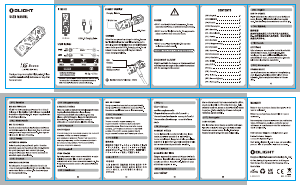
EAGTAC
User Manual
1) Replace new batteries
2)
Ensure retainer ring inside tailcap is tight
3) Clean all conductive contacts
4) Check battery polarity
Troubleshooting - Flashlight does not
turn on or fails to switch between
outputs normally:
WARNING - Lithium and Li-ion batteries
can explode or cause burns if disas-
sembled, shorted, or exposed to high
temperature. Do not mix with used or
other battery types or install backwards.
“No Hassle” EAGTAC Warranty
For repair, replacement, or other inquiries
contact your EAGTAC dealer. You can also
reach our customer support via email at
We warrant our ashlights to be free from
defects in workmanship and materials. We will
repair, replace at our option, without charging
any product or part which is found to be
defective under normal use within 120
months from the date of purchase with the
proof of purchase.
Electronics, chargers and rechargeable batter-
ies are covered for a period of 12 months with
purchase receipt. Such repair or replacement
shall be the purchaser’s sole and exclusive
remedy under this warranty. Normal wear and
tear including batteries draining is not
covered, nor is damage resulting from modi-
cation, misuse, abuse, neglect, faulty battery,
battery leakage, improper maintenance or
repaired by anyone other than EAGTAC or
authorized dealer.
Do not mix new and used lithium or li-ion
batteries. Do not mix batteries with
dierent brand, capacity, voltage, or
install batteries backwards. When the
output starts to dim (this implies battery
is almost drained), replace the batteries.
Do not drain the batteries completely
empty especailly when you’re using two
(or more) batteries in series.
All EAGTAC ashlights are designed to
use button-top battery with protruding
positive terminal. For rechargeable li-ion
battery, use only EAGTAC li-ion battery, or
other protected li-ion battery with com-
patible length and diameter. When using
third party li-ion battery, ensure it is
protected and its protection circuit is able
to oer 10 Amp or higher to allow the
ashlight to function at MAX output.
Battery Safety Precaution
Brightness Adjustment
USB Type-C charging port
LOW: 0.5% 1.5% 3% Strobe (cycle)
MED: 14% 27% 40% Strobe (cycle)
Tailcap
on/o
Quick Start Guide
Remove the battery isolation plastic
disc (if any). Unscrew the tailcap and
insert battery (w/ protrude top) to use.
Ensure the positive battery terminal is
facing the LED. Replace tailcap and
tighten snugly.
LED (Front)
High discharge (10A+) li-ion battery required
Tail-cap
EAGTAC ashlights pack big lumen
output and long beam distance in a
compact, tough and grippy ashlight
body. They oer versatile user interface,
highly ecient LED driver, and fast
battery charging ability. Be crazy lumen
with you in the dark.
Quick Specifications
Charging your battery
Remove the waterproof cover and
insert USB cable to charge. The ash-
light will switch o the LED output
during charge and reports the
estimated charging period once by
ashing the LED.
*USB charging port requirement
User can charge the ashlight using
any 5V USB adapter (rated 2A output
or higher).
Compatible battery charging type
This ashlight only charge a single
protected 3.7V li-ion battery. Do not
charge any other battery type such
as CR123A, 3.7V RCR123A, two 18650
batteries, or any unprotected li-ion.
After charging is done, turn o the
ashlight and replace the waterproof
cap to ensure water tightness.
Charge limit (ON-100% OFF-80%)
During charge, switch on the ash-
light switch at the tailcap to charge to
100%. Leaving the switch in o posi-
tion will only charge the battery to
80% (extend battery life cycle).
Low voltage protection
Output step down when battery
reaches 3V and shuts o at 2.5V to
prevent battery over-discharge.
Basic ON and OFF
Switch on/o the ashlight by pressing
the tailcap switch boot until it clicks. To
momentarily switch on the
light, apply light pressure
on the switch boot.
Adjusting output level
Twist the head to select between three
output levels. You can pre-select the
desired output level before turning on
the flashlight.
Tailcap strobe (o by default)
Switch to MAX level and turn the ash-
light on and o for 20 times to toggle
this setting. With this enabled, a double
press of the switch button (within 1
second) will activate strobe output.
Customize low and medium output
Switch to low or medium output and
turn the ashlight on and o for 20
times to toogle output setting to the
next one.
1st level
2nd, 3rd,
level
Output
100%
20%
0.5%
Level
1st
2nd
3rd
Maintenance
Periodically clean the thread and o-rings
with a lint free cloth and apply a thin coat-
ing of EAGTAC synthetic PTFE lubricant to
the o-rings and the thread.
Clean the battery contact, gold plated
signal pins, PCB board contact area, and
machined thread with a lint free cloth.
(Optional) Apply small amount of Deoxit
red cleaner solution (D100L series) to the
contact area for smooth operation.
LED
Output
Charging Circuit
Voltage
Battery
USB Charger
CREE XHP35/XHP50.2/XHP70.2
XP-L/XM-L2/Nichia 219/Luminus LED
3 brightness levels + AUX
C2500
2.7V to 4.2V
18650 / 21700
2A or higher
Active thermal management
After 30 seconds at MAX output, this
feature activates and continuously
adjusts the MAX output between 60%
to 100% according to tempearture.
Battery level indicator (selected model)
After turning on ashlight or switching
levels, it reports the battery capacity:
Battery Capacity
<30%
30-50%
50-70%
>70%
# of Flash
1
2
3
4
Battery Isolation Disk


Praat mee over dit product
Laat hier weten wat jij vindt van de EAGTAC G3L Zaklamp. Als je een vraag hebt, lees dan eerst zorgvuldig de handleiding door. Een handleiding aanvragen kan via ons contactformulier.