
1
EKO 9260垃圾桶使用说明书
6折页_折叠尺寸:90*130mm
展开尺寸:130*540mm
纸张:157g哑粉纸
C:20 M:0 Y:100 K:8
1
20cm(±5cm)
Power ON/OFF
1
Power Supply
1
2
3
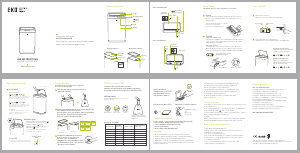
EK9260/EK9260R
MIRAGE X SENSOR BIN
USE INSTRUCTIONS
Thank you for choosing the
MIRAGE X SENSOR BIN
Please read these instructions before using the product.
Graphics are for illustrative purposes only.
Product Introduction
6 AA alkaline batteries and outlet/adaptor not included.
Depending on waste sorting and recycling needs,
use with or without bin bags.
1
3
Flap
Lid
4 Body
2
Sensor panel
Open
Close
With inner bucket Without inner bucket
Liner ring
Handle
Plastic bag
stabilizer
Inner bucket
Handle
Back of lid (EK9260)
Deodorizer
compartment
Power
switch
Battery box
OFF
ON
Sensor switch
OFF
ON
Back of lid (EK9260R)
Deodorizer
compartment
Micro-USB B
charging port
Power switch
OFF
ON
Sensor switch
OFF
ON
EK9260
Turn to the bottom of the lid, press down and slide open the battery
box cover. Insert 6 AA alkaline batteries according to directions in
the battery box.
Place hand or object 20cm (±5cm) directly
above the sensor panel to open the bin.
All LED signal lights will turn on.
F-1
15L+15L
F-1
20L+20L
B
10L+10L
F
30L/45L
G
47L/68L
Liner ring
(45L/68L/80L only)
Inner bucket
EK9260R
1. Connect to power cord
Plug the power cord into the micro USB port(Micro-USB B) in the back,
connect the other end to a power adaptor and outlet for direct power
supply. Adaptor is not included.
Micro-USB B plug
Turn the power switch on.
Make sure sensor switch is also in the ON position.
2
Sensor panel lights up to signal power on.
LED light flashes every 6 seconds when bin is in standby mode.
Sensor Mode
Pull out and tighten the drawstrings, then
remove the bin bag.
2
Replace the bin bag and insert excess bin bag into the
bag stabilizer on the inner bucket.
Or take out the liner ring, fold the edge of the bin bag
over the liner ring, place back into the bin.
Place the lid back on top of the bin.
Deodorizer compartment is located
at the front inner side of the lid.
Open the cover of deodorizer
compartment. Insert deodorizer into
the compartment, then close the cover.
*Deodorizer not included
Sensor switch
OFF
Sensor Open/Close
5 seconds automatic countdown close:
LED signal lights count down 5 seconds
before the bin automatically closes.
Stay Open
Keep hand or object within the sensor
range to keep bin open, or use touch
buttons to operate the bin.
If sensor switch is turned to off, the bin can only
be operated by touch buttons(manual mode).
Product Code
Liner Dimension
(W L, cm)
Suitable
Liner Size
A
B
C
D
E
F
G
F-1
Bin Capacity
3L-6L
7L-9L
10L-15L
18L-21L
25L-35L
40L-60L
50L-90L
18L-28L
EK33701
EK33702
EK33703
EK33704
EK33705
EK33706
EK33707
EK33706-1
35x40
40x45
45x50
55x55
55x70
65x75
68x85
49x68
Custom fit like a match made in heaven.
Maximize the functionality of our products by pairing
them with custom fit liners, batteries, and odour filters.
Extra strong plastic bag for
EKO bins or bins with similar
dimensions.
Integrated drawstring handles so they are easy
to lift, tie, and carry.
Convenient
drawstring design
Tailor made for
EKO bins
Extra strong
and tear-resistant
EKO BIN LINERS
Bin Liners Size Guide
x
1. When installing batteries, please mind the battery polarity.
2. Avoid use under long exposure to direct sunlight and humidity.
3. Avoid manual force on the bin’s lid during operation.
4. Wipe lid with clean dry cloth and do not clean with running water.
5. If lid contacts water, remove the battery compartment cover and
air dry the lid before use.
6. Avoid pressure on the lid and repeated flipping of the lid.
7. Replace batteries timely when low power signal is on.
8. Keep sensor panel clean for optimal use.
9. Keep away from heat, wind sources and high traffic areas.
10. Do not mix old and new alkaline batteries and do not use
rechargeable or acid-based batteries.
11. Please do not disassemble or attempt repair of the
product on your own.
Built in deodorizer
compartment can be used
with EKO odour filter or
EKO perfume capsules.
1 Lid 1 Body 1 Inner bucket (Single inner bucket only)
2 Inner buckets (Double inner buckets only)
1 Liner ring (Without inner bucket only)
1 Instructions manual
1 Micro-USB B cord (EK9260R only)
EKO Charcoal Odour Filter EKO Grancy Perfume Capsules
Available in 3 scents
-Rose
-Blue Ocean
-Fresh Forest
Attention
* We apologize for any inconvenience caused by minor
inconsistencies in these instructions, which may occur as a result
of product improvement and development.
Battery and Safety Instructions
1. Only adults should handle batteries.
2. Always use the correct type of batteries (AA alkaline batteries).
3. Always use all new batteries.
4. Do not use rechargeable batteries.
5. Do not mix old and new batteries, or batteries of different types.
6. Remove batteries from equipment which is not to be used for
an extended period of time.
7. For recycling and disposal of batteries, please check and
comply with your local regulations.
Product Warranty
Sensor switch
ON
Power switch
ON
*Insert 6 AA alkaline batteries according to
directions in the battery box.
*Do not use rechargeable batteries.
Green light: Full charging
Red light: Charging
Standby mode with sensor
Light on the left flashes indicating
sensor function is activated.
Standby mode with touch
Light on the right flashes
indicating touch buttons function
only, no sensor function.
Operating Instructions
Sensor OFF
Change Bin Bag
When lid has been opened using the " "
touch button, the lid must be closed by
lightly pressing the " " button.
*Please do not flip or slam the lid by hand to
avoid damages to the mechanism.
to keep the lid open
to close
Lightly press
Lightly press
2
Manual mode
Product Packing List
EKO Accessories Guide
Adaptor not included
4. Adaptor
Adaptor not included. Please use adaptors that comply with regulations.
Recommended adaptor with input voltage DC 5V, input current 1A.
Troubleshooting
1. No lights on - Please make sure the batteries are installed correctly
or try new batteries.
2. No response from sensor - The lid may have been closed by hand in
manual mode. Pressing " " will reset the modes.
3. Sensor lid does not open fully – Indicates low power, please replace
batteries with 6 new AA alkaline batteries.
Not covered by warranty
1. Damages due to user mishandling or other than its
intended use in a typical household activity .
2. Damages due to natural disasters such as fire,
earthquake, flood and other Force Majeur events.
3. Damages including dents, scratches, and water damage
due to transport handled by the user.
4. Any modification to the product, including disassembly
or attempts to repair by the user.
5. Intentional damage to the product.
*To request after-sales service, please provide proof of
purchase from EKO authorized retail channels.
*All copyrights belong to EKO.
2.Recharge the bin
To charge the bin, connect the micro USB side of the cable to the
micro USB port on the side of the sensor lid, then connect the other
side of the cable to any power supply outlet/adaptor with a USB plug.


Praat mee over dit product
Laat hier weten wat jij vindt van de EKO EK9260 Prullenbak. Als je een vraag hebt, lees dan eerst zorgvuldig de handleiding door. Een handleiding aanvragen kan via ons contactformulier.