GREAT BRITAIN - CUSTOMER SERVICE contact number: 08545 300 9799 e-mail: customerservice@clasohlson.co.uk internet: www.clasohlson.com/uk
English
1
4
3
5
6
7
2
Ver. 20130802
Door View with Display
Art.nr. 36-5399-01 Model JY8028-Black
36-5399-02 JY8028-Gold
Please read theentire instruction manual before using theproduct and save it
for future reference. We reserve theright for any errors in text or images and any
necessary changes made to technical data. If you have any questions regarding
technical problems please contact our Customer Services.
Safety
• Read theentire instruction manual before mounting.
• The product must not be disassembled.
• The batteries must never be disposed of by throwing them into open flames.
• This product is not suited for use in temperatures below 0 °C.
3. Thread thecamera’s cable through thehole from theoutside of thedoor.
Hold thecamera in place against thedoor. Note: The camera should not be
twisted during installation as this might damage its cable. Note: Make sure
thearrow on thecamera unit is facing upwards. Otherwise theimage will be
displayed upside down. The camera gasket should be mounted between
thecamera unit and thedoor.
4. Peel thebacking paper off thedisplay mount’s self-adhesive strip.
Thread thecamera cable through thedisplay mount and theselected tube.
Press thedoor mount onto theinside of thedoor with thescrew hole facing
downwards.
5. Use thetool to tighten thetube into place so that it holds thecamera in
place on theoutside of thedoor.
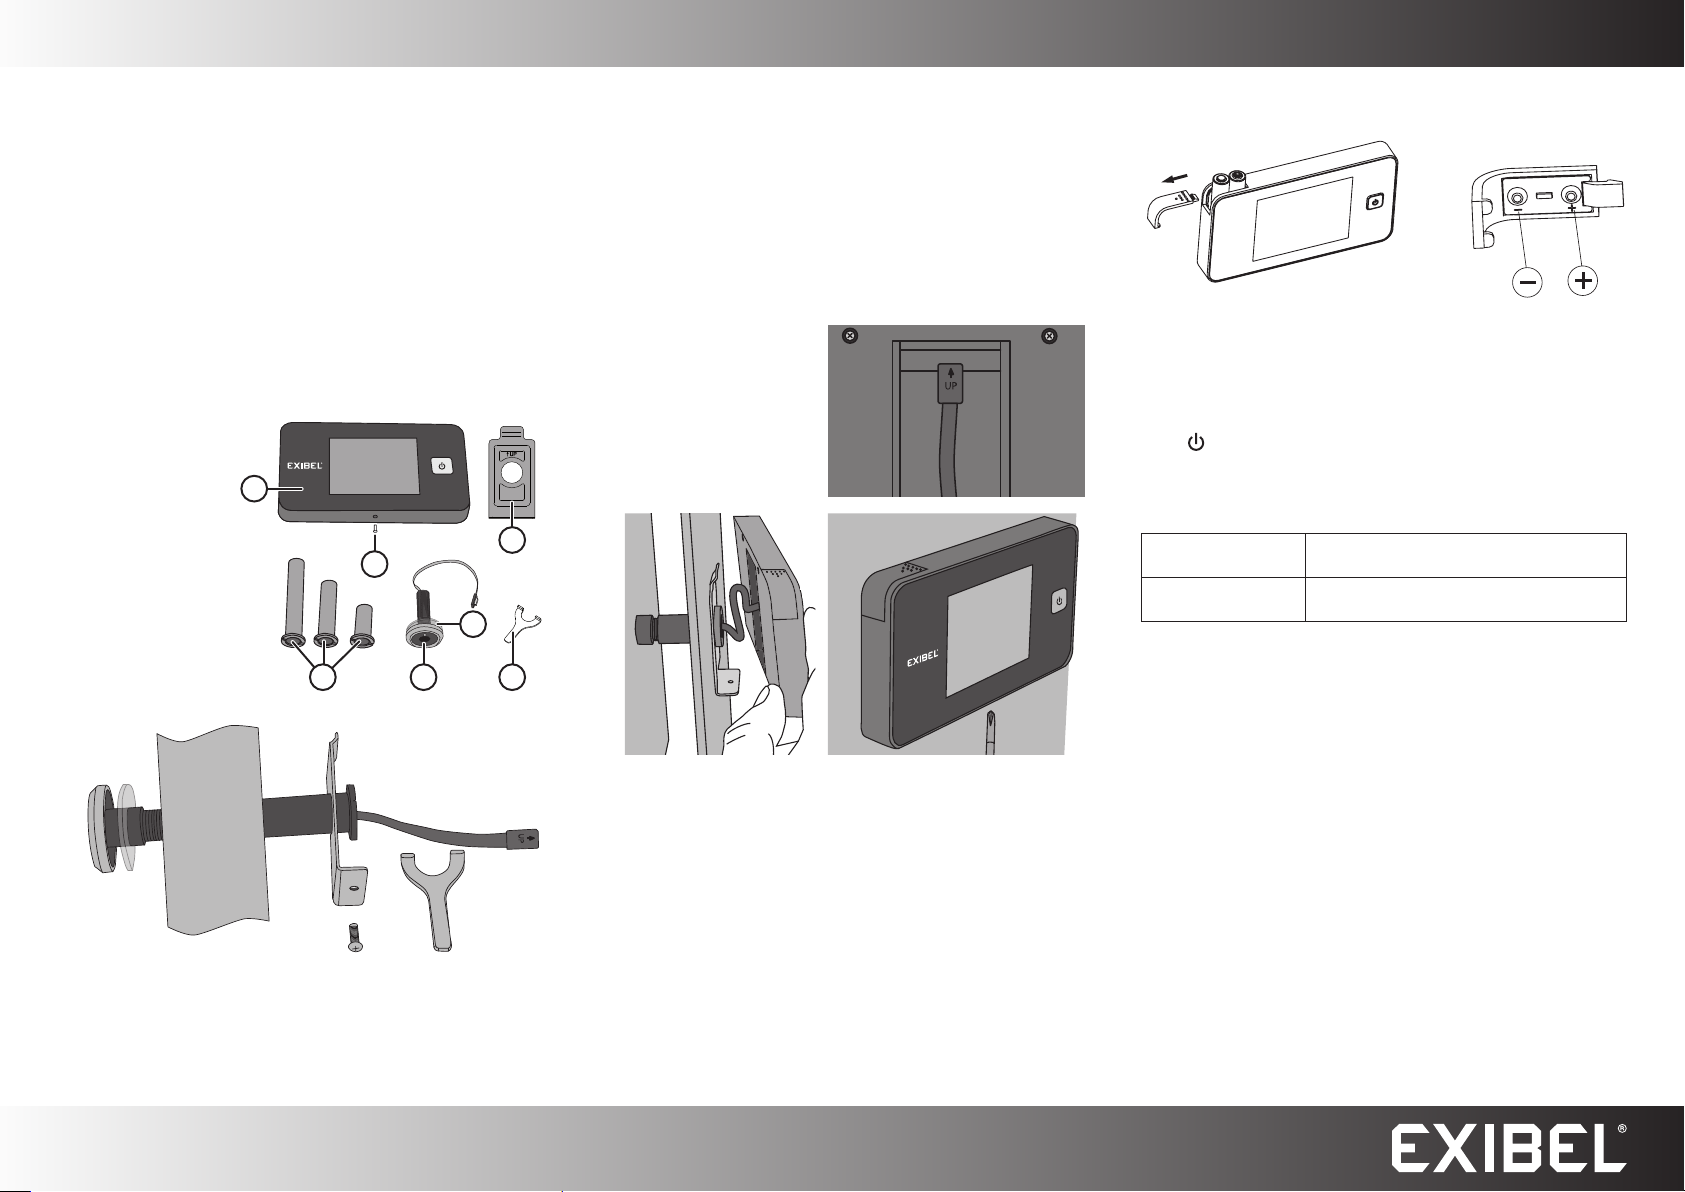
Inserting batteries
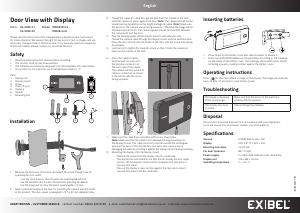
Parts:
1. Display unit
2. Display mount
3. Screw
4. Tubes (3 pcs)
5. Camera
6. Gasket
7. Mounting tool
Installation
1. Measure thethickness of thedoor and select thecorrect length tube for
spanning thedoor width.
- Use theshort tube for door thicknesses spanning 38–62 mm.
- Use themedium tube for door thicknesses spanning 62–86mm.
- Use thelong tube for door thickness spanning 86–110 mm.
2. Select adesired location in thedoor for mounting thecamera and drill ahole
at this location. The door viewer is designed to fit 14–22 mm diameter holes.
6. Press thecamera cable’s
terminal lead securely onto
theterminal connector on
theback side of theviewer.
The camera will only work if its
cable is connected as shown
in thepicture with thearrow
facing upwards.
7. Make sure thecable flows smoothly without any sharp kinks.
Note: Make sure that thecable is not damaged during mounting it to
thedisplay mount. The cable must not protrude outside therectangular
space at theback of thedisplay. Any protrusion may cause arisk of
damaging thecable by pinching it against thedisplay mount during mounting.
8. Mounting thedisplay onto thedisplay mount.
- Remove thescrew from thedisplay mount’s underside.
- The display has one insertion slot that fits the display mount’s upper
portion. Tilt thedisplay’s lower portion outwards abit and press it
securely into place.
- Press in thedisplay’s lower portion against thedoor and screw it
securely into place from theunderside.
• Press down on thebattery cover and slide outwards to release it.
• Insert two AAA/LR03 batteries (sold separately) according to themarkings
on theinside of thebattery cover. The markings show which poles should
be facing upwards, making contact against thebattery cover.
Operating instructions
Press [ ] to view thecamera’s image on thedisplay. The image automatically
turns off after 10 seconds to save battery power.
Troubleshooting
The image is displayed
at thewrong angle.
Make sure that thearrow on thecamera is
pointing directly upwards.
The display only turns
on briefly.
Check/change thebatteries.
Disposal
This product should be disposed of in accordance with local regulations.
If you are unsure how to proceed, contact your local authority.
Specifications
Camera 0.3 MP, field of view 105°
Display LCD 2.8″ TFT, 320×240
Mounting hole diam 14–22 mm
For door thickness 38–110 mm
Power supply 2 x AAA/LR03 batteries (sold separately)
Display unit 125×68×15 mm
Operating temperature 0 – +40 °C


Praat mee over dit product
Laat hier weten wat jij vindt van de Exibel JY8028 Intercomsysteem. Als je een vraag hebt, lees dan eerst zorgvuldig de handleiding door. Een handleiding aanvragen kan via ons contactformulier.