
tery compartment does not close
securely, stop using the product
and keep it away from children.
▪
Remove the batteries when they
are flat or when you know that
the device will not be used for a
long period of time. The manu-
facturer accepts no liability for
damage caused by leaking bat-
teries.
▪
Batteries, including those which
do not contain heavy metal,
should not be disposed of with
household waste. Always dis-
pose of used bat teries in accord-
ance with local environmental
regulations.
▪
To prevent battery leakage
which may result in physical in-
jury, property damage or dam-
Compliance with the WEEE Directive
and Disposing of the Waste Product:
This product complies with EU WEEE Directive
(2012/19/EU). This product bears a classification
symbol for waste electrical and electronic equipment
(WEEE).
This symbol indicates that this product
shall not be disposed with other house-
hold wastes at the end of its service life.
Used device must be returned to offical
collection point for recycling of electrical and elec-
tronic devices. To find these collection systems please
contact to your local authorities or retailer where the
product was puchased. Each household performs
important role in recovering and recycling of old ap-
pliance. Appropriate disposal of used appliance
helps prevent potential negative consequences for
the environment and human health.
Compliance with RoHS Directive
The product you have purchased complies with EU
RoHS Directive (2011/65/EU). It does not contain
harmful and prohibited materials specified in the Di-
rective.
Package information
Packaging materials of the product are
manufactured from recyclable materials in
accordance with our National Environ-
ment Regulations. Do not dispose of the packaging
materials together with the domestic or other wastes.
Take them to the packaging material collection points
designated by the local authorities.
This device is noise-suppressed according to the ap-
plicable EU directives.
This product fulfils the European directives 2014/53/
EU, 2009/125/EC and 2011/65/EU.
Never open the device casing. The manufacturer will
not accept any liability for damage resulting from im-
proper handling.
You can find the CE declaration of conformity for the
device in the form of a pdf file on the Grundig Home-
page www.grundig.com/downloads/doc.
The type plate is located at the rear of the device.
BATTERY OPERATION
▪
Remove the battery cover on the back of the unit
by sliding the cover in the direction of the arrow.
▪
Insert four LR6 (AA size) batteries into the spaces
in the compartment. Take care to ensure all batter-
ies are inserted with the correct polarity as shown
on the base of the battery compartment. Replace
the battery cover.
▪
Reduced power, distortion and a ‘stuttering’
sound are all signs that the batteries may need
replacing.
▪
If the radio is not to be used for an extended pe-
riod of time it is recommended that the batteries
are removed from the radio.
We would recommend for economy that the radio
is used via the DC adaptor whenever possible with
battery operation for occasional use only.
IMPORTANT: The batteries should not be ex-
posed to excessive heat such as sunshine, fire or the
like. After use, disposable batteries should if possible
be taken to a suitable recycling centre. On no ac-
count should batteries be disposed of by incineration.
USING A AC ADAPTOR
1 Place your radio on a flat surface and plug the
mains adaptor into the DC input socket located
on the right-hand side of your radio (marked
‘DC’) ensuring that the plug is pushed fully into
the socket.
2 Plug the other end of the mains adaptor into a
standard 13A mains socket outlet and switch on
the wall socket. Whenever the adaptor is used the
batteries are automatically disconnected.
The AC adaptor should be disconnected from
the mains supply and from the radio when not
in use.
IMPORTANT: The mains adaptor is used as the
means of connecting the radio to the mains supply.
The mains socket used for the radio must remain ac-
cessible during normal use. In order to disconnect the
radio from the mains completely, the mains adaptor
should be removed from the mains socket outlet com-
pletely.
DAB MODE
▪
Fully extend the telescopic aerial located on the
rear of your radio. The aerial should be fully ex-
tended and positioned vertically for optimum re-
ception.
▪
Press and release the »ON/OFF« button to
switch on your radio. The display will show
»GRUNDIG« for a few seconds. After each use
the radio will remember the mode used and then
switch on in that mode the next time that it is used.
▪
If this is the first time that the radio has been used
a scan of the Band III DAB channels will be car-
ried out. This is known as »AUTO TUNE«. After
scanning the DAB channels, the radio will switch
to FM and execute auto scan and store the avail-
able FM stations into FM presets. These opera-
tions will be ended when the 20 FM presets are
full or completes scanning the whole FM band.
If the radio has been used before, the last used
station will be selected.
▪
During Auto tune each group of stations will be
detected and the station count will be updated.
▪
When the scan is completed the first station (in
numeric-alpha order 0...9, A...Z) will be selected.
The first station in the list of stations found during
scanning will be played.
If no signal is found, then »OFF AIR« will be dis-
played and it may be necessary to relocate your ra-
dio to a position giving better reception. You should
then carry out the Auto tune again to find stations.
▪
Your radio has an indicator on the display to in-
dicate the strength of the DAB radio signal being
received.
Note: When switched on for the first time, the radio
will set the volume to a moderately high level, in case
the broadcast is very quiet. After you have set the
volume with »VOLUME« buttons, the radio will re-
member the setting that you have applied for the next
time that it is used.
Selecting a station
Press and release the »ON/OFF« button to switch
on your radio.
Press and release the »DAB/FM« button until the
»DAB« mode is selected. The display will show the
name of the radio station currently selected.
ary services do not broadcast continually and if
the selected service is not available, the radio will
re-tune to the associated primary service.
Display mode
Your radio has a range of display options when in
DAB mode:
▪
Press and release the »SELECT/INFO« button to
cycle through the various modes. All display op-
tions except the text display will revert to the clock
display after 60 seconds.
a. Station name : Displays the station
name being listened to.
b. Scrolling text : Displays scrolling text
messages such as artist/track name, phone in num-
ber, etc.
c. Programme type : Displays type of sta-
tion being listened to e.g. Pop, Classic, News, etc.
d. Signal Strength : Displays the signal
strength. The minimum signal marker (|) shows the
1 Press and release the »ON/OFF« button to
switch on your radio.
2 If needed, press and release the »DAB/FM«
button until the DAB mode is selected.
3 Press and release the »MENU« button. The DAB
menu will show on the display. Press and release
the »TUNING UP« or »DOWN« button until
the display shows »SCAN«.
4 Press and release the »SELECT/INFO« button.
Your radio will perform a scan of the Band III DAB
channels. As new stations are found, the station
counter on the right-hand side of the display will
increase and stations will be added to the list.
Press and release the »TUNING UP« or »DOWN«
button to step through the list of available stations.
When the desired station name appears on the dis-
play, press and release the »SELECT/INFO« button
to select the station. The radio will select the new sta-
tion.
Adjust the or »+« button to the required setting.
Note: If after selecting a station the station does not
connect it may be necessary to relocate your radio
to a position giving better reception.
Secondary services
▪
Certain radio stations have one or more second-
ary services associated with them. If a station has
a secondary service associated with it the second-
ary service will then appear immediately after
the primary service as you press and release the
»TUNING UP« or »DOWN« button.
▪
To tune to the secondary service, press and re-
lease the »SELECT/INFO« button. Most second-
SETUP AND SAFETY EN
▪
The device is designed for the
playback of audio signals. Any
other use is expressly prohibited.
▪
Protect the device from moisture
(water drops or splashes).
▪
Do not place any vessels such as
vases on the device. These may
be knocked over and spill fluid
on the electrical components,
thus present a safety risk.
▪
Do not place any naked flames
such as candles on the device.
▪
Only use the device in a moder-
ate climate.
▪
Do not cover the ventilation slots
with newspa pers, table cloths,
curtains, etc.
▪
When deciding where to place
minimum signal strength needed for good DAB re-
ception. The signal indicator chevrons increase or de-
crease showing the changing signal strength as you
adjust the telescopic aerial or your radio position.
e. Multiplex Name : Displays name of multiplex to
which the current station belongs.
f. Frequency : Displays the frequency for the
currently tuned DAB station.
g. Bit rate : Displays the digital bit rate for
the currently tuned DAB station.
h. Time : Displays current time.
i. Date : Displays current date.
Finding the new stations
From time to time, new DAB radio stations may be-
come available. Or you may have moved to a differ-
ent part of the country. In this case you may need to
.cause your radio to scan for new stations
age to the clock radio install the
batteries correctly. The polarity
is marked on the base of the bat-
tery compartment.
▪
Never open the device casing.
No warranty claims are ac-
cepted for damage caused by
in correct handling.
▪
If malfunctions occur due to static
electrical charges or fast tran-
sient overvoltage (burst), reset
the device. To do this, pull out
the mains adapter and connect
it again after a few seconds.
▪
Unplug the mains adapter to
completely disconnect the de-
vice from the mains.
▪
Prolonged listening at loud vol-
umes with the earphones can
damage your hearing.
the device, please note that furni-
ture surfaces are covered by var-
ious types of varnish and plastic,
most of which contain chemical
additives. These addi tives can
corrode the device supports,
leaving residues on the furniture
surfaces which can be difficult or
impossible to remove.
▪
Do not use any cleaning agent,
as this may dam age the casing.
Clean the device with a clean,
moist leather cloth.
▪
Do not expose the batteries to
extreme heat, caused for exam-
ple by direct sunlight, heaters or
fire.
▪
Keep new and used batteries
away from chil dren. If the bat-
Manual tuning
Manual tuning allows you to tune your radio to a
particular DAB frequency in Band III. Any new sta-
tions found will be added to the station list. This func-
tion can also be used to assist the positioning of the
aerial or the radio to optimise reception for a specific
channel or frequency. Note that UK DAB stations are
located in the range of channels 11B to 12D.
1 Press and release the »MENU« button, the dis-
play will show DAB menu.
2 Press and release the »TUNING UP« or
»DOWN« button until »MANUAL« shows on
the display.
3 Press and release the »SELECT/INFO« button to
enter manual tuning mode.
4 Press and release the »TUNING UP« or
»DOWN« button to select the desired DAB chan-
nel. Press and release the »SELECT/INFO« but-
ton to tune to the chosen frequency.
5 If a signal is present, this will be indicated on a sig-
nal strength display. The minimum signal marker
(|) shows the minimum signal strength needed for
good DAB reception. The signal indicator chev-
rons increase or decrease showing the changing
signal strength as you adjust the telescopic aerial
or your radio position.
6 When a DAB signal is found, the display will
show the name of the DAB station. Any new radio
stations found will be added to the list stored in
the radio.
7 Press and release the »SELECT/INFO« button to
return to normal tuning.
Dynamic Range Control (DRC)
The DRC function can make quieter sounds easier to
hear when your radio is used in a noisy environment.
1 Press the »ON/OFF« button to switch on your
radio.
2 Press and release the »MENU« button, the dis-
play will show DAB menu.
3 Press and release the »TUNING UP« or
»DOWN« button until » DRC « shows on the
display.
4 Press and release the »TUNING UP« or
»DOWN« button to enter adjustment mode.
5 Press and release the »TUNING UP« or
»DOWN« button to select required DRC setting
(default is 0).
▪
DRC 0 DRC is switched off, Broadcast
DRC will be ignored.
▪
DRC 1/2 DRC level is set to 1/2 that sent
by broadcaster.
▪
DRC 1 DRC is set as sent by
broadcaster.
6 Press and release the »SELECT/INFO« button to
confirm the setting. The display will return to the
station name display after several seconds.
Note: Not all DAB broadcasts use the DRC function.
If the broadcast does not provide DRC information,
then the DRC setting in the radio will have no effect.
Prune stations
If you move to a different part of the country, some
of the stations which were listed may no longer be
available. Also, from time to time, some DAB services
may stop broadcasting, or may change location or
frequency.
Stations which cannot be found, or which have not
been received for a very long time are shown in the
station list with a question mark.
The Prune stations function will delete the marked
DAB stations from your station list.
1 Press the »ON/OFF« button to switch on your
radio.
2 Repeatedly, press and release the »DAB/FM«
button until the DAB mode is selected.
3 Press and release the »MENU« button. The DAB
menu will show on the display.
4 Press and release the »TUNING UP« or
»DOWN« button until »PRUNE« shows on the
display. Press and release the »SELECT/INFO«
button.
5 Press and release the »SELECT/INFO« button
and »SELECT« will show on the display.
6 Press the »SELECT/INFO« button to remove
the invalid station names from the station list. The
display will return to station name display after
several seconds.
If you do not wish to prune stations press the
»MENU« button to return to the previous display.
Note: If you have moved your radio to a different
part of the country you should also carry out a search
for new stations (please see the section ‘Finding the
new stations’).
FM MODE
Auto Save to presets
After factory reset, the radio will scan for all the avail-
able DAB and FM stations. The scanned FM stations
will be stored into 20 FM presets.
Auto-tune
1 Carefully extend the telescopic aerial.
2 Press the »ON/OFF« button to switch on your
radio.
3 Repeatedly, press and release the »DAB/FM«
button until the FM mode is selected.
4 Press and hold the »SELECT/INFO« button. Your
radio will scan in an upward direction (low fre-
quency to high frequency) and stop automatically
when it finds a station of sufficient strength.
5 After a few seconds the display will update. The
display will show the frequency of the signal
found. If the signal is strong enough and there is
RDS data present then the radio will display the
station name.
6 Press and hold the »SELECT/INFO« button to
scan the FM band in a downward direction (high
frequency to low frequency).
7 When the waveband end is reached your radio
will recommence tuning from the opposite wave-
band end.
8 Press and release the Volume – or + button to the
required setting.
9 To switch off your radio press the »ON/OFF«
button.
Manual tuning
1 Carefully extend the telescopic aerial.
2 Press and release the »ON/OFF« button to
switch on your radio.
3 Repeatedly, press and release the »DAB/FM«
button until the FM mode is selected.
4 Press and release the »TUNING UP« or
»DOWN« button to tune to a station. The fre-
quency will change in steps of 50kHz.
If the radio is tuned to a station of sufficient signal
strength with RDS information present, then the dis-
play may change to show the station name.
5 When the waveband end is reached the radio
will recommence tuning from the opposite wave-
band end.
6 Set the » VOLUME « to the desired setting.
7 To switch off your radio press and release the
»ON/OFF« button.
8 Display options
In FM mode, your radio can display a range of infor-
mation on the bottom line of the display.
Press the »SELECT/INFO« button to cycle through
the various modes.
1 Scrolling text:
Display scrolling text messages such as artist/track
name, phone in number etc.
2 Programme type:
Displays type of station being listened to e.g. Pop,
Classic, News etc.
3 Frequency:
Displays the current frequency
4 Time:
Displays current time.
5 Date:
Displays current date.
Scan sensitivity setting
Your radio will normally scan for FM broadcasts that
are strong enough to give good reception. However,
you may wish the Auto-scan function to also be able
to find weaker signals, possibly from more distant ra-
dio transmitters. Your radio includes a local / distant
option for the Auto-scan.
1 Press and release the »ON/OFF« button to
switch on your radio.
2 Repeatedly, press and release the »DAB/FM«
button until the FM mode is selected.
3 Press and release the »MENU« button. The FM
menu will show on the display.
4 Press and release the »TUNING UP« or
»DOWN« button until »SCAN« shows on the
display. Press and release the »SELECT/INFO«
button.
5 Press and release the »TUNING UP« or
»DOWN« button to switch between »LOCAL«
and » DISTANT « options on the display. The
Distant option will allow the radio to find weaker
signals when scanning.
6 Press and release the »SELECT/INFO« button to
confirm your selection. The radio will then revert
to the normal information display. The Local or
Distant setting is stored in the radio and remains in
force until changed or until a System Reset.
Note:The initial setting (out of the box, or after a
System Reset) causes the radio to ignore weaker (or
more distant) signals.
PRESETTING STATIONS
You may store your preferred DAB and FM radio
stations to the preset station memories. There are 40
memory presets in your radio, 20 for DAB and 20
for FM. Presets are remembered by your radio in the
event of a power failure.
The procedure for setting presets and using them to
tune stations is the same for FM and DAB modes, and
is described below.
1 Press and release the »ON/OFF« button to
switch on the radio.
2 Repeatedly, press and release the »DAB/FM«
button to select either the FM or DAB mode.
3 Tune to the required station as previously de-
scribed.
4 Press and hold the »PRESET« button until the
display is blinking. Press and release »TUNING
UP« or »DOWN« button to choose an empty
preset, for example, »EMPTY 1« Press and
release »SELECT/INFO« button, the display
shows »P1 SAVED«. The Current tuned station
will be stored. Repeat this procedure for the re-
maining presets as needed.
5 Stations which have been stored in preset memo-
ries may be overwritten by following the above
procedure.
RECALLING A PRESET
STATION
1 Press and release the »ON/OFF« button to
switch on the radio.
2 Press and release the »DAB/FM« button to se-
lect either the FM or DAB mode.
3 Press and release the »PRESET« button, dur-
ing the display is blinking, press and release
»TUNING UP« or »DOWN« button to choose
the required preset, then press and release
»SELECT/INFO« button, your radio will tune to
the station stored in preset memory.
Note: The display will show, »Empty 1« if no sta-
tion has been stored to that preset.
TIMER MODE
Synchronise the time from
either DAB or FM
1 Switch on the radio by pressing »ON/OFF« but-
ton, then press and release the »MENU« button
to activate the menu setting.
2 Press the »TUNING UP« or »DOWN« button
to find » SYSTEM «, then press the »SELECT/
INFO« button to enter system menu;
3 Press the »TUNING UP« or »DOWN« button
to find »TIME «, then press the »SELECT/INFO«
button to enter;
4 Press the »TUNING UP« or »DOWN« button
to find »UDPATE « , then press the »SELECT/
INFO« button to enter;
5 Now you can use the »TUNING UP« or
»DOWN« button to choose the time source from
»ANY«, »DAB«, »FM« or »NO UPDATE«,
then press the »SELECT/INFO« button to enter
system menu;
Manual time setting
1 You can enter the time manually by following the
step 1 to 3 in the “Synchronise the time from ei-
ther DAB or FM” section.
2 Select »SET TIME«, then press the »SELECT/
INFO« button to enter manual time setting menu.
3 Please use the »TUNING UP« or »DOWN«
button to select the desired time and date, and
use the »SELECT/INFO« button to confirm the
settings
Setting the alarm time
1 Press the »ON/OFF« button to switch on the ra-
dio to either DAB or FM mode;
2 Press and hold the » ALARMS « button, the ra-
dio will display the alarm menu by blinking the
alarm 1 icons;
3 Press the »TUNING UP« or »DOWN« button
to choose if you want to set up alarm 1 or alarm 2
Press the »SELECT/INFO« button to confirm the
alarm you want to setup.
4 Please choose » ON « to activate the alarm, or
» OFF « to deactivate the alarm, then press the
»SELECT/INFO« button to move to the next step.
5 Please use the »TUNING UP« or »DOWN«
button to select the alarm time, and use the
»SELECT/INFO« button to move to the next step.
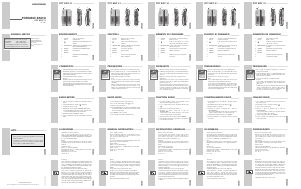
2 3 5 7 10 1194 6
1
8
1 Telescopic antenna
2 ON/OFF button
3 VOLUME - button
4 VOLUME + button
5 DAB/FM button
6 PRESET button
7 ALARMS button
8 MENU button
9 TUNING DOWN button
10 TUNING UP button
11 SELECT/INFO button
12 Headphone jack
13 DC-in jack
Music 40
EN - FR
User Manual
Clock Radio
01M-GPR1180-4320-02
01M-GPR1190-4320-02
01M-GPR1200-4320-02


Praat mee over dit product
Laat hier weten wat jij vindt van de Grundig Music 40 Radio. Als je een vraag hebt, lees dan eerst zorgvuldig de handleiding door. Een handleiding aanvragen kan via ons contactformulier.