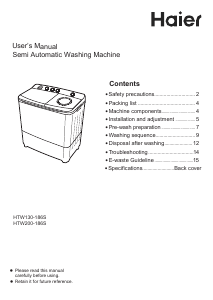
Handleiding Haier XBP65-114D Wasmachine
Handleiding voor je Haier XBP65-114D Wasmachine nodig? Hieronder kun je de handleiding gratis bekijken en downloaden als PDF in het Nederlands en/of Engels. Dit product heeft 14 veelgestelde vragen, 0 comments en heeft 0 stemmen. Is dit niet de handleiding die je zoekt, neem dan contact met ons op.
Is je product kapot en biedt de handleiding geen oplossing meer? Dan kun je voor reparatie gratis terecht bij Repair Café.
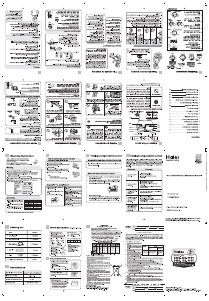
Handleiding
Loading…

Loading…
Beoordeling
Laat ons weten wat je van de Haier XBP65-114D Wasmachine vindt door een beoordeling achter te laten. Wil je je ervaringen met dit product delen of een vraag stellen? Laat dan een bericht achter onderaan de pagina.Meer over deze handleiding
We begrijpen dat het prettig is om een papieren handleiding te hebben voor je Haier XBP65-114D Wasmachine. Je kunt de handleiding bij ons altijd downloaden en daarna zelf printen. Indien je graag een originele handleiding wilt hebben, raden we je aan contact op te nemen met Haier. Zij kunnen wellicht nog voorzien in een originele handleiding. Zoek je de handleiding van Haier XBP65-114D Wasmachine in een andere taal? Kies op de homepage je taal naar keuze en zoek daarna op het modelnummer om te zien of we deze beschikbaar hebben.
Specificaties
| Merk | Haier |
| Model | XBP65-114D |
| Categorie | Wasmachines |
| Bestandstype | |
| Bestandsgrootte | 8.9 MB |
Alle handleidingen voor Haier Wasmachines
Meer handleidingen voor Wasmachines
Veelgestelde vragen over Haier XBP65-114D Wasmachine
Ons supportteam zoekt dagelijks naar nuttige productinformatie en antwoorden op veelgestelde vragen. Als er onverhoopt toch een onjuistheid tussen onze veelgestelde vragen staat, laat het ons dan weten via het contactformulier.
Mijn wasmachine gaat niet aan wanneer ik op de start-knop druk, wat kan ik doen? Geverifieerd
In veel gevallen is dit omdat de deur van de wasmachine niet goed gesloten is. Doe de deur open en weer dicht en probeer het nog een keer.
Ik vind dit nuttig (23054) Lees meerMijn wasmachine pompt geen water af, wat kan ik doen? Geverifieerd
De hoofdreden voor een wasmachine om geen water af te pompen is vanwege een verstopping in de pomp of de afvoerslang. Als de wasmachine toegang biedt tot deze onderdelen, probeer dan de verstopping te verwijderen. Als dit het probleem niet oplost of er is geen toegang tot deze onderdelen, neem dan contact op met een monteur of de fabrikant.
Ik vind dit nuttig (22451) Lees meerMijn Wasmachine pakt geen water, wat is er aan de hand? Geverifieerd
Controleer of de watertoevoer opengedraaid is en of er geen kink in de slang van de watertoevoer zit. Als dit het probleem niet oplost, neem dan contact op met de fabrikant.
Ik vind dit nuttig (8871) Lees meerDe deur van mijn wasmachine gaat niet open, wat kan ik doen? Geverifieerd
Hier kunnen verschillende oorzaken voor zijn. De meest voorkomende oorzaak is dat het pompfilter verstopt is. Haal de stroom van het apparaat en kijk deze na. Verwijder indien nodig verstoppingen. De locatie van het pompfilter verschilt per model. Het kan ook zijn dat er een aparte hendel is om de deur mee te openen. Mocht dit niet werken dan is de laatste optie om de wasmachine gedurende 30-60 minuten van de stroom te halen en daarna de deur proberen te openen. Mocht dit niet werken, neem dan contact op met de fabrikant of een monteur.
Ik vind dit nuttig (7350) Lees meerMijn wasmachine maakt veel lawaai en/of trilt hard, wat kan ik hieraan doen? Geverifieerd
Het kan dat de wasmachine niet goed gesteld is, dit is te verhelpen door de pootjes van de wasmachine te verstellen zodat deze waterpas komt te staan. Ook kan de wasmachine lawaai maken als er teveel was in zit. Als dit niet de oorzaken zijn, neem dan contact op met de fabrikant.
Ik vind dit nuttig (6360) Lees meerIn welk vak moet het wasmiddel? Geverifieerd
De meeste wasmachines hebben 3 vakken voor wasmiddel. In deze vakken is vaak aangeven met I, II en * welk middel erin moet. Vak I is voor de voorwas. II is voor de hoofdwas en * is voor wasverwachter. Het vak met II is het meest gebruikte vak.
Ik vind dit nuttig (4340) Lees meerMijn wasmachine stinkt., wat kan ik hier aan doen? Geverifieerd
Er zijn wasmachines met zelfreinigende functies. Als deze functies er niet zijn is het mogelijk om een 100ml natuurazijn of 100gr soda in de trommel te doen en de wasmachine een programma can 90 ℃ te laten draaien.
Ik vind dit nuttig (3557) Lees meerKan ik mijn wasmachine ook aansluiten op een warmwaterleiding? Geverifieerd
Hoewel wasmachines waterinvoer aankunnen tot ongeveer 65°C, raden veel fabrikanten dit af. Er zijn wasprogramma’s die specifiek gebruik maken van koud water. Warm water kan het wasresultaat dan negatief beïnvloeden. Bovendien zijn veel wasmachines ontworpen om aangesloten te worden op een koudwateraansluiting.
Ik vind dit nuttig (2833) Lees meerWaar moet ik op letten bij het verplaatsen van een wasmachine? Geverifieerd
Wanneer je gaat verhuizen dient te trommel van de wasmachine gefixeerd te worden. Hiervoor gebruik je de bijgeleverde transportbouten en zorgt ervoor dat de trommel niet gaat schudden. Daarnaast moet je al het water uit de wasmachine laten lopen.
Ik vind dit nuttig (1392) Lees meerWat is het verschil in gebruik tussen een was-droog combinatie en een losse wasmachine en droger? Geverifieerd
Het grootste voordeel is dat een was-droog combinatie minder ruimte inneemt. Een losse droger zal echter meer kunnen drogen dan een was-droog combinatie. Daarnaast kost een was-droog combinatie relatief veel energie en neemt hij iets meer tijd in beslag.
Ik vind dit nuttig (1097) Lees meerKan ik mijn wasdroger en wasmachine stapelen? Geverifieerd
In principe kunnen wasmachines en wasdrogers vaak direct op elkaar gestapeld. Dit kan alleen met voorladende modellen. Echter is het aan te raden hiervoor een passend accessoire te gebruiken. Hiermee wordt voorkomen dat de apparaten van elkaar af trillen en er schade ontstaat aan het onderste apparaat.
Ik vind dit nuttig (1096) Lees meerKan ik een wasmachine aansluiten op een verlengsnoer? Geverifieerd
Apparaten die veel stroom gebruiken, zoals een wasmachine, kunnen niet zomaar op elk verlengsnoer worden aangesloten. Bekijk wat het vermogen is van de wasmachine, aangegeven in Watt, en of het verlengsnoer dit aankan. Er zijn verlengsnoeren met dikkere kabels die gemaakt zijn om grotere apparaten op aan te sluiten.
Ik vind dit nuttig (1095) Lees meerDe deur van mijn Haier wasmachine wil niet openen, wat kan ik hieraan doen? Geverifieerd
Waarschijnlijk is het veiligheidsslot geactiveerd. Haal de stroom van het apparaat af wacht ongeveer 3 minuten. Het slot zal deactiveren en u kunt de deur weer openen.
Ik vind dit nuttig (350) Lees meerMijn Haier wasmachine geeft error 'Err4' aan, wat betekent dit? Geverifieerd
Dit is een verwarmingsprobleem. Verminder de lading was en start de cyclus opnieuw. Als dit niet de oplossing blijkt, neem dan contact op met de fabrikant.
Ik vind dit nuttig (338) Lees meer

Praat mee over dit product
Laat hier weten wat jij vindt van de Haier XBP65-114D Wasmachine. Als je een vraag hebt, lees dan eerst zorgvuldig de handleiding door. Een handleiding aanvragen kan via ons contactformulier.