
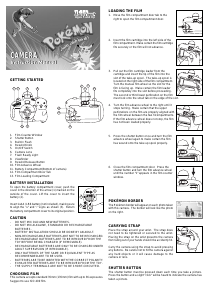
GETTING STARTED
1. Film Counter Window
2. Shutter Button
3. Built-In Flash
4. Rewind Knob
5. On/Off Switch
6. Camera Lens
7. Flash Ready Light
8. Viewfinder
9. Rewind Release Button
10. Film Advance Wheel
11. Battery Compartment(Bottom of camera)
12. Film Compartment Door Tab
13. Film Loading Compartment
BATTERY INSTALLATION
To open the battery compartment cover, push the
cover in the direction of the arrow (1) marked on the
outside of the cover. Lift the cover to insert the
battery (2).
Insert 1xAA / LR6 battery (not included), making sure
to align the “+” and “-” signs as shown (3). Return
the battery compartment cover to its original position.
CAUTION
- DO NOT MIX OLD AND NEW BATTERIES.
- DO NOT MIX ALKALINE, STANDARD OR RECHARGEABLE
BATTERIES.
- BATTERY INSTALLATION SHOULD BE DONE BY AN ADULT.
- NON-RECHARGEABLE BATTERIES ARE NOT TO BE RECHARGED.
- RECHARGEABLE BATTERIES ARE TO BE REMOVED FROM THE
TOY BEFORE BEING CHARGED (IF REMOVABLE).
- RECHARGEABLE BATTERIES ARE ONLY TO BE CHARGED UNDER
ADULT SUPERVISION (IF REMOVABLE).
- ONLY BATTERIES OF THE SAME OR EQUIVALENT TYPE AS
RECOMMENDED ARE TO BE USED.
- BATTERIES ARE TO BE INSERTED WITH THE CORRECT POLARITY.
- EXHAUSTED BATTERIES ARE TO BE REMOVED FROM THE TOY.
- THE SUPPLY TERMINALS ARE NOT TO BE SHORT-CIRCUITED.
CHOOSING FILM
This camera accepts standard 35mm (135mm) film with up to 36 exposures.
Suggest to use ISO 400 film.
LOADING THE FILM
1. Move the film compartment door tab to the
right to open the film compartment door.
2. Insert the film cartridge into the left side of the
film compartment. Make certain the film cartridge
fits securely or the film will not advance.
3. Pull out the film cartridge leader from the
cartridge and insert the tip of the film into the
slot of the take-up spool. The take-up spool is
located on the right side of the film compartment.
Turn the manual film wheel so the slot for the
film is facing up. Make certain the film leader
fits completely into the slot before proceeding.
The second or third lower perforation on the film
must lock onto the small tab on the edge of the slot.
4. Turn the film advance wheel to the right until it
stops turning. Make certain that the upper
perforations on the film are properly aligned with
the film wheel between the two filcompartments.
If the film advance wheel does not stop, the film
has not been loaded properly.
5. Press the shutter button once and turn the film
advance wheel again to make certain the film
has wound onto the take up spool properly.
6. Close the film compartment door. Press the
shutter button and turn the film advance wheel
until the number “1” appears in the film counter
window.
POKÉMON BORDER
The Pokémon border will appear on each photo taken
with this camera. The border will look like the photo
on the right.
CARRYING STRAP
Place the strap around your wrist. The strap does
not need to be tightened or secured to the wrist.
Placing the strap on the wrist prevents the camera
from falling out of your hands should it be accidently hit.
Carry the camera using the strap to avoid pressing
any buttons. Be careful not to hit the camera against
any hard objects or it will cause damage to the
camera or lens.
SHUTTER BUTTON
The shutter button must be pressed down each time you take a picture.
Press the button and a slight “click” will be heard to indicate the camera has
taken a picture.
Ages 5 and Up
CAMERA
ON-OFF
21 43
56
12
11
8 10
7
13
9
CAMERA
Instruction Manual
CAMERA
Instruction Manual
2
3
1





Praat mee over dit product
Laat hier weten wat jij vindt van de Hasbro Pokémon Camera. Als je een vraag hebt, lees dan eerst zorgvuldig de handleiding door. Een handleiding aanvragen kan via ons contactformulier.