
COMMUNICATOR MODEL SP3381
OWNER'S MANUAL AND
OPERATING INSTRUCTIONS
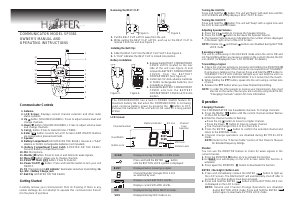
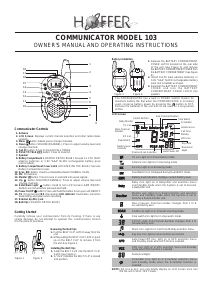
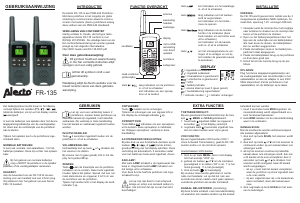
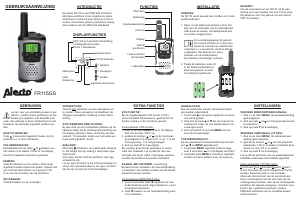
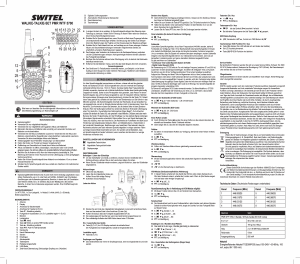
Communicator Controls
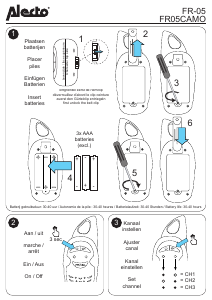
Removing the BELT CLIP:
1. Pull the BELT CLIP LATCH away from the unit.
2. While pulling the BELT CLIP LATCH, push up on the BELT CLIP to
remove it from the unit. See Figure 1.
Installing the Belt Clip:
1. Slide the BELT CLIP into the BELT CLIP SLOT. See Figure 2.
2. A "click" indicates the BELT CLIP is locked into position.
Battery Installation:
1. Release the BATTERY COMPARTMENT
COVER LATCH located on the rear
side of the unit (see Figure 3) and
remove the BATTERY COMPARTMENT
COVER from the BATTERY
COMPARTMENT (See Figure 4).
2. Install 4x1.5V AAA alkaline batteries
or Ni-MH rechargeable batteries (not
included) as shown.
3. Reinstall the BATTERY COMPARTMENT
COVER and lock the BATTERY
COMPARTMENT COVER LATCH into
position.
The COMMUNICATOR has a built in POWER SAVER feature for
maximum battery life. But when the COMMUNICATOR is not being
used, conserve battery power by pressing the button to OFF.
Remove the batteries if the unit will not be used for a long period
of time.
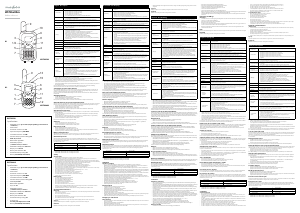
LCD Screen:
Turning the Unit ON:
Press and hold the button. The unit will "beep" with dual tone and the
LCD SCREEN will briefly display a SELF-TEST Screen.
Turning the Unit OFF:
Press and hold the button. The unit will "beep" with a signal tone and
the LCD Screen will turn blank.
Adjusting Speaker Volume:
1. Press the Up button to increase the Speaker Volume.
2. Press the Down button to decrease the Speaker Volume.
3. The Speaker Volume level is indicated by the number of bars displayed
in the lower right corner of the LCD Screen.
NOTE: Volume Up and Down buttons are disabled during BUTTON
LOCK mode
Receiving a Signal:
The unit is continuously in the RECEIVE mode when the unit is ON and
not Transmitting. When you receive a signal on the current channel, the RX
icon (BUSY) is displayed. (See "LCD SCREEN" for details).
Transmitting a Signal:
1. Check the channel activity by pressing and holding the MONITOR M
button. You'll hear static if the channel is unoccupied. Don't TRANSMIT
if someone is talking on the channel. Press and hold the PTT button to
TRANSMIT. The TX LED Indicator will light up in red. Hold the unit in a
vertical position with the MICROPHONE 2 to 3 inches from the mouth.
2. While holding the PTT button, speak into the unit using a normal tone
of voice.
3. Release the PTT button when you have finished transmitting.
NOTE: In order for other people to receive your transmission, they must
also be on the same channel you are currently using. Refer to the
"Changing Channels" section for more information.
Operation
Figure 1. Figure 2.
Figure 3. Figure 4.
BUSY
SCAN
VOX
DW
Carefully remove your communicator from its Packing. If there is any
visible damage, do not attempt to operate this communicator. Return
it to the place of purchase
Getting Started
Changing Channels:
The COMMUNICATOR has 8 available channels. To change channels:
1. Press the MENU button until the current channel number flashes
on the LCD Screen.
2. While the channel number is flashing:
Press the Up button to move to a higher channel.
Press the Down button to move to a lower channel.
The channel changes from 1 to 8, or from 8 to 1.
3. Press the ENTER
button to confirm the selected channel and
return to the NORMAL mode.
4. Channel change operations are disabled during BUTTON LOCK
mode.
NOTE: Refer to the "Channel Table" section of this Owner's Manual
for detailed frequency listings.
Monitor:
You can use the MONITOR feature to check for weak signals in the
current channel.
1. Press the MONITOR M button once to activate this function.
2. Rx BUSY icon will display on the LCD Screen while this function is
activated.
3. Press again the MONITOR M button to deactivate the function.
ENTER / Back-light / Button Lock:
1. Press and immediately release the ENTER
button to light up
the LCD Screen. The BACKLIGHT will automatically shut off after 4
seconds if no other buttons have been pressed.
2. Press and hold the ENTER
button until the BUTTON LOCK icon
is displayed on the LCD Screen.
NOTE: Volume and Channel Change Operations are disabled
during BUTTON LOCK mode. Press and hold the ENTER
button again to deactivate BUTTON LOCK mode.
1
2
3
4
5
6
7
8
9
10
11
12
13
14
15
16
17
RX Icon
1. Antenna
2. LCD Screen: Displays current channel selection and other radio
status symbols.
3. Up button (VOLUME/CHANNEL): Press to adjust volume level and
change channels.
4. Down button (VOLUME/CHANNEL): Press to adjust volume level
and change channels.
5. Call C button: Press to transmit CALL TONES.
6. Enter
button: Used to turn LCD Screen LAMP ON/OFF Buttons
are locked when pressed and held.
7. Speaker
8. Battery Compartment (LOCATED ON THE REAR): Houses 4 x "AAA"
alkaline or Ni-MH rechargeable batteries (not included).
9. Battery Compartment Cover Latch (LOCATED ON THE REAR):
Secures Battery Compartment cover.
10. Mic: Microphone.
11. Monitor M button: Press to tune in and hold onto weak signals.
12. Menu button: Allows you to change channels.
13. PUSH TO TALK PTT button: Press to transmit.
14. Power On/Off button: Press and hold the button to turn your unit
ON/OFF.
15. TX (Transmission) LED indicator: Illuminates red when transmitting. 16.
Sp. /Mic. / Battery Charge Jack
17. Belt Clip (LOCATED ON THE REAR)
SCAN Displayed during CHANNEL SCAN mode.
Press and hold the ENTER button
until the BUTTON LOCK symbol is displayed.
BUSY Displayed when receiving a signal.
Channel Number changes from 1 to 8
as selected by user.
Displays current BATTERY LEVEL.
Displays current VOLUME LEVEL.
DW Displayed during DUAL WATCH mode.
VOX Displayed during VOX mode is on.
M
C
Channel Number
Battery Indicator
Volume Level
Channel
Scan
Selection
Button Lock
Dual Watch
BUSY
SCAN
VOX
DW
VOX icon

Praat mee over dit product
Laat hier weten wat jij vindt van de Hoffer SP3381 Walkie-talkie. Als je een vraag hebt, lees dan eerst zorgvuldig de handleiding door. Een handleiding aanvragen kan via ons contactformulier.