- Based on the desired laundry dryness level:
Iron “ ”: suitable for clothes which will need ironing afterwards. the
remaining dampness softens creases, making them easier to remove.
Hanger “ ”: ideal for clothes which do not need to be dried fully.
Cupboard “ ”: suitable for laundry which can be put back in a cupboard
without being ironed.
- Based on a set time period: between 40 and 180 minutes.
If your laundry load to be washed and dried is much greater than the
maximum stated load, perform the wash cycle, and when the cycle is
complete, divide the garments into groups and put some of them back
in the drum. At this point, follow the instructions provided for a “Drying
only” cycle. Repeat this procedure for the remainder of the load. A
cooling-down period is always added to the end of each drying cycle.
Drying only
Press button to perform the drying-only cycle.
After selecting the desired cycle (compatible with the type of garments),
press button to exclude the washing phase and start the drying phase
at the maximum level for the selected cycle.
Push & Go
To start the Push & Go cycle press and hold the button for 2 seconds.
The indicator lights up to show that the cycle has started. The wash and
drying cycle is ideal for cotton or synthetic fabrics, as it washes them at
a temperature of 30° and a maximum spin speed of 1000 rpm. During
the drying cycle the maximum temperature is 60°C. At the end of the
cycle the residual humidity will be the same as for the “ ” level. Max
recommended load 3,5 kg. (Cycle duration 210’).
How does it work?
1. Load the laundry (cotton and/or synthetic garments) and close the door.
2. Pour the detergent and/or additives.
3. Start the cycle by pressing and holding the Push & Go button for 2
seconds. The relevant indicator light will turn green and the door will lock
(the DOOR LOCKED symbol is lit).
NB: starting the cycle through the Push & Go button activates an
automatic non-customisable wash and drying cycle recommended for
cotton and synthetic fabrics.
4. The automatic cycle can be used only for washing, excluding the drying
phase. Press the Push & Go button and then the drying button : the
drying icon of the “ ” level will switch o. Maximum load for washing-
only is 4 kg (Cycle duration 45’). The cycle cannot be customised further.
To open the door while an automatic cycle is under way, press the START/
PAUSE button. If the DOOR LOCKED symbol is o, the door may be
opened only during the washing phase. Press the START/PAUSE button
again to restart the wash cycle from the point at which it was interrupted.
5. Once the programme is nished, the END indicator light turns on.
TIPS AND SUGGESTIONS
Divide the laundry according to:
Type of fabric (cotton, mixed bres, synthetics, wool, garments to be
hand-washed). Colour (separate coloured garments from whites, wash new
coloured garments separately). Delicates (small garments – such as nylon
stockings – and items with hooks – such as bras: insert them in a fabric bag).
Empty the pockets:
Objects such as coins or lighters can damage the washing machine and
the drum. Check all buttons.
Follow the dosage recommendation / additives
It optimizes the cleaning result, it avoids irritating residues of surplus
detergent in your laundry and it saves money by avoiding waste of surplus
detergent
Use low temperature and longer duration
The most ecient programmes in terms of energy consumption are
generally those that perform at lower temperatures and longer duration.
Observe the load sizes
Load your washing machine up to the capacity indicated in the
“PROGRAMME CHART” table to save water and energy.
Noise and remaining moisture content
They are inuenced by the spinning speed: the higher the spinning speed
in the spinning phase, the higher the noise and the lower the remaining
moisture content.
CARE AND MAINTENANCE
Before performing cleaning and maintenance, switch the washing machine
o and disconnect it from the mains power. Do not use ammable liquids to
clean the washing machine. Clean and maintain your washer - dryer
periodically (at least 4 times per year).
Disconnect the water and power supplies
Close the water tap after every wash. This will limit wear on the hydraulic
system inside the washing machine and help to prevent leaks.
Unplug the washing machine when cleaning it and during all
maintenance work.
Clean the washing machine
The outer parts and rubber components of the appliance can be cleaned using
a soft cloth soaked in lukewarm soapy water. Do not use solvents or abrasives.
The washing machine has a “Auto-clean” cycle for its internal parts; it must
be run without any load in the drum.
To optimise this cycle, it is possible to use either detergent (10% of the quantity
specied for lightly soiled garments) or special additives to clean the washing
machine. We recommend running a cleaning cycle every 40 wash cycles.
To start the cycle press buttons and simultaneously for 5 seconds.
The cycle will start automatically and will run for about 70 minutes. To
stop the cycle, press the START/PAUSE button.
Clean the detergent dispenser drawer
Wash it under running water; this operation should be repeated frequently.
Care for the door and drum
Always leave the porthole door ajar in order to prevent unpleasant
odours from forming.
Check the water inlet hose
Check the water inlet hose at least once a year. If it is cracked or broken, it
must be replaced: during wash cycles, the high pressure of the water
could suddenly split the hose open.
! Never use hoses that have already been used.
Cleaning the water lter / draining residual water
Switch o and unplug the washing machine, take out the kitchen plinth before
cleaning the water lter or draining residual water.
The kitchen plinth must be mounted back all the time once the cleaning
operation is over.
If you used a hot wash programme, wait until the water has cooled down
before draining any water. Clean the water lter regularly, to avoid that the
water cannot drain after the wash due to obstruction of the lter. If the water
cannot drain, the display indicates that the water lter may be clogged.
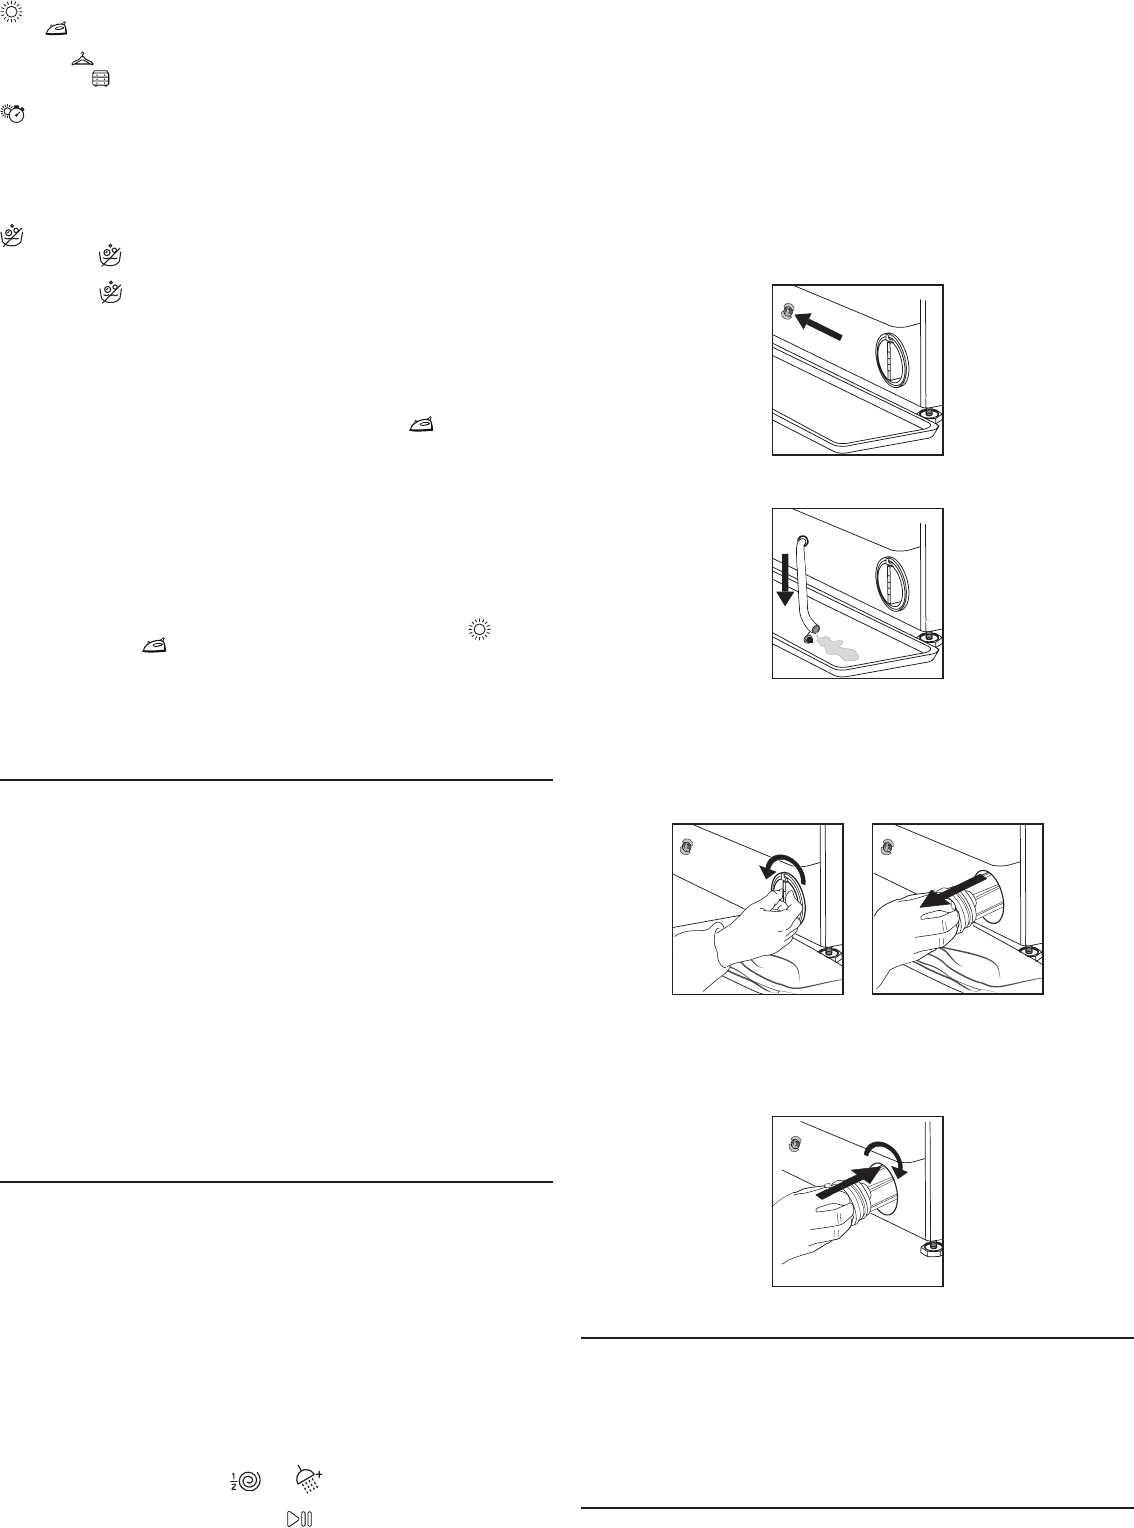
1 . Place a container close to the pump to collect any spillage.
2 . Remove, pulling it out, the “emergency drain hose” from the base of
the washing machine .
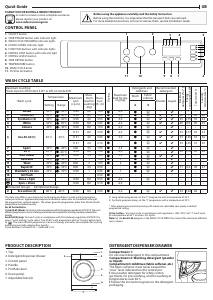
Remove the stopper of the “emergency drain hose” at the end of the hose
and let the water ow into the container.
3 . Turn the exhaust lter handle and pull it out of the housing .
When the container of plinth is full with water, plug the stopper to the
hose end, and reinsert the small hose in the washing machine’s base . After,
empty the container .
Afterwards rmly close the emergency drain hose with the stopper .
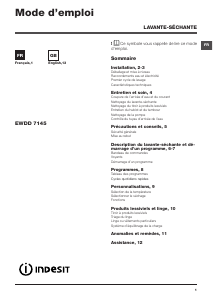
4. Remove lter: Lay a cotton cloth beneath the water lter, which can
absorb a small amount of rest water . Then remove the water lter by
turning it out anticlockwise .
5 . Clean the water lter: remove residues in the lter and clean it under
running water .
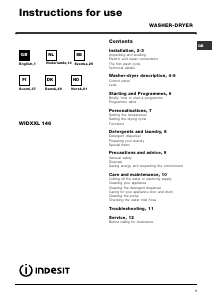
6 . Insert the water lter: Reinsert the water lter again by turning it in
clockwise direction . Make sure to turn it in as far as it goes; the lter handle
must be in vertical position . To test water tightness of the water lter, you
can pour about 1 liter of water into the detergent dispenser .
1
2
Then reinstall the kitchen plinth.
LOAD BALANCING SYSTEM
Before every spin cycle, to avoid excessive vibrations before every
spin and to distribute the load in a uniform manner, the drum rotates
continuously at a speed which is slightly greater than the washing
rotation speed. If, after several attempts, the load is not balanced
correctly, the machine spins at a reduced spin speed. If the load is
excessively unbalanced, the washing machine performs the distribution
process instead of spinning. To encourage improved load distribution and
balance, we recommend small and large garments are mixed in the load.
TRANSPORT AND HANDLING
Do not lift the washing machine by gripping it from the upper section.
Unplug the appliance and close the water tap. Check that the door and
detergent dispenser drawer are tightly closed. Detach the lling hose from the
water tap then detach the drain hose. Empty all the water remaining in the
hoses and secure the latter so that they do not get damaged during transport.
Apply the transport bolts back on. Repeat, in reverse order, the transport bolt
removal procedure described in the “Health & Safety and Installation Guides”.

Praat mee over dit product
Laat hier weten wat jij vindt van de Indesit BI WDIL 861284 UK Was-droog combinatie. Als je een vraag hebt, lees dan eerst zorgvuldig de handleiding door. Een handleiding aanvragen kan via ons contactformulier.
beantwoord | Ik vind dit nuttig (0) (Vertaald door Google)
beantwoord | Ik vind dit nuttig (0)