Handleiding Karlsson KA6124RD Klok

Handleiding voor je Karlsson KA6124RD Klok nodig? Hieronder kun je de handleiding gratis bekijken en downloaden als PDF in het Nederlands en/of Engels. Dit product heeft 3 veelgestelde vragen, 0 comments en heeft 0 stemmen. Is dit niet de handleiding die je zoekt, neem dan contact met ons op.

Is je product kapot en biedt de handleiding geen oplossing meer? Dan kun je voor reparatie gratis terecht bij Repair Café.

Handleiding

Loading…

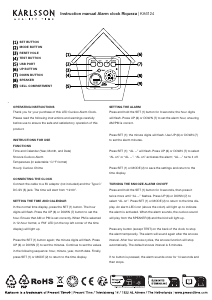
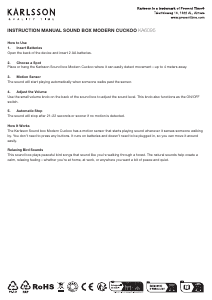
Instruction manual Alarm clock Riqueza | KA6124
OPERATING INSTRUCTIONS
Thank you for your purchase of this LED Cuckoo Alarm Clock.
Please read the following instructions and warnings carefully
before use to ensure the safe and satisfactory operation of this
product.
INSTRUCTIONS FOR USE
FUNCTIONS
Time and Calendar (Year, Month, and Date)
Snooze Cuckoo Alarm
Temperature (in selectable °C/°F format)
Hourly Cuckoo Chime
CONNECTING THE CLOCK
Connect the cable to a 5V adaptor (not included) and the ‘Type C’
DC-5V (5) jack. The time will start from “12:00”.
SETTING THE TIME AND CALENDAR
In the normal time display, press the SET (1) button. The hour
digits will ash. Press the UP (6) or DOWN (7) button to set the
hour. Ensure that AM or PM is set correctly. When PM is selected
in 12-hour format, a ‘PM’ LED (on the top left corner of the time
display) will light up.
Press the SET (1) button again; the minute digits will ash. Press
UP (6) or DOWN (7) to set the minutes. Continue to set the values
in the following sequence: hour, minute, year, month date. Finally,
press SET (1) or MODE (2) to return to the time display.
SETTING THE ALARM
Press and hold the SET (1) button for 3 seconds; the hour digits
will ash. Press UP (6) or DOWN (7) to set the alarm hour, ensuring
AM/PM is correct.
Press SET (1); the minute digits will ash. Use UP (6) or DOWN (7)
to set the alarm minutes.
Press SET (1); “AL --” will ash. Press UP (6) or DOWN (7) to select
“AL on” or “AL --”. “AL on” activates the alarm; “AL --” turns it off.
Press SET (1) or MODE (2) to save the settings and return to the
time display.
TURNING THE SNOOZE ALARM ON/OFF
Press and hold the SET (1) button for 3 seconds, then press it
twice more until “AL --” ashes. Press UP (6) or DOWN (7) to
select “AL on”. Press SET (1) or MODE (2) to return to the time dis-
play. An alarm LED icon (above the colon) will light up to indicate
the alarm is activated. When the alarm sounds, the cuckoo sound
will play from the SPEAKER (8) and the bird will light up.
Press any button (except TEST) on the back of the clock to stop
the alarm temporarily. The alarm will sound again after the snooze
interval. After four snooze cycles, the snooze function will stop
automatically. The default snooze interval is 5 minutes.
If no button is pressed, the alarm sounds once for 14 seconds and
then stops.
OPERATING INSTRUCTIONS
Instrucons for use
1. Funcons
1) Time and Calendar (Year, Month, and Date)
2) Snooze Cuckoo Alarm
3) Temperature (in selectable C/F format)
4) Hourly Cuckoo Chime
2. Connect the cable to a 5V adapter (not included) and the ‘Type C’ DC-5V (5) jack. Time starts from12:00” o’clock.
3. Set the me and calendar
1) In the normal  display, press SET (1) buon, hour digits ash. Press UP (6) or DOWN (7) buon to set the
hour. Take care to set AM or PMcorrectly. When the PM me
is set under 12-hour format, aPM LED
icon (on the top le corner of
2) Press SET (1) buon, minute digits ash. Press UP (6) or DOWN (7) buon to set the minute. Connue to set in
the sequence as: hour -> minute -> year -> month -> date. At last, press SET (1) or MODE (2) 
ill return to the me display.
4. Set the alarm
1) Press and hold SET (1)UP (6) or DOWN (7)

2) Press SET (1)UP (6) or DOWN (7)
3) Press SET (1)UP (6) or DOWN (7)

4) Press SET (1) or MODE (2)
5. Turn the Snooze Alarm ON/OFF
Press and hold SET (1)UP (6) or
DOWN (7) SET (1) or MODE (2)

SPEAKER (8)



Thank you for your purchase of this LED Cuckoo Alarm Clock. Please read the folloing instrucons and arnings
carefully before use to ensure safe and sasfactory operaon of this product.


3) Press and hold SET (1)UP (6) or
DOWN (7), then press SET (1) or MODE (2)

6. Hourly Cuckoo Chime


UP (6) 
at 7:00 am). Press UP (6) or DOWN (7)
MODE (2)

UP (6)SET (1)
UP (6) or DOWN (7) to select “HC --”. “HC on” means Hourly Chime sound is on, “HC --”
Press SET (1) or MODE (2)


7. Temerature Display
The display alternates beteen me and temperature.ress DOWN (7) buon to select
Celsius or Fahrenheit.
UP (6)


MODE (2)
MODE (2)





MODE (2)UP (6) or DOWN
(7)MODE (2)

12. Back-up Cell
CR2032 buon c
ell (not included) is a backeep me ongoing in the eent of blackout or other poer
failure.CELL
compartment (9)
13. TEST (4) 

14. RESET hole (3)
If the clock is dead (the display does not moe) during seng or orking, please use a slim but blunt object (like ball
pen pointer, toothpick etc.) to press this hole, the clock ill return to the inialdisplay.
Warnings:
1. Keep this product aay from any liquids.
2. Please use a so cloth or a paper toel to clean the clock.
3. Do n
ot use any corrosie cleanser or chemical soluons on the clock.
4. Please keep the instrucons paper ell for future use.
5. This product is not a toy. Keep aay from children and animals.
SET BUTTON
MODE BUTTON
RESET HOLE
TEST BUTTON
USB PORT
UP BUTTON
DOWN BUTTON
SPEAKER
CELL COMPARTMENT
Download de handleiding in het Nederlands en/of Engels (PDF, 3.29 MB)
(Denk aan het milieu en print deze handleiding alleen als dat echt noodzakelijk is)

Loading…

Meer over deze handleiding

We begrijpen dat het prettig is om een papieren handleiding te hebben voor je Karlsson KA6124RD Klok. Je kunt de handleiding bij ons altijd downloaden en daarna zelf printen. Indien je graag een originele handleiding wilt hebben, raden we je aan contact op te nemen met Karlsson. Zij kunnen wellicht nog voorzien in een originele handleiding. Zoek je de handleiding van Karlsson KA6124RD Klok in een andere taal? Kies op de homepage je taal naar keuze en zoek daarna op het modelnummer om te zien of we deze beschikbaar hebben.

Specificaties

Merk Karlsson
Model KA6124RD
Categorie Klokken
Bestandstype PDF
Bestandsgrootte 3.29 MB

Alle handleidingen voor Karlsson Klokken
Meer handleidingen voor Klokken

Veelgestelde vragen over Karlsson KA6124RD Klok

Ons supportteam zoekt dagelijks naar nuttige productinformatie en antwoorden op veelgestelde vragen. Als er onverhoopt toch een onjuistheid tussen onze veelgestelde vragen staat, laat het ons dan weten via het contactformulier.

Wat is een quartz-uurwerk? Geverifieerd

Horloges en klokken met een quartz-uurwerk worden aangedreven door een batterij. Deze stuurt een stroom door quartz kristallen die hierdoor gaan trillen. Deze trillingen worden doorgegeven naar het uurwerk. Omdat deze trillingen een vaste frequentie hebben, zijn horloges en klokken met een quartz-uurwerk extreem precies.

Ik vind dit nuttig (94) Lees meer

Wat is GMT Geverifieerd

GMT staat voor Greenwich Mean Time (en wordt soms UTC genoemd dat staat voor Coordinated Universal Time. Het is de tijd die geldt voor lengtegraad 0 die door Greenwich, in de buurt van Londen, loopt.

Ik vind dit nuttig (79) Lees meer

Wat is een 'Chronograph'? Geverifieerd

Een 'Chronograph' is letterlijk een 'tijdmeter'. Hier worden klokken en horloges bedoeld die de tijd weergeven en daarnaast ook de functie van een stopwatch hebben.

Ik vind dit nuttig (59) Lees meer

Beoordeling

Laat ons weten wat je van de Karlsson KA6124RD Klok vindt door een beoordeling achter te laten. Wil je je ervaringen met dit product delen of een vraag stellen? Laat dan een bericht achter onderaan de pagina.
Bent u tevreden over de Karlsson KA6124RD Klok?
Ja Nee
Beoordeel dit product als eerste
0 stemmen

Praat mee over dit product

Laat hier weten wat jij vindt van de Karlsson KA6124RD Klok. Als je een vraag hebt, lees dan eerst zorgvuldig de handleiding door. Een handleiding aanvragen kan via ons contactformulier.

Handleiding Karlsson KA6124RD Klok

Gerelateerde producten

Gerelateerde categorieën

×
Download