
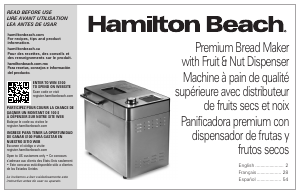
INSTRUCTION MANUAL
Bread maker
MBF-010
Read all instructions before using and save it for future reference
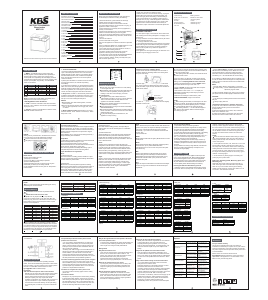
1.Steel Housing
2.LCD Touch Control Panel
3.Steel Lid
4.Handle
5.Viewing Window
6.Fruit/Nut Dispenser
7.Air Vent
8.Baking chamber
9.Bread Pan with handle
10.Kneading blade
11.Hook
12.Measuring Spoon
13.Measuring Cup
IMPORTANT SAFEGUARDS
CONVENIENT FUNCTION & USEFUL TIPS
CLEANING & CARE
RECIPES RECOMMENDED
TECHNICAL SPECIFICATION
WARRANTY
MEASUREMENTS
TROUBLE SHOOTING
OPERATION GUIDES
PARTS AND FEARTURES
Check wire cord, socket and fuse box in order; Rating
Load is higher than 6A.
Bread Maker must be grounded in safe. Earth Wire and
Zero Line must be separated, preventing them from
twisting in each other over three-plug connector.
The appliance may emit a little smoke and a
characteristic smell when you turn it on for the first time.
This is normal and will soon stop. Make sure the
appliance has sufficient ventilation.
Please check whether all parts and accessories are
complete and free of damage.
Clean all the parts according to the section“CLEANING
AND MAINTENANCE”.
Set the bread maker on BAKE mode and bake empty for
about 10 minutes. Then let it cool down and clean all the
detached parts again.
Dry all parts thoroughly and assemble them, the
appliance is ready for using.
15 minute memory-keeping
If an occasional electricity-disconnection happened and its
duration is less than 15 minutes, re-connecting electricity
would make bread maker continue to work and the time of
working could be changed and not equal to the original
time set before:
Actual Working Time = Time of Disconnecting Electricity +
Original Working Time Set Before.
Keep Warm
1) After baking process is complete, the bread machine will
shift to the Keep Warm setting for 1 hour.
2) To cancel the Keep Warm process, press the
START/STOP button for 3 seconds until a buzzer sound is
given and then “Keep Warm” closes down.
TIP: Removing bread immediately after baking cycle is
complete will prevent crust from becoming darker.
Flour
1) All-Purpose Flour
Flour that contains no baking powder, suitable for “quick”
breads or bread made with the Quick settings. Bread flour
is better suited for yeast breads.
2) Bread Flour
Bread flour is the most important ingredient of making
bread and is recommended in most yeast-bread recipes. It
has a high gluten content and can keep the size of the
bread from collapsing after rising. Flour varies by region.
For example, American flour is milled from hard spring
wheat; Canadian flour is milled from hard winter wheat.
NOTE:
Do not use metal utensils with the baking pan as they
will damage the nonstick surface.
2) Dry ingredients: Fill a dry measuring cup with a spoon
and then level off the measurement with the back of a knife
or a spatula to make sure the measurement is exact. Never
use the cup to scoop the ingredients directly from container
(for example, flour). By scooping, you could add up to one
tablespoon of extra ingredients. Do not pack down.
If you experience difficulties when operating the bread
maker, review the troubleshooting information in this section
to find a solution. If you are unable to find a solution, please
feel free to contact KBS Customer Service E-mail:
This product is warranted to be free from defects in
materials or workmanship for a period of one year from the
original purchase date. This product warranty is extended
only to the original consumer purchaser of the product and
is not transferable.
Please contact our Customer Service Email:
replacement of the appliance if a covered defect occurs
within the one year warranty period.
Results may vary when using other recipes as the recipes
in this booklet are sized so that the dough is kneaded
properly and the finished bread does not exceed the
bread pan capacity. Use only recipes with similar
quantities of ingredients. As a general guide, a minimum 2
cups and maximum 4.5 cups of total dry ingredients is
recommended on the bread settings. On the jam setting,
as a general guide, a maximum 3 cups of fruit should be
used.
Ingredients
Can other bread recipes be made in this machine?
• Yes, egg powders, dried buttermilk or dry milk can be
used. These products allow you to use the Delay Start
feature, however always ensure to add the water to the
bread pan first, then add the dried substitution after the
flour to keep them separate.
• Similarly, fresh milk and eggs can be substituted for dry
milk and egg powders, but the baked bread will have a
heavier texture. If you still choose to use fresh milk,
ensure to decrease the same measurement of liquid to
equal the fresh milk and omit the milk powder. Do not use
the Delay Start feature with perishable ingredients.
Can powdered products be used in place of fresh
products and visa-versa?
Yes, honey, golden syrup or brown sugar can be used.
When substituting honey or similar sweet liquids for sugar,
ensure to decrease the same measurement of liquid to
equal the liquid sugar substitute. We do not recommend
powdered or liquid artificial sweeteners.
Yes, but the bread crumb may appear a more creamy,
yellow color.
Can other sweetening agents be used in place of sugar?
Can butter or margarine be used in place of oil?
To ensure all dry ingredients are mixed with the water and
to avoid the yeast activating prematurely with the water,
salt or sugar when using the Delay Start feature.
Why do the ingredients need to be placed in the bread
pan in the specified order?
Salt plays a very important part in bread making. Omitting
it will decrease water retention in the dough, as well as
affect mixing, the strength of the gluten development and
the fermentation of the yeast. In the finished bread, salt
improves the loaf shape, crumb structure and crust color,
as well as extending shelf life and enhancing flavor.
Can salt be omitted?
There may be several reasons. Check the protein level of
the flour, we recommend flours with at least 11-12%
protein. The yeast may have failed to activate so check
the ‘Best Before Date’ of the yeast, the yeast
measurements and the temperature of the liquids
(80°F/27°C) and dry ingredients (68°F-77°F/20°C-25°C).
Why did the bread not rise?
Try using less yeast (1/4 teaspoon less at a time). This
could also be the result of forgetting to add salt to the
recipe or forgetting to put the kneading blade into the
baking pan.
What do I do if the bread rose too much?
Occasionally air bubbles will concentrate at a certain
location during the last ‘rise’ phase and will bake in this
state. This could be caused by too much water and/or
yeast or insufficient flour. Check the recipe ingredients
and method of weighing/measuring.
Why do large holes appear inside the bread?
Usually this is because the ingredients are not in balance
or low protein flour is used. Check the method of
weighing/measuring the ingredients. Too much yeast,
water or other liquid ingredients, or insufficient flour, may
cause the bread to be pale on top and collapse while
baking.
Why does the top of the bread collapse?
This can happen as the paddle is detachable. Use a
non-metal utensil to remove it from the baked loaf before
slicing. Use caution as the paddle will be hot. Alternatively,
you can remove the paddle before the start of the ‘bake’
phase.
Why does the paddle come out with the bread?
• It is normal that the bread maker emit a fine smoke
during first use as it burns off the
protective substances on the heating element. It is also
normal that steam emit from the steam vents.
• However, smoke can also be caused by spilt ingredients
on the outside of the bread pan and inside the baking
chamber. Without turning off the bread maker, remove the
plug from the power outlet. With a soft damp cloth
(non-metallic, non-abrasive), clean then thoroughly dry the
outside of the bread pan, baking chamber and heating
element, using caution as they will be hot. Reinsert the
power plug. The Power Failure Protection will
automatically resume the cycle where it was interrupted.
Why is there smoke coming out of the bread maker?
Accessories: Measurement Cup & Measurement
Spoon
Measurement and conversion chart
1) Liquid: Use only liquid measuring cups with the
cups/ounces marked clearly on the side. After filling the
measuring cup, place it on a flat surface and view it at eye
level to make sure the amount of liquid is exact. Liquids
must be room temperature.
Salts
Salt in bread is NOT just a matter of taste! Salt restrains the
growth of the yeast, and improves elasticity and structure. If
you reduce or eliminate salt from the bread, it will rise
excessively - if you use too much salt the loaf will not rise
enough. Use
common table salt.
Butter
Butter makes breads soft and glossy. Measured and cut into
small pieces.
Water
When bread machine baking, all liquids, particularly water,
should be 80°F (27°C) unless stated otherwise.
Temperatures too cool or too warm can prevent the yeast
from activa ting.
Milk
Whole, semi-skimmed or skimmed milk can be used in
bread making but it should always be added lukewarm.
Refrigerated milk must be heated to around 80ºF (27ºC).
Never heat milk above 98ºF (37ºC) as this can cause
problems with yeast.
Egg
Eggs can improve bread texture and make the bread larger
in size. The egg must be whisked in with the other liquid
ingredients.
Tips for successful baking
1) Ingredients: Always use fresh ingredients.
2) Measurements: Measure ingredients accurately. Bread
and yeast are very delicate and will not rose and bake
properly if the ingredients are measured inaccurately.
3) Liquids First: Always place liquid ingredients in the baking
pan first to allow the Home Bakery to knead properly.
4) Room Temperature: If the room temperature is over 77℉
(25℃), we recommend using refrigerated liquids. Flour
should be fresh and at room temperature.
5) Humidity: Humidity tends to make dough moister. Try
adding an extra tablespoon of flour to improve the dough
consistency. Repeat if necessary until the dough forms a
nice ball.
6) High Altitude: For baking in high altitudes, decrease the
amount of yeast by approximately 1/2 teaspoon, and
decrease the sugar slightly.
3) Self-Rising Flour
Flour that contains baking powder, used especially for
making cakes. Do not use self-rising flour in combination
with yeast.
4) Whole-Wheat Flour
Whole-wheat flour is ground from the entire wheat kernel.
Bread made with all or part whole-wheat flour will have
higher fiber and nutritional content. Whole-wheat flour is
heavier and, as a result, loaves may be smaller in size and
have a heavier texture.
Yeast
Yeast is a living organism and should be kept in the
refrigerator to remain fresh. It needs carbohydrates found
in sugar and flour as nourishment. Yeast used in bread
maker recipes will be sold under several different names:
Bread machine yeast (preferred), active-dry yeast, and
instant yeast. Before using, check the expiration date of the
yeast. Return to refrigerator immediately after each use.
Sugar
Sugar is “food” for the yeast and also increases the sweet
taste and color of bread. It is very important for the color
and flavor of the bread. White sugar is normally used;
however, brown sugar, powdered sugar, or cotton sugar
may also be called for in some recipes. Do not substitute
with powdered sugar, brown sugar or other artificial
sweeteners unless indicated.
If you found a obstruct with barrel during pressing down,
you could lift barrel again and turn the axle at the bottom of
barrel to the another angle.
After placing barrel into container, then rotate the barrel
clockwise, barrel is fixed.
4.Plug into outlet, you will hear a buzzer sound and the
digital control panel will illuminate: The default value after
starting unit is 1.5 lb(750g) /Medium Color/ soft bread.
5. Select your Bread Recipe by pressing “MENU” button:
The number will be moving in circle from 1-17.
6. Press “COLOR” to select your bread color and press
“LOAF” to select your bread size.
7. Set “Reserve” Time. Press “+” or “-” to adjust your
desirable time. Please skip current step if you want to
make bread right now.
8. Start the unit and begin to make bread : press
“START/STOP/PAUSE”, begin to Count Down .
Operation Instruction on Making Bread:
1.Open the lid and take out bread pan from the inside of
container, attach the kneading blade to the rotating shaft
and push down firmly.
2.Add the appropriate measured ingredients in the bread
pan. Insure yeast to be added above flour and do not mix
yeast with water, sugar and salt, otherwise the activation of
yeast will be weaken.
3. Put the bread pan into the Bread Maker and turn slightly
clockwise. Close the lid.
1
2
3
5
6
7
4
8
10
12
13
11
9
Yeast Powder
Flour or other Stuff
Mixture of Water,
Oil, Sugar and Salt
4
1. “MENU”: The MENU button is used to select the
desired program. Press the MENU button repeatedly to
scroll through the menu. Select your program on the
control panel menu repeatedly, the LCD display will show
corresponding programs. When you see the number of the
program you required, stop pressing. The PROGRAM
LISTS are as follows:
4. “START/STOP/PAUSE”:
1) Press the START/STOP/PAUSE button once to start a
cycle. A short beep will be heard. The colon in the time
display will begin to flash, and the cycle will start. When
the bread maker starts to work, it will start “Exceptional
Stop“ as protection performance to avoid exceptional
contact or collision.
2) When press the button for at least 2 seconds until hear
a prompt sound “Buzz”, the unit will stop working
immediately.
3) To pause the programme, you should press the button
within one second, then the program will stop countdown,
while the machine is at the state of “Pause” and you can
add some ingredients, etc. Press again to quit the status
“Pause” and then all programs will continue the action.
5. Delay Timer “+” and “-”: Use the Delay Timer feature
to start the bread maker at a later time. Press the + and –
buttons to increase the cycle time shown on the display.
Add up to 15 hours including the delay time.
NOTE:
When pressing the START button, the default menu
displayed on the LCD screen is Program1:
1.5lb(750g)/Medium Color/ Soft Bread.
NOTE:
When starting bread maker, the unit begins to stir flour.
In the first 7 minutes, the program is set automatically to
interval stirring to avoid the splashing of flour. 7 minutes
later, it automatically switches to continuous stirring.
After setting “Reserve”, “:” at LCD indicator begins to
flash and the unit is started. When Countdown begins,
flour stirring begins too.
NOTE:
To Keep Warm: Refer to “Keep Warm” in next page.
To Stop Heating: 1)Press “Start/Stop/Pause” for 2 second
2)Remove plug from outlet
CAUTION:
The bread pan, kneading blade and the bread could be
very hot.
Always unplug after use.
When “Whole Wheat ” is working, the equipment will
not stir the flour immediately even if “Reserve” is not set.
The first 30minutes is a period for soaking the whole
wheat flour and the next 30minutes begins stirring flour.
The flashing of “:” at LCD indicates the unit is working.
9. The Finishing of Bread-making: When countdown is up
to 0:00, the buzzer sound will be given to notify that bread
making is done. And the item will turn into insulation state
automatically.
10. Take Out Bread. Wearing oven gloves, turn the bread
pan upside down and shake slightly to release the bread.
“Automatic Fruit Dispenser” Operation Instruction
(1) Open the cover, take out of the fruit box, pressed the
fruit box handle and lift up to remove the fruit box .
(2) Open the box.
(3) Add the ingredients such as fruits, nuts, seeds and
herbs. Then closed the cover .
(4) Place the two pillars in the bottom of the box holder
and push the fruit box handle until it’s set on the lid.
Regular maintenance of your appliance will keep it safe
and in proper operational order. Before cleaning always
disconnect the appliance from the mains supply.Wash
removable parts in warm, soapy water then rinse and dry
all parts. Allow the bread maker and all accessories to
cool completely before disassembling and cleaning.
Cleaning the Stainless Steel Housing and Lid
1. Wipe the exterior of the stainless steel housing and the
LCD screen with a soft, damp cloth. A non-abrasive liquid
cleanser or mild spray solution may be used to avoid
build-up of stains. Apply the cleanser to the sponge, not
the outer surface or LCD screen, before cleaning. Do not
use a dry paper towel or cloth to clean the LCD screen, or
use an abrasive cleanser or metal scouring pad to clean
any part of the bread maker as these will scratch the
surface.
2. If over-spills such as flour, nuts, raisins etc. occur in the
interior baking chamber, carefully remove them using a
soft, damp cloth. Use extreme caution when cleaning the
heating elements. Ensure the bread maker is completely
cool then gently rub a soft, damp sponge or cloth along
the length of the heating element. Do not use any type of
cleanser or cleaning agent.
3. Let all surfaces dry thoroughly prior to inserting the
power plug into a power outlet.
Baking pan, Kneading paddle, Measuring Spoon and
Measuring Cup
Wash with warm soapy water and rinse thoroughly, or
clean in the upper rack of the dishwasher. Dry all parts
after use. If you have trouble removing the kneading
paddle from the bread pan, soak in warm water for 10 to
15 minutes – this will loosen the blade.
2. “LOAF”: Press the LOAF button and select the bread
size from 1.0 lb/1.5 lb/2.0 lb. This function is just available
for program 1 to 9.
3. “COLOR”: Press the COLOR button to select a LIGHT,
MEDIUM or DARK colored crust.
CONTROL PANEL
TABLE OF CONTENTS
IMPORTANT SAFEGUARDS
2
3
4
5
7
11
15
17
18
18
18
19
19
19
19
20
20
21
21
21
21
22
22
22
22
23
28
SAVE THESE INTRUCTIONS
PARTS AND FEARTURES
CONTROL PANEL
OPERATION GUAIDES
CONVENIENT FUNCTION & USEFUL TIPS
MEASUREMENTS
CLEANING & CARE
RECIPES RECOMMENDED
1. Soft Bread
2. Sweet Bread
3. Natural Sourdough
4. French
5. Whole Wheat
6. Quick
7. Sugar Free
8. Multi-grain Bread
9. Milky Loaf
10. Cake
11. Raw Dough
12. Leaven Dough
13. Jam
15. Yogurt
16. Gluten Free
TECHNICAL SPECIFICATION
TROUBLE SHOOTING
WARRANTY
1 2 3 4
5 6 7 8 9 10
11 12 13 14 15 16
17 18 19 20 21 22
23 24 25 26 27 28
When using the electrical appliance, basic precautions
should always be followed. Including the following:
1.Read all instructions, product labels and warnings
carefully before using the bread maker.
2.Do not touch hot surfaces. Use handles or knobs.
3.To avoid electrical shock, do not immerse cord, plug, or
appliance in water or other liquid.
4.Close supervision is necessary when any appliance is
used by or near children.
5.Unplug form outlet when not in use and before cleaning.
Allow to cool before attaching or removing parts.
6.The use of accessory attachments not recommended by
the appliance manufacturer may cause fire, electric shock
or injury.
7.Do not use outdoors.
8.Avoid contact with moving parts.
9.Do not use appliance for other than intended or specified
uses.
10.Do not place the appliance on unstable surfaces or near
a hot gas or electric burner, or in a heater oven.
11.Do not let cord hang over edge of table or counter, or
touch hot surfaces including the stove.
12.Extreme caution must be used when moving an
appliance containing hot oil or other hot liquids.
13.To disconnect, press and hold the START/STOP Button
for a full second; remove plug form the wall outlet.
14.Do not scratch, damage, modify, forcefully bend, pull,
twist or fold the power cord.
15.Use only 120-VOLT AC electrical current.
16.When unit is not in use and before cleaning, unplug the
bread maker from wall outlet. Let the bread maker cool
down thoroughly before assembling or disassembling it.
17.Do not operate this or any appliance with a frayed or
damaged cord, or plug, or after the appliance malfunctions
or is dropped or has been damaged in any manner. Take
appliance to the nearest authorized service facility for
examination, repair or electrical or mechanical adjustment.
HOUSEHOLD USE ONLY
SAVE THESE INTRUCTIONS
a. A short power-supply cord should be used to reduce the
risk resulting from becoming entangled in or tripping over a
longer cord.
b. Longer extension cords are available and may be used if
care is exercised in their use.
c. If a longer extension cord is used:
1) The marked electrical rating of the extension cord should
be at least as great as the electrical rating of the appliance;
2) Don't drape the cord over the countertop or table top
where it can be pulled on by children or tripped over
unintentionally.
If the appliance is of the grounded type, the extension cord
should be a grounding-type 3-wire cord.
Number Program Number Program Number Program
1 Soft 7 Sugar-Free 13 Jam
2 Sweet Bread 8 Multigrain 14 Bake
3 Natural Sourdough 9 Milky Loaf 15 Yogurt
4 French 10 Cake 16 Gluten Free
5 Whole Wheat` 11 Raw Dough 17 Ferment
6 Quick 12 Leaven Dough
NOTES:
Set the Delay Time after selecting Menu, Loaf Size,
and Crust Color.
Do not use the timer function with recipes that include
dairy or other ingredients, such as eggs, milk, cream,
or cheese.
6. Working Status Includes: Reservation (if you need) -
Preheat - Knead1 - Rest - Knead2 - Ferment1,2,3 - Bake -
Keep warm - End.
Buzzer Sound
A buzzer sound will be given as:
1) electricity is connected.
2) Loaf, Color, Menu or Time Setup is pressed.
3) switch “Start/Stop/Pause”.
4) During kneading process, the buzzer sound is given
continuously to remind you of adding material.
5) The intermittent buzzer sound is given as “Keep Warm”
is closed down.
NOTES:
Stirring rod may remain stuck in the bread when it comes
out. In this case, use a hook attachment as follows.
insert the hook in the axis of the stirring rod (A).
pull gently to release the stirring rod (B).
Please be careful before use:
For the First Use:
(1) (2) (3) (4)
NOTE:
Never immerse the stainless steel housing in water or
place in the dishwasher. Take care not to allow water or
cleaning fluids to seep under the buttons or LCD screen
on the control panel.
Fluid Ounce(s)
1 cup of: Ounces Grams
8 1 16 48
All-purpose flour 4.5 125
Bread flour 4.4 128
Whole-wheat flour 4.2 119
Rye flour 3.6 102
7 7/8 14 46
6 3/4 12 32
5 5/8 10 30
4 1/2 8 24
3 3/8 6 18
2 1/4 4 12
1 1/8 2 6
1 3
1/2 1 1/2
Cup Tablespoon(s) Teaspoons
1. Soft Bread
2. Sweet Bread
3. Natural Sourdough
4. French
5. Whole Wheat
6. Quick
Circuit Diagram
7. Sugar Free
8. Multigrain Bread
9. Milky Loaf
10. Cake
11. Raw Dough
12. Leaven Dough
13. Jam
14. Yogurt
15. Gluten Free
Flour
Whole Wheat Flour
Dry Milk
Sugar
Yeast
Ingredients 1LB 1.5LB 2LB
Water 180ml 240ml 310ml
Butter 2 Tbsp. 2 Tbsp. 3 Tbsp.
Dry Milk 2 Tbsp. 3 Tbsp. 4 Tbsp.
Yeast 2 Tbsp. 3 Tbsp. 4 Tbsp.
Xylitol
Whole Wheat
1/2 cup / 50g 3/5 cup / 75g 4/5 cup / 100g
Cake flour (weak flour)
3cups /
384g
Eggs
Salt
Sugar
Quantity
240ml
Vegetable Oil 2 Tbsp.
Salt 1½ tsp
Sugar 1 Tbsp.
Flour
3cups / 384g
Yeast 1½ tsp
Ingredients Quantity
Fruit 6cups
sugar 1½ cups /
300g
Gelatin or Pudding
powder
3 Tbsp.
Ingredients Quantity
Milk 1½ cups / 350ml
Yogurt 50ml
Sugar 3 Tbsp.
Ingredients
Water
Sugar
Salt
Vegetable Oil
Gluten free flour
Corn flour
~
(
Baking Bread
Operation
One-year limited warranty
Bread Maker fails to mix
flour and work
Check if plug into outlet Press “Start/Stop” and
Bread Maker begins to
delayed
Indicator “:” is flashing,
and countdown begins to
Send To Maintenance
Department
Abnormal Sound
There is a litter of hard
stuffs or crumbs in barrel
inside the unit before
Lock Barrel into position Re-place bread barrel
Abnormal Smell/Taste
Wire cord damaged Keep wire cord away
something left on heating
Remove the matter left
LED indicates ”LLL”
unit lower than 14°F
environment at14°F
~
LED indicates “HHH”
unit higher than 122°F
use electric fan to cool it
or naturally cool to be at
LED indicates “EE0” or ”
EE1”
Sent to Maintenance
Department
less water or water
temperature is high
1.0lb 1.5lb 2.0lb
750g
Tips: Bread Basics for Ingredients

Praat mee over dit product
Laat hier weten wat jij vindt van de KBF MBF-010 Broodbakmachine. Als je een vraag hebt, lees dan eerst zorgvuldig de handleiding door. Een handleiding aanvragen kan via ons contactformulier.
beantwoord | Ik vind dit nuttig (0) (Vertaald door Google)
beantwoord | Ik vind dit nuttig (0) (Vertaald door Google)