
Step 4: Humidity Control and Ventilation
Fill the moisture rings in the bottom of the incubator with water. Water
will help keep eggs naturally moist. Check moisture rings daily, adding
lukewarm water as needed. If the room where your incubator is placed
has good natural moisture content, add water less frequently than if your
climate or room conditions are dry.
Good ventilation is important in the hatching process. Air exchange is
needed during embryo development and should be increased as chicks
start to hatch.
Remove one of the red plastic vent plugs on the top of the incubator.
One is located between the two windows toward the front of the incuba-
tor, closest to the power cord. The second is located at the opposite end
of the incubator, furthest from the power cord.
If your incubator has a fan kit, evaporation may occur at a more rapid
rate. If so, you will need to add water more frequently.
Step 5: Maintain Sanitary
Conditions
Embryos are extremely susceptible to dis-
ease from bacteria. Hand perspiration or
other foreign materials block the pores of
the shells and can permeate the egg, resulting in bacterial growth.
Always wash hands with anti-bacterial soap before handling eggs. Avoid
excess handling of eggs. Avoid breathing on eggs, particularly if you
have a cold or are ill. Eggs should be held in a cool location between 50
- 55
°
F until you are ready to incubate. Do not refrigerate.
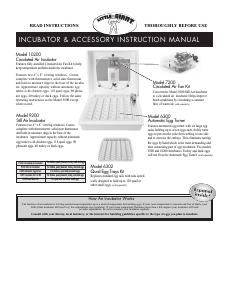
Step 6: Mark and Set the Eggs
If using the Automatic Egg Turner:
Set eggs in the turner with the small end down. Do not put goose or other
large eggs in the turner. They are too large for the egg cups and may
come in contact with the heating element or fall out of the cups. Do not
place an egg in the hole closest to the motor. Do not over load the
Automatic Egg Turner. You will note that with the Automatic Egg Turner,
the eggs sit up higher and are closer to the heating element.
Place the Thermometer with the permanently attached plastic holder so
that it lays flat on the top of the eggs, to assure the temperature reading is
taken at the top of the eggs. Line the notches in the top half of the incu-
bator with the notches in the bottom half; make sure the power cord is
aligned with the appropriate slot before setting the
top in place and pluging in the Automatic egg turn-
er. You can now view the temperature readings thru
the window
IMPORTANT: The model 9200 and 10200 incuba-
tors were previously supplied with a thermometer
that was attached to a metal bracket, you must use
the new thermometer supplied with the Automatic
Egg Turner. The new thermometer supplied with the Automatic Egg
Turner is mounted to a permanent clear plastic holder and is placed flat
on top of the eggs.
If you do not have an Automatic Egg Turner:
Using a lead pencil, lightly place a small "x" on one side of each egg,
and an "o" on the other side. (Do not use pen or markers as they may
contaminate the eggshell.) This mark will help you identify when eggs
have been turned.
Place the eggs in the incubator so that
they lay sideways on the wire screen. Do
not overcrowd eggs.
Place the Thermometer with the perma-
nently attached plastic holder so that it
lays flat on the top of the eggs. Warm air
rises and the thermometer should be read
at the top of the eggs. Set the top of the
incubator in place, and if necessary, move the thermometer so you can
view the temperature readings thru either window.
Allow at least 2-3 hours for the eggs to warm up to the temperature of
the incubator. Do not adjust the control knob during this time. Do not
open the incubator the first day after the eggs are set.
Step 7: Turning The Eggs
Turn the eggs at least 2-3x per day, every day at the same time. Avoid
shocking and jarring the eggs. Eggs can be rotated by removing a few
from the center of the incubator and rolling the rest toward the center.
Using the palm of your hand, gently roll the eggs until they have been
turned. Continue to turn eggs until 3 days prior to total incubation
and hatching time.
If using the Automatic Egg Turner, discontinue use 3 days prior to total
incubation and hatching time (see Step 9 Hatching Time and Temperature
chart). Unplug the turner and remove it from the incubator. Carefully
place eggs on the wire screen.
Consult your local library,
local hatchery, or the World Wide Web
for information and tips on
successful hatching.
Miller Manufacturing Company
• 1450 West 13th St. • Glencoe, MN 55336 • Customer Service 800-260-0888 • FAX 952-846-2301 •
www.miller-m fg.com


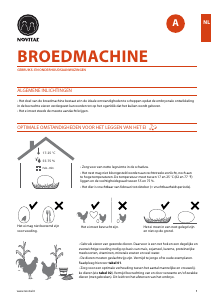
Praat mee over dit product
Laat hier weten wat jij vindt van de Little Giant 6302 Broedmachine. Als je een vraag hebt, lees dan eerst zorgvuldig de handleiding door. Een handleiding aanvragen kan via ons contactformulier.