SIZE: 72*97MM
SIZE: 72*97MM
23 4
7865
11109 12
13 14 15
1. Press the “
AVG” button to enter Average function.
2. If the User Page is not what you want to view, press the
“PAGE ” button to select.
3. Press the “
AVG” button to view different Average Values.
5 different Average Values are available:
s7!2.).'"ABIESYOUNGCHILDRENORINDIVIDUALSWHOCANNOT
express their consent are not suitable for blood pressure
measurement.
s7!2.).')NDIVIDUALSWITHSERIOUSARTERIOSCLEROSISARENOT
suitable for blood pressure measurement.
s7!2.).'"LOODPRESSUREREADINGSMAYFLUCTUATEDURING
pregnancy. Pregnant women should consult their doctor
before taking measurement.
s7!2.).')FTHEREAREUNUSUALVALUESPLEASECONSULTYOUR
doctor before taking medical action.
s7!2.).'.OTICEFOR#ALIFORNIA#USTOMERS
#ALIFORNIA0ROPOSITION7!2.).'4HISPRODUCTCONTAINSA
CHEMICALKNOWNTOTHE3TATEOF#ALIFORNIATOCAUSECANCERAND
reproductive or developmental harm.
s#!54)/.(ANDLINGBATTERIESPROPERLY
!SSOONASBATTERIESWEAROUTREPLACETHEMWITHNEW
batteries.
$ONOTUSEOLDANDNEWBATTERIESTOGETHER
!LIGNTHEPOLARITIESOFBATTERIESCORRECTLY
7HENTHEUNITWILLNOTBEUSEDFORMORETHANMONTHS
REMOVETHEBATTERIES/THERWISEBATTERIESMAYLEAKAND
cause damage to the unit.
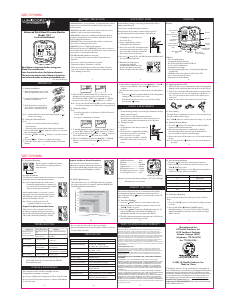
15)#+34!24'5)$%
1. Sit upright in a chair with your
feet on the floor.
7HENTHEMEASUREMENTIS
complete, the cuff will
automatically deflate and your
systolic and diastolic pressure
values and pulse rate will display.
0RESSTHEhvBUTTON4HECUFFWILLAUTOMATICALLYINFLATEAND
the measurement will start.
3. Pull on the end of the cuff until it wraps
securely around your wrist. Place your
arm on a table so that the cuff will be
at the same level as your heart.
2EMOVETIGHTFITTINGORTHICK
clothing from the lower arm.
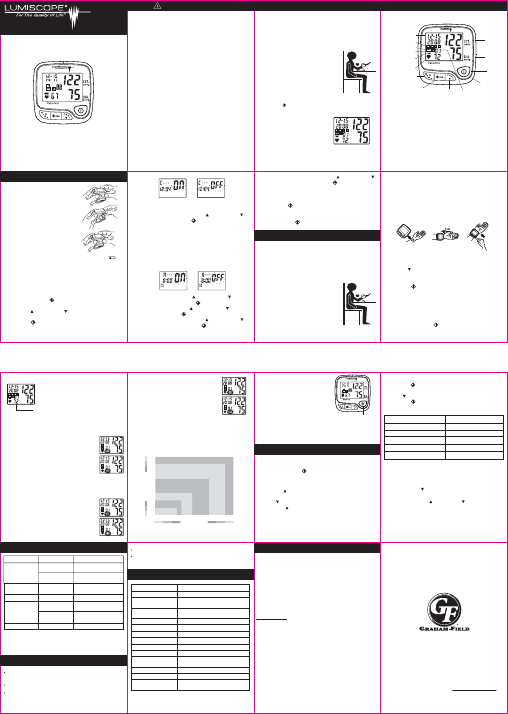
Monitor
Features
/6%26)%7
"ATTERY)NSTALLATION
.OTE˖2EPLACEBATTERIESWHENTHEBATTERYINDICATORhv
shows low voltage.
3. Slide the battery cover back to
CLOSEIT4HECOVERWILLCLICKINTO
place when completely closed.
02%0!2!4)/.
2EMOVETHEBATTERYCOVERINTHE
direction indicated on the cover.
2. Insert 2 AAA batteries with the
polarities as indicated.
3ETTINGTHE$ATEAND4IME
.OTE
3ETTHECORRECTDATEANDTIMEBEFORETAKINGA
measurement.
2ESETTHEDATEANDTIMEAFTERREPLACINGTHEBATTERIES
1. Press and hold the “
AVG” button for a few seconds until
the Year display flashes.
2. Press the“
-%-/” or “PA GE ” button to select the current
year.
3. Press the“
AVG” button to confirm Year Setting.
&OLLOWTHESAMESTEPSTOSETTHE-ONTH$ATE(OURAND
Minute.
.OTE)FYOUSELECT#LOCK&UNCTIONh/.vYOUWILLCONTINUEAT
THE!LARM3ETTINGSECTION/THERWISESETTINGWILLEND
h/.vANDh/&&vWILLTHENFLASH4HISISTOHAVETHECLOCK
display when the unit is not in use; you can choose
#LOCK&UNCTIONh/.vORh/&&v0RESSh
-%-/” or “PA GE ”
button to select. Press the “
AVG” button to confirm.
2.3 Setting the Alarm
.OTE
9OUWILLNOTBEABLETOSETALARMCLOCKIF#LOCK&UNCTION
ISSETTOh/&&v
9OUCANSETAMAXIMUMOFALARMS
7HEN-INUTEDIGITFLASHESPRESSTHEh
-%-/” or “PA GE ”
button to select Minute. Press the“
AVG” button to
confirm.
10. Follow the same steps to set the 2nd, 3rd, and 4th Alarm.
4ODISABLE!LARM0RESSTHEv-%-/ ” or “PA GE ” button
TOSELECTh/&&vANDPRESSTHEv
AVG” button to confirm.
4OSETST!LARM0RESSTHEv
-%-/” or ” PA GE ” button to
SELECTh/.v0RESSTHEv
AVG” button to confirm.
7HEN(OURDIGITFLASHESPRESSTHEh
-%-/” or “PA GE ”
BUTTONTOSELECT(OUR0RESSTHEh!6'vBUTTONTO
confirm.
.OTE
0RESSTHEhvBUTTONANYTIMEDURINGCLOCKSETTINGALARM
setting to start over if an error occurs.
%ACHALARMLASTSSECONDSORYOUCANTURNITOFFBY
pressing the “ ” button.
4!+).'!-%!352%-%.4
.OTE
!VOIDSMOKINGEATINGOREXERCISINGFORMINUTESBEFORE
taking a measurement.
$ONOTMOVEORTALKDURINGMEASUREMENT
-EASUREMENTCANBETAKENONEITHERARMHOWEVERIF
possible, always take measurements on the left arm.
Avoid smoking, eating or exercising for 30 minutes before
taking a measurement.
$ONOTMOVEORTALKDURINGMEASUREMENT
Measurement can be taken on either arm; however, if
possible, always take measurements on the left arm.
3ITTING#ORRECTLY
2EMOVETHICKORTIGHTFITTINGCLOTHING
FROMTHELOWERARM$ONOTROLLUP
your sleeve if it is too tight.
4. Place your arm on a table so that the
cuff wil be at the same level as your
heart.
!PPLYINGTHE7RIST#UFF
1. Place your elbow on a table with the palm facing upward.
7RAPTHEWRISTCUFFAROUNDTHELEFTWRISTASSHOWNBELOW
2. Pull on the end of the cuff until it wraps securely around
YOURUPPERWRIST$ONOTOVERTIGHTENTHECUFF!LLOW
cm or ½ inch between the bottom of the cuff and your
wrist joint.
2ELAX
2. Sit upright in a chair with your feet on
the floor.
3. Make sure the cuff is at the same level as your heart.
3.3 User Setting
Press ”
PAGE
” button to switch between User Page 1 ,2, 3 and 4.
4HISUNITALLOWSAMAXIMUMOFUSERSTOSTOREMEASUREMENT
records in different User Pages.
0RESSTHEhvBUTTON4HECUFFWILLAUTOMATICALLYINFLATE
and the measurement will start.
7HENTHEMEASUREMENTISCOMPLETETHECUFFWILL
automatically deflate and your systolic and diastolic
pressure values and pulse rate will display.
2EMOVETHEWRIST cuff and take note of your measurement
results.
4AKING!-EASUREMENT
.OTE9OUCANPRESSTHEhvBUTTONTOSTOPMEASUREMENTAT
any time.
(EARTBEAT2EADINGS
"ESIDES3YSTOLICAND$IASTOLICVALUES
Pulse will also be displayed after a
measurement
Pulse
)RREGULAR(EARTBEAT
4HISUNITHASAUNIQUEFEATURETHATALERTSUSEROFIRREGULAR
heartbeat detection during measurement.
.OTE!NIRREGULARHEARTBEATISDEFINEDASA
heartbeat rhythm that has a variation of
more than 25% from the average rhythm
detected during measurement.
If an irregular rhythm occurs twice or more
during the same measurement, the monitor
WILLDISPLAYTHEPULSEVALUEANDh)(vSYMBOL
ALTERNATELY%XAMPLE)(
.OTE0LEASECONSULTYOURDOCTORIF
irregular heartbeat occurs often.
Regular but Below Normal Heartbeat
If the monitor detects a pulse rate below
58 beats per minute during measurement,
the monitor will display the pulse value and
h,/vSYMBOLALTERNATELY%XAMPLE,/
If the monitor detects a pulse rate above
100 beats per minute during measurement,
the monitor will display the pulse value and
h()vSYMBOLALTERNATELY%XAMPLE()
Regular but Above Normal Heartbeat
7(/,IGHT)NDICATOR
4HISUNITFEATURESACOLOR,%$LIGHTINDICATORTODISPLAY
BLOODPRESSURELEVELINACCORDANCEWITHTHE7(/7ORLD
(EALTH/RGANIZATIONCLASSIFICATION
MM(G
MM(G
120 130 140 150 160 170 180
110
105
100
95
90
85
80
'RADEHYPERTENSIONSEVERE2ED
'RADEHYPERTENSIONMODERATE
9ELLOW
'RADEHYPERTENSIONMILD
0URPLE
(IGHNORMAL'REEN
.ORMAL
3KY"LUE
/PTIMAL"LUE
Systolic Pressure
Diastolic Pressure
7(/#LASSIFICATION#OLOR
/PTIMAL"LUE
.ORMAL3KY"LUE
(IGHNORMAL'REEN
-ILDHYPERTENSION0URPLE
-ODERATEHYPERTENSION9ELLOW
3EVEREHYPERTENSION2ED
6IEW!VERAGE2EADINGS
%XAMPLE)FYOURMEASUREMENTREADINGISTHE,%$LIGHT
will display the color in blue.
1. Press the “
-%-/” button to enter memory function.
2. If the User Page is not what you want to view, press the
“PAGE ” button to select.
After measurement, the last set of measured values will be
saved automatically after measurement when the unit is
TURNEDOFFBYPRESSINGhvBUTTONORBYAUTOMATICPOWEROFF
after 3 minutes.
6IEW0AST2EADINGS
-%-/29&5.#4)/.3
3. Press the “ -%-/” button to display the next sets of
values for the user selected. Past readings are
displayed from the most recent to the oldest.
4HISBLOODPRESSUREMONITORCANSTOREUPTOSETSOF
PASTREADINGSFOREACHUSERX
1. Press the “PA GE ” button to select the User Page you want
to delete.
3YMBOLON$ISPLAY !VERAGE6ALUESOF
H /NE(OUR
D /NE$AY
D /NE7EEK
D /NE-ONTH
!,, !LL2EADINGS
$ELETE0AST2EADINGS
User can delete all the past readings stored in each User
Page.
2. Press and hold the “ -%-/” & “PA GE ” buttons
simultaneously for 5 seconds. Symbol of “ALL EE” will be
displayed and all past readings stored in that User Page
will be deleted.
“Err P” displays Failure to inflate
Ensure the cuff is properly
connected
“Err 1” displays
$EFLATINGTOORAPIDLY
2ETURNFORSERVICE
“Err 2” displays
Movement during
measurement
$ONOTMOVEDURING
measurement
Signal interference
2EMOVEINTERFERINGSOURCE
e.g. mobile phones, magnets
“Err 3” displays Incorrect results Measure again
3YMPTOM 0OSSIBLE#AUSE 3OLUTION
.ODISPLAYWHEN
you press the
0OWER3TARTBUTTON
"ATTERIESAREWORN
out
"ATTERYPOLARITIES
are incorrect
2EPLACEWITHNEWBATTERIES
2EALIGNBATTERIESINCORRECT
polarities
.OTE)FYOURPROBLEMCANNOTBESOLVEDBYTHEABOVECONSULT
A'&(EALTH0RODUCTS)NCREPRESENTATIVE$/./4
disassemble the unit.
42/5",%3(//4).'
34/2!'%-!).4%.!.#%
2EMOVETHEBATTERIESFROMTHEUNITWHENITWILLNOTBEUSED
for more than 3 months.
$ONOTWASHTHEWRISTCUFFOREXPOSEITTOLIQUID
5SEADRYORSLIGHTLYWATERDAMPENEDCLOTHTOCLEANTHEUNIT
+EEPAWAYTHEUNITFROMDIRECTSUNLIGHTEXTREME
temperatures, humidity or moisture.
$ONOTUSEALCOHOLBENZENETHINNEROROTHERVOLATILELIQUIDS
to clean the unit.
-ODEL.O 1147
Measurement Method /SCILLOMETRIC
-EASUREMENT2ANGE 0RESSUREnMM(G
0ULSE2ATEnBEATSMIN
Accuracy 0RESSUREMM(G
0ULSE2ATE
Inflation Pump driven
0RESSURE$ETECTION 3EMICONDUCTOR
Power Supply 2x AAA batteries
!UTO0OWER/FF 3 minutes after last operation
Storage Environment ²&TO²&TO2(
/PERATION%NVIRONMENT ²&TO²&TO2(
%XTERNAL$IMENSIONS
80 x 85 x 60 mm
.ET7EIGHT GBATTERIESEXCLUDED
#UFF$IMENSIONS 7RISTCIRCUMFERENCEOF^MM
0ACKAGE#ONTENTS "LOOD0RESSURE-ONITOR
)NSTRUCTION-ANUAL"ATTERIES
30%#)&)#!4)/.3
4()2493)8-/.4(,)-)4%$7!22!.49
s/PERATEDBY!!!BATTERIES
s!UTOOFF0OWER3AVING&EATURE
s7(/"LOOD0RESSURE)NDICATORWITH#OLOR,%$
s-ODE!VERAGING&UNCTIONn(OUR$AY7EEK-ONTH
AND/VERALL
s!LARM#LOCK3ETTINGS
s5SER4OTAL-EMORY
s"LOOD0RESSURE-ODEAND#LOCK-ODE
s)RREGULAR(EARTBEAT$ETECTOR
s/NE4OUCH/PERATION
-EMORY2ECALL
5P
Average Values
3ET
Page Select
$OWN
Power
3TART
7(/,IGHT
Indicator
$ATE4IME
5SER^
Memory Average
Systolic
$IASTOLIC
,OW"ATTERY
Indicator
Pulse Symbol
-EMORY.O
READINGS
Memory
v,Xv7Xv(OR
Kpa
7(/,IGHT)NDICATOR
Kpa
Read these instructions before using your
Blood Pressure Monitor.
Save these instructions for future reference.
The most current version of these instructions
can be found online at www.grahameld.com.
).3,!"2EV#
Advanced Wrist Blood Pressure Monitor
Model 1147
Instruction Manual
Manufactured for:
GF Health Products, Inc.
2935 Northeast Parkway
Atlanta, Georgia 30360
telephone: 770-368-4700
fax: 770-368-2386
© 2009 GF Health Products, Inc.
Made in China
www.grahamfield.com
3!&%4902%#!54)/.3
'&(EALTH0RODUCTS)NCISNOTRESPONSIBLEFORTYPOGRAPHICAL
errors. All illustrations, specifications, packaging and warranties
contained in this document are based on the latest product
INFORMATIONAVAILABLEATTHETIMEOFPRINTING4HEMOSTCURRENT
product information, including the most current revision of
this manual, can be found online at www.grahamfield.com.
Graham-Field, Lumiscope, and
Lumiscope
For The Quality Of Life
are registered trademarks
OF'&(EALTH0RODUCTS)NC
SCOPE OF WARRANTY
'&(EALTH0RODUCTS)NCh'&vWARRANTSTOTHEORIGINALPURCHASERh#USTOMERv
only, that it will replace or repair components, at GF’s sole discretion, that are
DEFECTIVEINMATERIALORWORKMANSHIPUNDERNORMALUSEFORAPERIODOFTHIRTYSIX
MONTHSAFTERTHEPURCHASEDATEUNLESSTHEREISANEXPIRATIONDATEONTHE
component in which case the warranty shall expire on the earlier of the warranty
PERIODORTHEEXPIRATIONDATE4HEWARRANTYDOESNOTEXTENDTONONDURABLEPARTS
ANDDOESNOTINCLUDELABORORCOSTSOFSHIPPING4HISLIMITEDWARRANTYISNOT
transferable. All warranties are conditioned upon the proper use of the product
strictly in accordance with good commercial practice and applicable GF
INSTRUCTIONSANDMANUALSINCLUDINGPROPERUSEANDMAINTENANCE4HEWARRANTYIS
void if the defect is caused by any other reason not related to defects in materials
or workmanship.
Obtaining Warranty Service
GF’s customer service team must be notified of any warranty claim within the
APPLICABLEWARRANTYPERIOD#ALLORFAXOREMAIL
MAKECHECKSPAYABLETO'&(EALTH0RODUCTS)NC&AILURETOFOLLOWTHESPECIFIC
directions provided by the GF customer service team will result in denial of the
warranty claim.
ENTIRE WARRANTY, EXCLUSIVE REMEDY AND CONSEQUENTIAL DAMAGES
DISCLAIMER
4()37!22!.49)3'&3/.,97!22!.49!.$)3).,)%5/&!,,/4(%2
7!22!.4)%3%802%33/2)-0,)%$'&-!+%3./)-0,)%$7!22!.4)%3/&!.9
+).$).#,5$).'!.9)-0,)%$7!22!.4)%3/&-%2#(!.4!"),)49/2&)4.%33
&/2!0!24)#5,!20520/3%)&!.9-/$%,/23!-0,%7!33(/7.4/4(%
#534/-%235#(-/$%,/23!-0,%7!353%$-%2%,94/),,5342!4%4(%
'%.%2!,490%!.$15!,)49/&4(%02/$5#4!.$./44/2%02%3%.44(!4
4(%02/$5#47/5,$.%#%33!2),9#/.&/2-4/4(%-/$%,/23!-0,%).
!,,2%30%#43
'&34/4!,,)!"),)49&/2!.902/$5#4/23%26)#%02/6)$%$)3,)-)4%$4/
4(%#/34/&4(%02/$5#4')6).'2)3%4/4(%#,!)-)../%6%.47(%4(%2).
#/.42!#4).$%-.)497!22!.49.%',)'%.#%342)#4,)!"),)49/2
/4(%27)3%7),,'&"%,)!",%&/2!.9$)2%#430%#)!,).$)2%#4).#)$%.4!,
%8%-0,!29/2#/.3%15%.4)!,$!-!'%3).#,5$).'"54./4,)-)4%$4/
$!-!'%3&/2,/33/&02/&)43/2).#/-%,/33/&53%$/7.4)-%#/6%2
/2%-0,/9%%/2).$%0%.$%.4#/.42!#4/27!'%30!9-%.43!.$"%.%&)43
4HISWARRANTYGIVESYOUSPECIFICLEGALRIGHTS9OUMAYHAVEADDITIONALRIGHTSWHICH
vary from state to state.


Praat mee over dit product
Laat hier weten wat jij vindt van de Lumiscope 1147 Bloeddrukmeter. Als je een vraag hebt, lees dan eerst zorgvuldig de handleiding door. Een handleiding aanvragen kan via ons contactformulier.