Package Contents
❏ D5600 camera
❏ DK-25 rubber eyecup
❏ BF-1B body cap
❏ EN-EL14a rechargeable Li-ion
battery (with terminal cover)
❏ AN-DC3 strap
❏ User’s Manual (this sheet)
❏ Warranty (see left)
❏ MH-24 battery charger (plug adapter supplied in countries or
regions where required; shape depends on country of sale)
Purchasers of the lens kit option should con rm that the package
also includes a lens. Memory cards are sold separately. Cameras
purchased in Japan display menus and messages in English and
Japanese only; other languages are not supported. We apologize
for any inconvenience this may cause.
A
The Camera Body
14
12
13
1516
8
9
11
10
18
67
3
4
5
2
1
17
1 AF-assist illuminator
Self-timer lamp
Red-eye reduction lamp
2 Power switch
3 Shutter-release button
4
E/N button
5 Movie-record button
6 Live view switch
7 Mode dial
8 Built-in ash
9
M/Y button
10 Eyelets for camera strap
11 Fn button
12 Mounting mark
13 Lens release button
14
s/E button
15 Mirror
16 Lens mount
17 CPU contacts
18 Body cap
29
30
31
28
27
26
20 2119
22 23 24
25
19 Stereo microphone
20 Accessory shoe (for optional
ash units)
21 Eye sensor
22
R (information) button
23 Command dial
24
A/L button
25 Connector cover
26
G button
27 Speaker
28
Focal plane mark (E)
29 USB connector
30 Connector for external
microphone
31 Accessory terminal
32
47
33 34 35
36
37
39
40
38
414244 43
51
50
49
48
46
45
32 View nder eyepiece
33 Diopter adjustment control
34
K button
35
P button
36 Multi selector
37
J (OK) button
38 N-Mark (NFC antenna)
39
O button
40 Memory card access lamp
41 Battery-chamber cover latch
42 Battery-chamber cover
43
W/Q button
44
X button
45 Tripod socket
46 Touch-sensitive vari-angle
monitor
47 Rubber eyecup
48 HDMI connector cover
49 Memory card slot cover
50 Power connector cover for
optional power connector
51 Battery latch
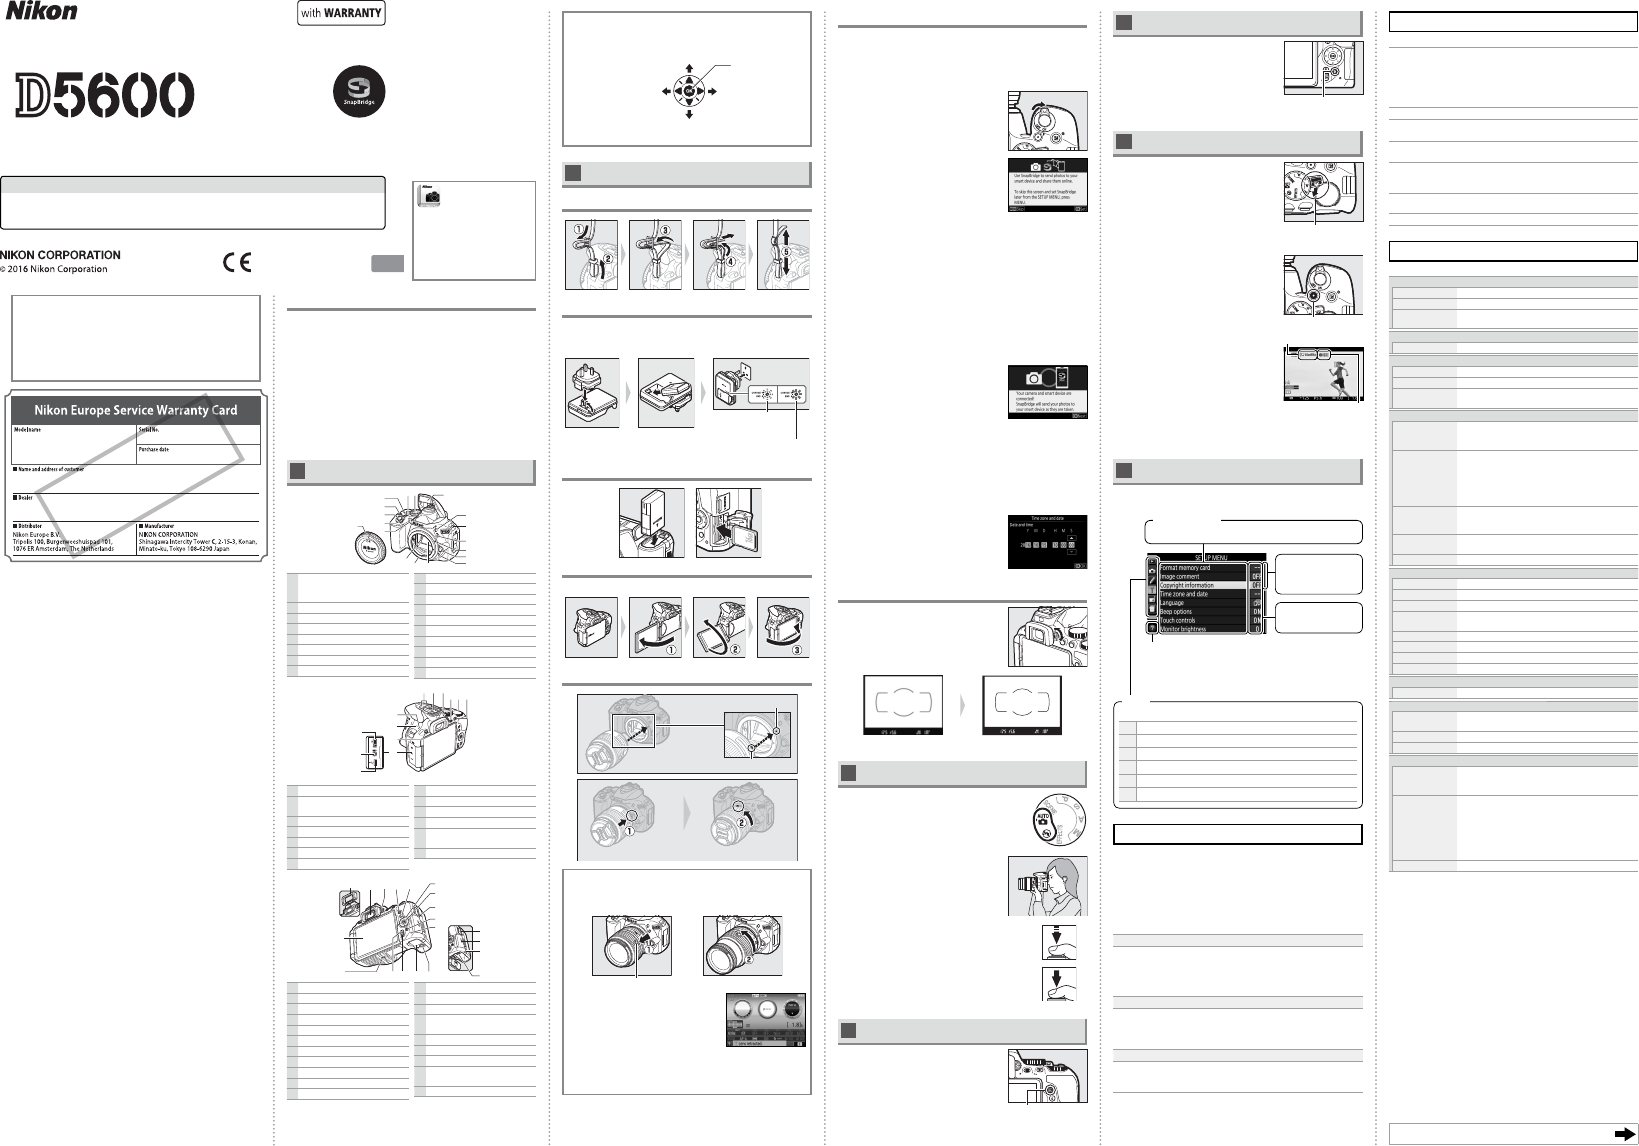
A The Multi Selector
In this manual, operations using the multi selector are represented by
1, 3, 4, and 2 icons.
1: Press the multi selector up
4: Press the multi
selector left
2: Press the multi selector
right
3: Press the multi selector
down
J button (select)
B
Quick Start Guide
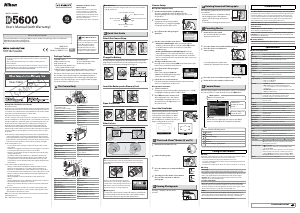
Attach the Camera Strap
Charge the Battery
If a plug adapter is supplied, raise the wall plug and connect the
plug adapter as shown below at left, making sure the plug is fully
inserted. Insert the battery and plug the charger in.
Battery charging
Charging complete
Insert the Battery and a Memory Card
Open the Monitor
Open the monitor as shown. Do not use force.
Attach a Lens
Mounting mark (camera)
Mounting mark (lens)
Rotate the lens as shown until it clicks into place.
A Lenses with Retractable Lens Barrel Buttons
Before using the camera, unlock and extend the lens. Keeping the
retractable lens barrel button pressed (q), rotate the zoom ring as
shown (w).
Retractable lens barrel button
Pictures can not be taken when the lens is
retracted; if an error message is displayed as
a result of the camera having been turned on
with the lens retracted, rotate the zoom ring
until the message is no longer displayed.
A Removing Lenses
To remove the lens, turn the camera o and press and hold the
lens-release button on the front of the camera while rotating
the lens in the direction opposite that shown above.
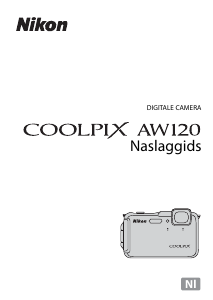
Camera Setup
❚❚ Setup from a Smartphone or Tablet
1
Download and install the SnapBridge app.
The app is available free from the Nikon website
(http://snapbridge.nikon.com), the Apple App Store®, and
GooglePlay™.
2
Turn the camera on.
A language-selection dialog will be
displayed; press 1 and 3 to highlight
a language and press J to select.
3
Press J when the dialog at right is
displayed.
4
Pair the camera and the smart device.
• Android devices with NFC support: After checking that NFC is
enabled on the smart device, touch the camera H (N-Mark)
to the NFC antenna on the smart device to launch the
SnapBridge app.
• iOS devices and Android devices without NFC support: Press the
camera J button. The camera will wait for a connection;
launch the SnapBridge app on the smart device and follow
the on-screen instructions to tap the name of the camera you
want to pair with.
5
Check the authentication code.
Press J on the camera and tap PAIR on the smart device (the
button may vary with the smart device).
6
Press J when the dialog at right is
displayed.
If the camera displays Unable to
connect., the display will change after
a short pause. Return to Step 4.
7
Follow the on-screen instructions.
Follow the instructions displayed by the camera and smart
device to complete the setup process.
❚❚ Setup from the Camera Menus
1
Turn the camera on.
A language-selection dialog will be displayed; press 1 and 3
to highlight a language and press J to select.
2
Press G and set the camera clock.
After setting time zone, date format,
and daylight saving time options, use
the multi selector and J button to set
the camera clock.
Focus the View nder
After removing the lens cap, rotate the
diopter adjustment control until the AF
area brackets are in sharp focus. When
operating the control with your eye to
the view nder, be careful not to put your
ngers or ngernails in your eye.
View nder not in focus View nder in focus
C
“Point-and-Shoot” Modes (i and j)
1
Rotate the mode dial to i or j.
2
Frame the photograph.
3
Press the shutter-release button halfway to
focus.
4
Smoothly press the shutter-release button
the rest of the way down to take the
photograph.
D
Viewing Photographs
Pressing K displays a picture in the
monitor.
K button
E
Deleting Unwanted Photographs
Note that photographs can not be recovered
once deleted.
• Press the O button. A con rmation dialog
will be displayed; press the O button
again to delete the image and return to
playback.
O button
• To exit without deleting the picture, press K.
F
Recording Movies
1
Rotate the live view switch.
The view through the lens will be
displayed in the monitor.
Live view switch
2
Press the shutter-release button halfway to focus.
3
Press the movie-record button to
start recording.
Movie-record button
A recording indicator and the time
available are displayed in the monitor.
Time remaining
Recording indicator
4
Press the movie-record button again to end recording.
5
Rotate the live view switch to exit live view.
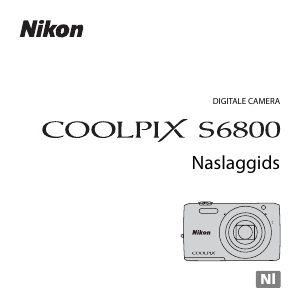
G
Camera Menus
Most shooting, playback, and setup options can be accessed from
the camera menus. To view the menus, press the G button.
Help icon
If the help icon is displayed, you can press the W(Q)
button to view help for the currently selected item.
Choose from the following menus:
D
Playback
C
Shooting
A
Custom Settings
B
Setup
N
Retouch
m Recent Settings / OMy Menu
Tabs
Options in current menu.
Menu options
Slider shows
position in current
menu.
Current settings are
shown by icons.
Caring for the Camera
❚❚ Storage
When the camera will not be used for an extended period, turn the camera
o and remove the battery. Do not store in locations that:
• are poorly ventilated or subject to humidities of over 60%
• are next to equipment that produces strong electromagnetic elds, such
as televisions or radios
• are exposed to temperatures above 50°C (122°F) or below –10°C (14°F)
❚❚ Cleaning
Camera Body
Use a blower to remove dust and lint, then wipe gently with a soft, dry
cloth. After using the camera at the beach or seaside, wipe o sand or salt
with a cloth lightly dampened in distilled water and dry thoroughly.
Important: Dust or other foreign matter inside the camera may cause
damage not covered under warranty.
Lens, Mirror, and View nder
These glass elements are easily damaged. Remove dust and lint with a
blower. If using an aerosol blower, keep the can vertical to prevent the
discharge of liquid. To remove ngerprints and other stains, apply a small
amount of lens cleaner to a soft cloth and clean with care.
Monitor
Remove dust and lint with a blower. When removing ngerprints and
other stains, wipe the surface lightly with a soft cloth or chamois leather.
Do not apply pressure, as this could result in damage or malfunction.
* Do not use alcohol, thinner, or other volatile chemicals.
Troubleshooting
❚❚ Battery/Display
The camera is on but does not respond: Wait for recording to end. If the problem
persists, turn the camera o . If the camera does not turn o , remove and
reinsert the battery or, if you are using an AC adapter, disconnect and
reconnect the AC adapter. Note that although any data currently being
recorded will be lost, data that have already been recorded will not be
a ected by removing or disconnecting the power source.
View nder is dark: Insert a fully-charged battery.
Displays turn o without warning: Choose longer delays for Custom Setting c2
(Auto o timers).
View nder display is unresponsive and dim: The response times and brightness
of this display vary with temperature.
Fine lines are visible around active focus point or display turns red when focus point is
highlighted: These phenomena are normal for this type of view nder and
do not indicate a malfunction.
❚❚ Shooting (All Modes)
Camera takes time to turn on: Delete les or folders.
Speci cations
❚❚ Nikon D5600 Digital Camera
Type
Type Single-lens re ex digital camera
Lens mount Nikon F mount (with AF contacts)
E ective angle of view Nikon DX format; focal length equivalent to approx. 1.5×
that of lenses with FX format angle of view
E ective pixels
E ective pixels 24.2 million
Image sensor
Image sensor 23.5 × 15.6 mm CMOS sensor
Total pixels 24.78 million
Dust-reduction System Image sensor cleaning, Image Dust O reference data
(CaptureNX-D software required)
Storage
Image size (pixels) • 6000 × 4000 (Large)
• 4496 × 3000 (Medium)
• 2992 × 2000 (Small)
File format • NEF (RAW): 12- or 14 bit, compressed
• JPEG: JPEG-Baseline compliant with ne (approx.
1:4), normal (approx. 1:8), or basic (approx. 1:16)
compression
• NEF (RAW)+JPEG: Single photograph recorded in both NEF
(RAW) and JPEG formats
Picture Control System Standard, Neutral, Vivid, Monochrome, Portrait,
Landscape, Flat; selected Picture Control can be
modi ed; storage for custom Picture Controls
Media SD (Secure Digital) and UHS-I compliant SDHC and SDXC
memory cards
File system DCF 2.0, Exif 2.3, PictBridge
View nder
View nder Eye-level pentamirror single-lens re ex view nder
Frame coverage Approx. 95% horizontal and 95% vertical
Magni cation Approx. 0.82× (50mm f/1.4 lens at in nity, –1.0m
–1
)
Eyepoint 17mm (–1.0m
–1
; from center surface of view nder
eyepiece lens)
Diopter adjustment –1.7 – +0.5m
–1
Focusing screen Type B BriteView Clear Matte Mark VII screen
Re ex mirror Quick return
Lens aperture Instant return, electronically controlled
Lens
Autofocus support Autofocus is available with AF-S, AF-P, and AF-I lenses.
Shutter
Type Electronically-controlled vertical-travel focal-plane
shutter
Speed / – 30 s in steps of / or /EV; Bulb; Time
Flash sync speed X = /s; synchronizes with shutter at /s or slower
Release
Release mode
8 (single frame), ! (continuous L), 9 (continuous H),
J (quiet shutter release), E (self-timer); interval timer
photography supported
Frame advance rate
• !: Up to 3fps
• 9: Up to 5fps (JPEG and 12-bit NEF/RAW) or 4fps
(14-bit NEF/RAW)
Note: Frame rates assume continuous-servo AF, manual or
shutter-priority auto exposure, a shutter speed of /s
or faster, Release selected for Custom Setting a1 (AF-C
priority selection), and other settings at default values.
Self-timer 2s, 5s, 10s, 20s; 1 – 9 exposures
• Read this manual thoroughly before using the camera.
• To ensure proper use of the camera, be sure to read “For Your Safety”
(overleaf).
• After reading this manual, keep it in a readily accessible place for
future reference.
No reproduction in any form of this manual, in whole or in part (except
for brief quotation in critical articles or reviews), may be made without
written authorization from NIKON CORPORATION.
Nikon D5600
Warranty Terms - Nikon Europe Service Warranty
Dear Nikon Customer,
We thank you for your purchasing this Nikon product. Should your Nikon product
require warranty service, please contact the dealer from whom it was purchased
or a member of our authorized service network within the sales territory of Nikon
Europe B.V. (e.g. Europe/Russia/others). See details under:
http://www.europe-nikon.com/support
In order to avoid any unnecessary inconvenience, we advise you to read the user
manuals carefully before contacting the dealer or our authorized service network.
Your Nikon equipment is guaranteed against any manufacturing defects for one
full year from the date of original purchase. If during this period of guarantee
the product proves defective due to improper material or workmanship, our
authorized service network within the sales territory of Nikon Europe B.V. will,
without charge for labor and parts, repair the product in the terms and conditions
set as below. Nikon reserves the right (at its sole discretion) to replace or repair
the product.
1. This warranty is only provided upon presentation of the completed warranty
card and original invoice or purchase receipt indicating the date of purchase,
product type and dealer’s name, together with the product. Nikon reserves the
right to refuse free-of-charge warranty service if the above documents cannot
be presented or if the information contained in it is incomplete or illegible.
2. This warranty will not cover:
• necessary maintenance and repair or replacement of parts due to normal
wear and tear.
• modifi cations to upgrade the product from its normal purpose as described
in user manuals, without the prior written consent of Nikon.
• transport costs and all risks of transport relating directly or indirectly to the
warranty of the products.
• any damage resulting from modifi cations or adjustments which may be
made to the product, without the prior written consent of Nikon, in order
to comply with local or national technical standards in force in any other
country than the ones for which the product was originally designed and/or
manufactured.
3. The warranty will not be applicable in the case of:
• damage caused by misuse including but not limited to failure to use the
product for its normal purpose or according to the user instructions on
the proper use and maintenance, and to installation or use of the product
inconsistent with the safety standards in force in the country where it is used.
• damage caused by accidents including but not limited to lightning, water,
fi re, misuse or neglect.
• defacing, illegibility or removal of the model or serial number on the
product.
• damage resulting from repairs or adjustments which have been conducted
by unauthorized service organizations or persons.
• defects in any system into which the product is incorporated or with which
it is used.
4. This service warranty does not aff ect the consumer’s statutory rights under
applicable national laws in force, nor the consumer’s right against the dealer
arising from their sales/purchase contract.
Notice: An overview of all authorized Nikon Service Stations can be found online
by following this Link
(URL = http://www.europe-nikon.com/service/).
Continued overleaf
D5600 Model Name: N1538
Nikon User Support
Visit the site below to register your
camera and keep up-to-date with
the latest product information. You
will nd answers to frequently asked
questions (FAQs) and can contact us
for technical assistance.
http://www.europe-nikon.com/support
Nikon Manual Viewer 2
Install the Nikon Manual Viewer 2
app on your smartphone or tablet
to view Nikon digital camera
manuals, anytime, anywhere.
Nikon Manual Viewer 2 can be
downloaded free of charge from
the App Store and Google Play.
DIGITAL CAMERA
En
AMA16622
Printed in Europe
SB6J01(11)/6MB37111-01
User’s Manual (with Warranty)
About the Reference Manual
For more information on using your Nikon camera, download a pdf copy of the caera Reference
Manual from the website listed below.
http://downloadcenter.nikonimglib.com/


Praat mee over dit product
Laat hier weten wat jij vindt van de Nikon D5600 Digitale camera. Als je een vraag hebt, lees dan eerst zorgvuldig de handleiding door. Een handleiding aanvragen kan via ons contactformulier.