
1. CHARGING A BATTERY 2. MAINTENANCE
• Disconnect the charger from power source before cleaning.
• Keep the charger in a dry place out of reach of children.
• If the enclosure of the charger requires cleaning, do not use solvents. Use a dry, soft
cloth only to wipe down the surface. Never let any liquid get inside the charger; never
immerse any part of the charger.
• There are no other parts inside the charger which require maintenance.Do not
take the charger apart. If the charger is damaged, contact your supplier or the
manufacturer.
Mounting The Charging Unit On A Wall
The charging unit can be mounted to a wall or workbench.
The correct dimensions for drill holes can be found on the back of the charging unit; a
template for the mounting hole locations can also be found on the Ozito website.
Note: When mounting on a wall you must use suitable screws, e.g.M3 pan-head
screws, in order to prevent damage to the housing and risk of falling.
OZITO Australia/New Zealand (Head Ofce)
1-23 Letcon Drive, Bangholme, Victoria, Australia 3175.
WARRANTY
IN ORDER TO MAKE A CLAIM UNDER THIS WARRANTY YOU
MUST RETURN THE PRODUCT TO YOUR NEAREST BUNNINGS
WAREHOUSE WITH YOUR BUNNINGS REGISTER RECEIPT. PRIOR TO
RETURNING YOUR PRODUCT FOR WARRANTY PLEASE TELEPHONE
OUR CUSTOMER SERVICE HELPLINE:
Australia 1800 069 486
New Zealand 0508 069 486
TO ENSURE A SPEEDY RESPONSE PLEASE HAVE THE MODEL
NUMBER AND DATE OF PURCHASE AVAILABLE. A CUSTOMER
SERVICE REPRESENTATIVE WILL TAKE YOUR CALL AND
ANSWER ANY QUESTIONS YOU MAY HAVE RELATING TO THE
WARRANTY POLICY OR PROCEDURE.
The benets provided under this warranty are in addition to other rights and
remedies which are available to you at law.
Our goods come with guarantees that cannot be excluded at law. You are
entitled to a replacement or refund for a major failure and for compensation
for any other reasonably foreseeable loss or damage. You are also entitled to
have the goods repaired or replaced if the goods fail to be of acceptable
quality and the failure does not amount to a major failure.
Generally you will be responsible for all costs associated with a claim under
this warranty, however, where you have suffered any additional direct loss as
a result of a defective product you may be able to claim such expenses by
contacting our customer service helpline above.
36 MONTH REPLACEMENT WARRANTY
Your product is guaranteed for a period of 36 months from the original date
of purchase and is intended for DIY (Do It Yourself) use only. If a product is
defective it will be replaced in accordance with the terms of this warranty.
Warranty excludes consumable parts.
WARNING
The following actions will result in the warranty being void.
• If the tool has been operated on a supply voltage other than that specied
on the tool.
• If the tool shows signs of damage or defects caused by or resulting from
abuse, accidents or alterations.
• Failure to perform maintenance as set out within the instruction manual.
• If the tool is disassembled or tampered with in any way.
PXCG-030
Charger LED Indicator Lights
LED Indicator Situation
GREEN (Flashing) Stand By (no battery pack is inserted)
RED (Flashing) Battery is charging (low charge)
RED (Illuminated) Battery is fast charging (mid charge)
GREEN (Illuminated) Battery is 85% - 100% charged and is ready for use.
BOTH(Illuminated) Battery pack is too hot or too cold (charging will begin
automatically when battery reaches correct charging
temperature).
BOTH (Flashing) The battery is deffective, charging is no longer
possible. Do not charge. Contact Ozito Customer
Service.
CAUTION: THE CHARGER SHOULD BE PROTECTED BY
A RESIDUAL CURRENT DEVICE (RATED AT 30MA OR
LESS).
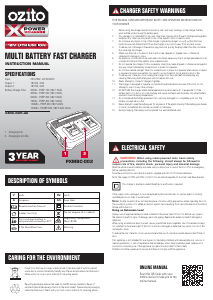
2. Align and then slide the ribs on
the battery into the recess in the
charger.
1. Connect the charger to the power
supply and the LED will ash
green showing power is being
supplied to the charger.
3. The red LED will illuminate while
the battery charges.
4. The green LED will illuminate
once the battery is charged.
0219

Praat mee over dit product
Laat hier weten wat jij vindt van de Ozito PXCG-030 Batterijlader. Als je een vraag hebt, lees dan eerst zorgvuldig de handleiding door. Een handleiding aanvragen kan via ons contactformulier.