
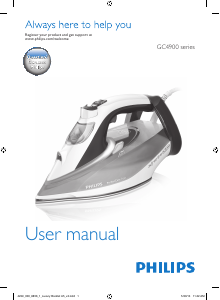
Introduction
Congratulations on your purchase and welcome to Philips! To fully benet from the
support that Philips offers, register your product at www.philips.com/welcome.
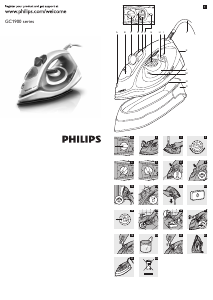
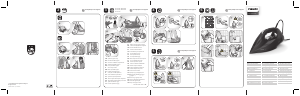
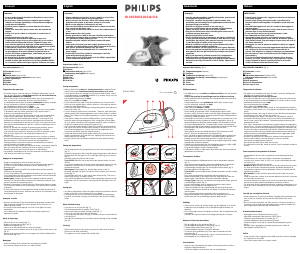
General description (Fig. 1)
A Spray nozzle (all types except GC1903/GC1910)
B Cap of lling opening
C Steam control
- O= no steam
- small cloud = minimum steam
- large cloud = maximum steam
- x = Calc-clean position
D Spray button 8 (all types except GC1903/GC1910)
E Steam boost button \ (all types except GC1903/GC1905/GC1910/GC1920)
F Automatic shut-off light (GC1990/GC1991 only)
G Temperature dial
H Double-Active Calc System (all types except GC1903/GC1905/GC1910/
GC1920)
I Temperature light
J Mains cord
K Type plate
L Water tank
M MAX water level indication
N Soleplate
O Heat-resistant storage cover (GC1981/1991 only)
Important
Read this user manual carefully before you use the appliance and save it for future
reference.
Danger
- Never immerse the iron in water.
Warning
- Check if the voltage indicated on the appliance corresponds to the local mains
voltage before you connect the appliance.
- Do not use the appliance if the plug, the mains cord or the appliance itself shows
visible damage, or if the appliance has been dropped or leaks.
- If the mains cord is damaged, you must have it replaced by Philips, a service
centre authorised by Philips or similarly qualied persons in order to avoid a
hazard.
- Never leave the appliance unattended when it is connected to the mains.
- This appliance is not intended for use by persons (including children) with
reduced physical, sensory or mental capabilities, or lack of experience and
knowledge, unless they have been given supervision or instruction concerning
use of the appliance by a person responsible for their safety.
- Children should be supervised to ensure that they do not play with the
appliance.
- Do not let the mains cord come into contact with the hot soleplate of the iron.
Caution
- Only connect the appliance to an earthed wall socket.
- Check the mains cord regularly for possible damage.
- The soleplate of the iron can become extremely hot and may cause burns if
touched.
- When you have nished ironing, when you clean the appliance, when you ll or
empty the water tank and also when you leave the iron even for a short while:
set the steam control to position O, put the iron on its heel and remove the
mains plug from the wall socket.
- Always place and use the iron on a stable, level and horizontal surface.
- Do not put perfume, vinegar, starch, descaling agents, ironing aids or other
chemicals in the water tank.
- This appliance is intended for household use only.
Electromagnetic elds (EMF)
This Philips appliance complies with all standards regarding electromagnetic elds
(EMF). If handled properly and according to the instructions in this user manual, the
appliance is safe to use based on scientic evidence available today.
Before first use
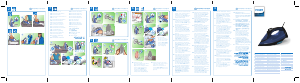
1 Remove any sticker or protective foil from the soleplate.
2 Let the iron heat up to maximum temperature and pass the iron over a piece
of damp cloth for several minutes to remove any residues from the soleplate.
Using the appliance
Filling the water tank
This iron is designed to be used with tap water.
If the tap water in your area is very hard, we advise you to mix it with an equal
amount of distilled water. Do not use distilled water only.
Do not put perfume, vinegar, starch, descaling agents, ironing aids, chemically
descaled water or other chemicals in the water tank.
1 Switch off the appliance and unplug it.
2 Set the steam control to position O (= no steam) (Fig. 2).
3 Openthecapofthellingopening(Fig.3).
4 Tilttheironandllthewatertankuptomaximumlevelunderthetap(Fig.4).
Note: Do not ll the water tank beyond the MAX indication.
5 Closethecapofthellingopening(‘click’).
Selecting temperature and steam setting
Fabric type Temperature
setting
Steam
setting
Steam boost
(specic
types only)
Spray
(specic
types only)
Linen MAX large
cloud
Yes \ Yes 8
Cotton 3 large
cloud
Yes \ Yes 8
Wool 2 small
cloud
No Yes 8
Silk 1 O No No
Synthetic fabrics
(e.g. Acrylic,
nylon, polyamide,
polyester).
1 O No No
Check the laundry care label of the article to be ironed to determine the required
ironing temperature.
If you do not know what kind or kinds of fabric an article is made of, determine the
right ironing temperature by ironing a part that is not visible when you wear or use
the article.
Silk, woollen and synthetic materials: iron the reverse side of the fabric to prevent
shiny patches. Avoid using the spray function to prevent stains.
1 To set the appropriate ironing temperature, turn the temperature dial to the
appropriate position (see the table above) (Fig. 5).
2 Put the iron on its heel.
3 Put the mains plug in an earthed wall socket.
, The temperature light goes on.
Do not set the steam control to a steam setting if you have set a low ironing
temperature (below 2/ WOOL setting) or when the iron is still heating up (as
long as the temperature light is on). Otherwise water will leak from the iron.
4 When the temperature light goes out, wait a while before you start ironing.
, During ironing, the temperature light goes on from time to time. This indicates
that the iron is heating up to the set temperature.
5 Set the appropriate steam setting. Make sure that the steam setting you select
is suitable for the set ironing temperature:
- O for no steam (for all temperature settings). (Fig. 2)
- small cloud for minimum steam (temperature settings 2 and 3. (Fig. 6)
- large cloud for maximum steam (temperature settings 3 to MAX. (Fig. 7)
Features
Spray function (specic types only)
You can use the spray function at any temperature to moisten the article to be
ironed. This helps remove stubborn creases.
1 Make sure that there is enough water in the water tank.
2 Press the spray button several times to moisten the article to be
ironed (Fig. 8).
Steam boost function (specic types only)
A powerful boost of steam helps to remove very stubborn creases.
The steam boost function only works at temperature settings between 3 and
MAX.
1 Press and release the steam boost button (Fig. 9).
Vertical shot of steam (specic types only)
You can also use the steam boost function when you hold the iron in vertical position.
This is useful for removing creases from hanging clothes, curtains etc.
1 Hold the iron in vertical position and press and release the steam boost
button (Fig. 10).
Never direct the steam at people.
Automatic shut-off function (specic types only)
The automatic shut-off function automatically switches off the iron if it has not been
moved for a while.
, Theautomaticshut-offlightashestoindicatethattheironhasbeenswitched
off by the automatic shut-off function (Fig. 11).
To let the iron heat up again:
1 Pick up the iron or move it slightly.
ENGLISH

Praat mee over dit product
Laat hier weten wat jij vindt van de Philips GC1900 Strijkijzer. Als je een vraag hebt, lees dan eerst zorgvuldig de handleiding door. Een handleiding aanvragen kan via ons contactformulier.