
Register your product and get support at
HD9045
HD9046
www.philips.com/welcome
Specifications are subject to change without notice
© 2012 Koninklijke Philips Electronics N.V.
All rights reserved.
HD9045/HD9046_UM_V1.0
EN User manual
RU Руководствопользователя
UK Посібниккористувача
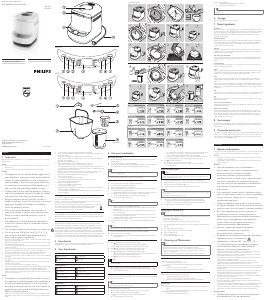
4 Use your breadmaker
Beforetherstuse
1 Remove all packaging material from the appliance. Be careful not to throw away the
kneading blade.
2 Remove any labels from the body of the appliance.
3 To remove any dust that may have accumulated on the appliance, wipe the outside of
the appliance, the bread pan and the kneading blade with a damp cloth.
Note
• Never use scouring pads, abrasive cleaning agents or aggressive liquids such as petrol or
acetone to clean the appliance.
4 Dry all parts thoroughly before you start to use the appliance.
Prepare your breadmaker and ingredients
1 Put your breadmaker on a stable, horizontal and level surface.
2 Turn the bread pan anticlockwise and lift it out.
3 Push the kneading blade rmly onto the shaft.
4 Measure the ingredients for the recipe you want to prepare (see the recipes booklet).
• Always measure ingredients accurately.
• All ingredients should be at room temperature unless recipe suggests otherwise.
5 Put ingredients in the bread pan in the order they are listed in the recipe.
• Always add liquid ingredient rst, and then add dry ingredients.
• Do not let the yeast touch the salt.
Note
• Do not add more quantities than mentioned in the recipe as it may damage the breadmaker.
• Always use active dry yeast with this breadmaker.
• The yeast should be dry and separate from other ingredients when it is added to
the bread pan.
• Butter and other fats should be cut into small pieces before putting in the bread
pan to aid the mixing.
• If necessary, use a spatula to scrape down the sides of the bread pan to get the
mixture sticking to the wall back to the mix.
• During the mixing stage, there will be beep sounds to alert you to add additional
ingredients such as nuts if you wish.
6 Put the bread pan in the appliance. Turn the bread pan clockwise until it locks into
position.
Note
• If the bread pan is not assembled properly, the kneading blade does not turn.
7 Put down the handle of the bread pan and close the lid of the appliance.
8 Put the mains plug in the wall socket.
» The appliance beeps and ‘1’ and ‘3:55’ appear on the display, which refers to the
‘White’ program.
Set your breadmaker
1 Press (menu button) repeatedly to select the program.
• The select program number and processing time are displayed.
• For detailed program description, see section ‘Bread recipe’ below.
2 Press (crust color button) repeatedly to select the crust color.
• The selected crust color can be changed from light to dark.
3 Press (loaf weight button) repeatedly to select the loaf weight.
• Make sure the selected weight is appropriate for the amount of ingredients of the
selected recipe. See section ‘Bread recipe’ below.
4 Press (Start/stop button) to start bread making process.
Caution
• During the baking process, the breadmaker itself and the lid become extremely hot. Be careful
not to burn yourself.
» The display counts down the processing time until the bread is ready.
» When the baking process is nished, the breadmaker beeps and goes to the keep-
warm mode (for 60 minutes).
Preset time for delayed baking
You can use the timer if you want the bread to be ready at a later time. The maximum delay
time that can be set is 13 hours.
Note
• Do not use the timer function with recipes that require fresh ingredients that may go bad, for
instance eggs, fresh milk, sour cream or cheese.
1 Put all ingredients in the bread pan.
2 Select the appropriate program, loaf size and crust color for your recipe.
» The total processing time is shown on the display.
3 Press (preset timer button) to choose the desired preset time.
» The breadmaker enters preset mode.
• For example, if the current time is 19:00 and you want your bread ready at 7:00
next morning (12 hours later), you can set set the preset time to 12:00.
• If you keep the button pressed, the time increases more quickly.
• If the time on the display reaches 13 hours and you still keep the timer button
pressed, the display goes back to the baking time of the set program.
4 Press (start/stop/cancel button).
» The timer counts down the set time in minutes.
» The bread is ready when the timer has counted down to 0:00 and the
breadmaker beeps.
Finish the baking process
Caution
• The inside of the breadmaker, the bread pan, the kneading blade and the bread are very hot.
• Always use oven mitts when you remove the bread pan at the end of the baking cycle or at
any time during the keep-warm mode.
1 To power off the breadmaker, remove the mains plug from the wall socket.
2 Using pot holders or oven mitts, open the lid and turn the bread pan anticlockwise.
3 Grab the bread pan by its handle and lift it out.
4 Turn the pan upside down, hold the handle and shake the bread out.
Note
• Do not use metal utensils to remove the bread, as these may damage the non-stick coating of
the bread pan.
• Be careful, the bread pan and the bread are hot.
5 Use the hook supplied to remove the kneading blade from the shaft/bread.
• Always make sure that the kneading blade does not stay inside the bread,
otherwise you may damage the kneading blade when you slice the bread.
6 Let the breadmaker cool down before you clean it.
Making Yoghurt (HD9046 only)
Note
• Ensure the yogurt container is thoroughly washed with warm water and soap, and it is
dried before making yoghurt.
• Full fat, skim, or 2% milk can be used.
• Make sure the yoghurt is fresh and thus the culture starter is active.
1 The milk and yoghurt mixture proportion is 10:1 (For example: 400ml milk with 40ml
yoghurt).
2 Pour milk into the yoghurt container.
3 Add yoghurt into the yoghurt container, and mix well.
4 Close and tighten the lid.
5 Start the yoghurt program.
» Yoghurt will be ready in 8 hours.
5 Cleaning and Maintenance
Note
• Uplug the breadmaker before starting to clean it.
• Wait until the breadmaker has cooled down sufciently before cleaning it.
• Never immerse the appliance in water or any other liquid, nor rinse it under the tap.
• Never use scouring pads, abrasive cleaning agents or aggressive liquids such as petrol or
acetone to clean the appliance.
• For maximum safety, keep the appliance clean and free of grease and food residues.
Interior
Inside of the cover and the main body:
• Wipe with wrung out and damp cloth.
• Make sure to remove all the food residues stuck to the breadmaker.
Heating element:
• Wipe with wrung out and damp cloth.
• Remove sfood residues with wrung out and damp cloth or toothpicks.
Exterior
Surface of the cover lid and outside of the main body:
• Wipe with a cloth damped with soap water.
• ONLY use soft and dry cloth to wipe the control panel.
• Make sure to remove all the food residues around the control buttons.
Accessories
Bread pan:
• Clean the bread pan with a soft cloth moistened with hot water or washing-up
liquid.
• Do not immerse the bread pan in water and do not clean it in the dishwasher.
Kneading blade, measuring spoon and cup, and hook:
• Soak in hot water and clean with sponge.
3140 035 30602
X7
X8
X9
X10
X11
X1
X2
X3
X4
X5 X6
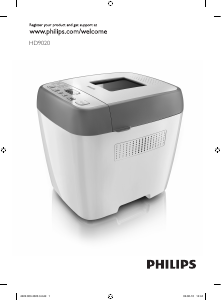
HD9045 HD9046
HD9045/HD9046
6
1
1
2
2
9
10
11 12
2
BEEP
1
5
4
2
7
3
6
2
BEEP
1
1
Y
O
G
H
T
U
R
T
8
1
1
2
2
English
1 Important
Read this user manual carefully before you use the appliance, and save the user manual for
future reference.
Danger
• Never immerse the body of the breadmaker in water or any other liquid, nor rinse it
under the tap.
• Do not cover the steam and air vents while the breadmaker is operating.
Warning
• This appliance can be used by children aged from 8
years and above and persons with reduced physical,
sensory or metal capabilities or lack of experience
and knowledge if they have been given supervision
or instruction concerning use of the appliance in a
safe way and understand the hazards involved.
• Children shall not play with the appliance. Cleaning
and user maintenance shall not be made by children
unless they are older than 8 and supervised.
• Keep the appliance and its cord out of reach of
children less than 8 years. Do not let the mains cord
hang over the edge of the table or worktop on
which the appliance stands.
• If the mains cord is damaged, you must have it
replaced by Philips, a service centre authorised by
Philips or similarly qualied persons in order to
avoid a hazard.
• The appliance is not intended to be operated by
means of an external timer or a separate remote
control system.
• The accessible surfaces may become hot during use.
• Do not put over 560 g our, and 9 g, 12 g, 14 g
yeast for general bread, super rapid bread, and
easter cake programs respectively.
• Check if the voltage indicated on the appliance corresponds to the local mains voltage
before you connect the appliance.
• Only connect the appliance to an earthed wall socket. Always make sure that the plug
is inserted rmly into the wall socket.
• Do not use the appliance if the plug, the mains cord, the body of the appliance or the
bread pan is damaged.
• Make sure that the heating element, the rotating shaft of the bread pan and the outside
of the bread pan are clean and dry before you put the plug in the wall socket.
• Do not use the appliance for any other purpose than described in this manual.
• Do not plug in the appliance or operate the control panel with wet hands.
• Do not come near the steam and air vents with your face or hands when the appliance
is operating.
• Do not open the lid during the baking process, as this may cause the dough or bread
to collapse.
• During the baking process, the appliance itself and the lid become extremely hot. Be
careful not to burn yourself.
• Do not remove the bread pan from the appliance during use.
• Never use any utensils to mix the ingredients in the bread pan during a baking program.
• Only put ingredients in the bread pan. Do not put or spill any ingredients and/or
additives in the inside of the appliance to avoid damage to the heating element.
• When you remove jam from the bread pan, lift the bread pan with both hands in oven
mitts to pour out the hot jam.
Caution
• This appliance is intended for household use only. If
the appliance is used improperly or for professional
or semi-professional purposes or if it is not used
according to the instructions in the user manual, the
guarantee becomes invalid and Philips refuses any
liability for damage caused.
• Never use any accessories or parts from other manufacturers or that Philips does not
specically recommend. If you use such accessories or parts, your guarantee becomes
invalid.
Yoghurt container with lid:
• Thoroughly washed with warm water and soap.
• Make sure it is dried before use.
Tip
• After baking, immediately remove the kneading blade from the bread pan to prevent it from
getting stuck.
6 Storage
Store your breadmaker in a safe and dry place.
7 Bread ingredients
Breadour
Bread our has high content of high gluten (so it can be also called high-gluten our which
contains high protein), it has good elastic and can keep the size of the bread from collapsing
after rise. As the gluten content is higher than the common our, so it can be used for
making bread with large size and better inner ber. Bread our is the most important
ingredient of making bread.
Whole-wheatour
Whole-wheat our is ground from grain. It contains wheat skin and gluten. Whole-wheat
our is heavier and more nutrient than common our. The bread made by whole-wheat
our is usually small in size. So many recipes usually combine the whole -wheat our or
bread our to achieve the best result.
Ryeour
Rye our has high ber level but it has lower gluten content than wheat our. Rye bread
usually has darker color and stronger taste than white and wheat bread. It should be used
with bread our in this breadmaker.
Cornourandoatmealour
Corn our and oatmeal our are ground from corn and oatmeal separately. They are the
additive ingredients of making rough bread, which are used for enhancing the avor and
texture.
Allpurposeour
It has weaker gluten than bread our. In our recipes, it can be used for Easter cake, cake,
steam bun and fried bread sticks.
Sugar
Sugar is very important ingredient to increase sweet taste and color of bread. And it is also
considered as nourishment in the yeast bread. White sugar is largely used. Brown sugar,
powder sugar or cotton sugar may be called by special requirement.
Yeast
After yeasting process, the yeast will produce carbon dioxide. The carbon dioxide will
expand bread and make the inner ber soften. For this breadmaker, please use active dry
yeast.
Yeast must be stored in the refrigerator, as the fungus in it will be killed at high temperature,
before using, check the production date and storage life of your yeast. Store it back to the
refrigerator as soon as possible after each use. Usually the failure of bread rising is caused by
the bad yeast.
Salt
Salt is necessary to improve bread avor and crust color. But salt can also restrain yeast from
rising. Never use too much salt in a recipe. But bread would be larger if without salt.
Egg
Eggs can improve bread texture, make the bread more nourish and large in size, the egg
should be stirred evenly.
Grease, butter and vegetable oil
Grease can make bread soften and delay storage life. Butter should be melted or chopped to
small particles before using.
Water and other liquid
Water is essential ingredient for making bread. Generally speaking, water temperature
between 20°C and 25°C is the best. The water may be replaced with fresh milk or water
mixed with 2% milk powder, which may enhance bread avor and improve crust color.
Some recipes may call for juice for the purpose of enhancing bread avor, e.g. apple juice,
orange juice, lemon juice and so on.
8 Environment
Do not throw away the appliance with normal household waste at the end of its life, but
hand it in at an ofcial collection point for recycling. By doing this, you can help to preserve
the environment.
9 Guarantee and service
If you need service or information, or if you have a problem, visit the Philips website at www.
philips.com or contact the Philips Customer Care Center in your country. You can nd its
phone number in the worldwide guarantee leaet. If there is no Customer Care Center in
your country, go to your local Philips dealer.
Русский
1 Важнаяинформация
Перед эксплуатацией прибора внимательно ознакомьтесь с настоящим руководством и
сохраните его для дальнейшего использования в качестве справочного материала.
Опасно!
• Запрещается погружать корпус хлебопечи в воду или другие жидкости, а также
промывать его под струей воды.
• Не закрывайте отверстия выхода пара и вентиляционные отверстия во время
работы хлебопечи.
Внимание!
• Данным прибором могут пользоваться
дети старше 8 лет и лица с ограниченными
возможностями сенсорной системы,
интеллектуальными или физическими
возможностями, а также лица с недостаточным
опытом и знаниями под присмотром других
лиц или после инструктирования о безопасном
использовании прибора и потенциальных
опасностях.
• Не позволяйте детям играть с прибором. Дети
могут осуществлять очистку и уход за прибором,
только если они старше 8 лет и только под
присмотром взрослых.
• Храните прибор и шнур в месте, недоступном
для детей младше 8 лет. Не допускайте свисания
шнура с края стола или места установки прибора.
• В случае повреждения сетевого шнура его
необходимо заменить. Чтобы обеспечить
безопасную эксплуатацию прибора, заменяйте
шнур только в авторизованном сервисном
центре Philips или в сервисном центре с
персоналом высокой квалификации.
• Данное устройство нельзя подключать
к внешнему таймеру или системам
дистанционного управления.
• Во время использования устройства некоторые
поверхности могут нагреваться.
• Добавляйте не более 560 г муки и 9 г, 12 г,
14 г дрожжей при использовании программ
приготовления обычного хлеба, экспресс-
выпечки и куличей соответственно.
• Перед подключением прибора убедитесь, что указанное на нем номинальное
напряжение соответствует напряжению местной электросети.
• Подключайте прибор только к заземленной розетке. Убедитесь, что сетевая
вилка правильно вставлена в розетку электросети.
• Не пользуйтесь прибором, если поврежден сетевой шнур, штепсельная вилка,
корпус прибора или форма для выпечки.
• Перед тем как вставить вилку в розетку электросети, убедитесь, что
нагревательный элемент, вращающийся вал формы для выпечки и внешняя
поверхность формы для выпечки являются чистыми и сухими.
• Не используйте прибор для целей, отличных от описанных в данном руководстве.
• Запрещается включать устройство в сеть или пользоваться панелью управления с
мокрыми руками.
• Во время работы прибора соблюдайте достаточное расстояние от отверстий
выхода пара и вентиляционных отверстий, чтобы не обжечь лицо и руки.
• Не открывайте крышку в процессе выпекания, т.к. тесто может сесть.
• В процессе выпекания прибор и крышка являются очень горячими. Соблюдайте
осторожность, чтобы не обжечься.
• Не извлекайте форму для выпечки во время использования.
• В процессе выпекания не перемешивайте ингредиенты в форме для выпечки
кухонными принадлежностями.
• Только поместите ингредиенты в форму для выпечки. Не добавляйте в прибор
ингредиенты и/или добавки, чтобы не повредить нагревательный элемент.
• Чтобы удалить повидло из формы для выпечки, наденьте кухонные рукавицы,
двумя руками поднимите форму для выпечки и слейте горячее повидло.
Предупреждение
• Прибор предназначен только для домашнего
использования. В случае нарушения
• Do not touch the bread pan with sharp utensils to avoid damage.
• Do not expose the appliance to high temperatures, nor place it on a working or still
hot stove or cooker.
• Always place the appliance on a stable, level and horizontal surface.
• Always put the bread pan in the appliance before you put the plug in the wall socket
and switch on the appliance.
• Always unplug the appliance after use.
• Always let the appliance cool down before you clean or move it.
• Do not place the bread pan in a conventional oven to bake bread.
• The accessible surfaces may become hot when the appliance is operating. Always use
oven mitts when you lift the bread pan by its handle or when you handle the hot bread
pan, the kneading blade or the hot bread.
• Beware of the hot steam that comes out of the steam vents during baking or out of
the breadmaker when you open the lid during or after the baking process.
• Do not lift and move the appliance while it is operating.
• Do not touch moving parts.
• Do not expose the appliance to direct sunlight.
• Do not insert metallic objects or alien substances into the steam vents.
• Do not use the bread pan if it is damaged.
• Always clean the appliance after use.
• Do not clean the appliance in the dishwasher.
• Do not use the appliance outdoors.
• Leave a free space of at least 10cm above, behind and on both sides of the appliance
to prevent damage due to radiated heat.
• To avoid damage to the appliance, do not place the bread pan or any other object on
top of the appliance.
Recycling
Your product is designed and manufactured with high quality materials and components,
which can be recycled and reused.
When you see the crossed-out wheel bin symbol attached to a product, it means the
product is covered by the European Directive 2002/96/EC:
Never dispose of your product with other household waste. Please inform yourself about
the local rules on the separate collection of electrical and electronic products.
The correct disposal of your old product helps prevent potentially negative
consequences on the environment and human health.
Electromagneticelds(EMF)
This Philips appliance complies with all standards regarding electromagnetic elds (EMF). If
handled properly and according to the instructions in this user manual, the appliance is safe
to use based on scientic evidence available today.
Power failure backup
This appliance has a backup function that remembers the status before a power failure,
provided the power supply resumes within 10 minutes. If the power failure occurs during
a cooking process, the countdown of the cooking time continues where it left off when
the power supply resumes. If the power failure lasts longer than 10 minutes and the failure
occurs during a cooking process, the breadmaker automatically resets to the preset setting
when the power supply resumes. Open the breadmaker, remove its contents and start all
over again. If you have set the timer and the preset cooking process has not yet started when
a power failure occurs, the breadmaker automatically resets to the preset setting when the
power supply resumes. Open the breadmaker, remove its contents and start all over again.
2 Introduction
Congratulations on your purchase and welcome to Philips! To fully benet from the support
that Philips offers, register your product at www.philips.com/welcome.
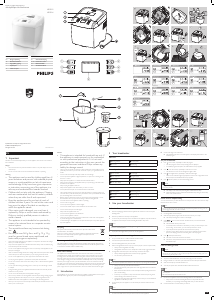
3 Your breadmaker
Main unit
Viewing window Control panel
Cover lid Mains plug
Control panel
CYCLE Preset timer
Loaf weight Program menu
Crust color Start/stop/cancel button
LCD status display
Accessories
Kneading blade Measuring spoon
Bread pan Measuring cup
Hook
Yoghurt container with lid (HD9046 only)
(HD9046 only)
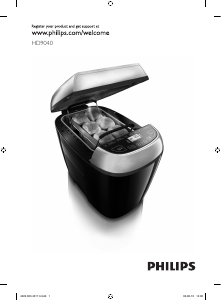
HD9045
HD9046


Praat mee over dit product
Laat hier weten wat jij vindt van de Philips HD9045 Broodbakmachine. Als je een vraag hebt, lees dan eerst zorgvuldig de handleiding door. Een handleiding aanvragen kan via ons contactformulier.