
HR1830
Register your product and get support at
www.philips.com/welcome
English
1 Important safety instructions
Read this user manual carefully before you use the appliance, and save
the user manual for future reference.
Danger
•
Do not immerse the main unit of the juicer in water, any other
uid, nor rinse it under the tap. Use only a moist cloth to clean.
Warning
•
Check if the voltage indicated on the juicer corresponds to the
local power voltage before you connect it.
• Do not connect the appliance to an external timer to prevent
danger.
• Only connect the juicer to a grounded power outlet. Always make
sure that the plug is inserted rmly into the power outlet.
• Make sure that the damaged power cord is replaced by Philips, a
service center authorized by Philips or similarly qualied persons in
order to avoid a hazard.
• If you detect cracks in the lter, the driving shaft, or any accessories
is damaged in any way, do not use the appliance anymore and
contact the nearest Philips service center. Do not replace parts of
the appliance yourself.
• This appliance is not intended for use by persons (including
children) with reduced physical, sensory or mental capabilities, or
lack of experience and knowledge, unless they have been given
supervision or instructions concerning use of the appliance by a
person responsible for their safety.
• For their safety, do not allow children to play with the appliance.
• Keep the appliance and its power cord out of the reach of children.
Do not hang the power cord over the desk or table edge, where
you place the appliance.
• To prevent a short circuit or an electric shock, make sure that your
hands are dry before you insert the plug into the power outlet and
switch on the appliance.
• Never let the appliance run unattended.
• Never reach into the feeding tube and the main unit with your
ngers or an object while the juicer is running. Never use any
objects to replace the pusher. Keep your eyes from the feeding
tube to avoid accidents.
Caution
•
This appliance is intended for household use only.
• Never use any accessories or parts from other manufacturers
or that Philips does not specically recommend. If you use such
accessories or parts, your guarantee becomes invalid.
• Do not use this appliance on an unstable or uneven surface.
• Before you insert the plug into the power outlet, make sure that
the appliance is assembled correctly.
• Unplug the appliance immediately after use.
Specifications are subject to change without notice
© 2013 Koninklijke Philips N.V.
All rights reserved.
HR1830_UM_ASEAN_V0.1
4241 210 14521
1
2
3
4
1
1
1
1
2
4
6
7 8
1
23
5
2
1
2
3
3
3
5 6
4
2
3
2
1
3 4 5
321
2
d
k
l
e
abc
f h i jg
• Switch off and unplug the appliance from the power outlet after
use. Wait till the main unit and the driving shaft stop turning, then
you can take out any accessories from the main unit.
• Cut large ingredients into pieces that t into the feeding tube.
Remove stones, cores, seeds, and thick peels in fruits or vegetables
before juicing.
• Do not exert too much pressure on the pusher, since this would
affect the quality of the end result and it could even cause the
driving shaft to come to a halt.
• Food coloring can discolor components. This is normal and has no
impact on use.
• This appliance comes with an intelligent protection chip, it will
automatically stop working after about 20 minutes of continuous
running. Allow the appliance to cool down and stop for 20 - 30
minutes before re-use. This makes the appliance more durable.
• This appliance comes with a protected design. When the driving
shaft is blocked or stuck, the appliance will sound once and come
to stop.
• When the appliance is stopped and cannot automatically reverse,
switch the power button to O. Then, switch the power button to
REV to clear the ingredients from the appliance. Switch the power
button to ON again to use the appliance. If it is still blocked, we
suggest to clean the driving shaft before you re-use again. This is to
protect the appliance.
• To prevent damages due to heat deformation, never use water that
have a temperature of over 60°C and microwave oven to clean all
components.
• Do not use scouring pads, abrasive cleaning agents or aggressive
liquids such as petrol, alcohol or acetone to clean the appliance.
Electromagnetic Fields (EMF)
This Philips appliance complies with all applicable standards and
regulations regarding exposure to electromagnetic elds.
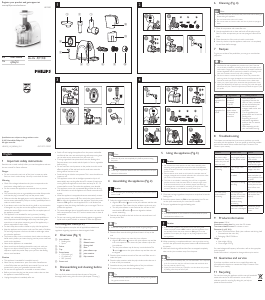
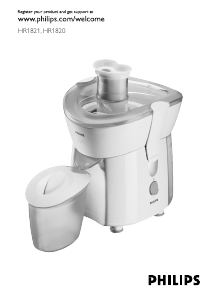
2 Overview (Fig. 1)
a Juice collector
• Feeding tube
• Spout
b Pusher
c Tr ay
d Power button
• ON (switch on)
• O (switch off)
• REV (reverse)
e Power cord
f Main unit
g Release button
h Driving shaft
i Filter
j Juice collector cap
k Juice container
l Pulp container
3 Disassembling and cleaning before
first use
Take out all the accessories and clean the parts of the juicer
thoroughly before using it the rst time (see chapter “Cleaning”).
Note
• Make sure all parts are completely dry before you start using
the juicer.
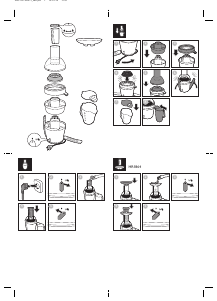
Tip
•
Follow Fig. 4-4, press the release button and meanwhile turn the juice
collector to disassemble.
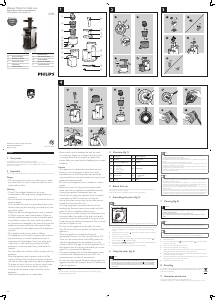
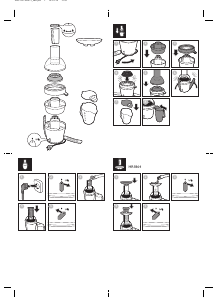
4 Assembling the appliance (Fig. 2)
Caution
•
Before assembling and connecting to the power, make sure the power
button is at O.
1 Follow the pictorial steps to assemble the juicer.
• Align the ▼ and the icons on the juice collector and the main
unit respective. Then, insert the juice collector to the main unit.
• Turn the juice collector in anti-clockwise. You will hear a “click”
sound, and the ▼ and the
icons are aligned to indicate
correct assembling.
2 Point the driving shaft to the hole in the main unit, and insert it all
the way to the end.
Tip
•
Rotate the driving shaft for the screw threads to get a good grip.
3 Place the lter onto the driving shaft, and insert it all way to the
end.
4 Place the juice collector cap onto the juicer collector.
• Align the ▼ and the icons on the juice collector cap and the
main unit respective. Then, insert the juice collector cap to the
juice collector.
• Turn the juice collector cap all the way in anti-clockwise. The
▼ and the
icons on the juice collector cap and the main unit
are aligned.
5 Place the juice container at notch of the main unit. Make sure it is
under the spout.
6 Place the pulp container under the pulp window, and make sure it
is close to the juice container.
7 Assemble the tray onto the feeding tube of the juice collector.
8 Connect to the power, and start extracting juice.
Tip
•
The tray is especially suitable for your ease in adding small ingredients
like grapes, strawberries, etc.
5 Using the appliance (Fig. 3)
Caution
•
Do not exert too much pressure on the pusher, especially when
extracting hard ingredients like carrots, since this would affect the
quality of the end result and it could even cause the driving shaft to
come to a halt.
• Remove stones, cores, seeds, or thick peels, for examples those of
oranges, pineapples and uncooked beetroots. Also, remove the white
pith of citrus fruits because it has a bitter taste.
• This juicer is not suitable in extracting juice of fruits or vegetables
that are extra hard and with extra bers, for example sugar canes.
Fruits that contain starch, such as bananas, papayas, avocados, gs
and mangoes are not suitable for processing in the juicer. Use a food
processor, blender or bar blender to process these fruits.
1 Clean and cut large ingredients into pieces or strips that t into the
feeding tube.
2 Switch the power button to ON to start extracting juice. Do not
run the juicer continuously for more than 20 minutes.
3 Put your ingredients through the feeding tube.
Tip
•
If the pulp container or juice container is full, disconnect the power
and clean them before re-use.
Caution
•
If you nd the ingredients are blocked around the driving shaft,
switch the power button to REV mode to clear the ingredients from
the appliance. Switch the power button to ON again to use the
appliance. Do not place your ngers or any foreign objects to clear
the ingredients.
4 When processing is complete and there is not more juice coming
out from the spout, switch the power button to O and disconnect
the power.
5 Wait until the driving shaft and the lter are stopped completely,
take out the juice container away from the spout.
Tip
•
Drink the juice immediately after you have extracted it. If it is exposed
to air for some time, the juice will lose its taste and nutritional value.
• Do not preserve pulps for long.
• Apple juice turns brown very quickly. You can slow down this process
by adding a few drops of lemon juice.
6 Cleaning (Fig. 4)
Note
•
Disconnect the power and remove the power cord before cleaning or
disassembling this appliance.
• Do not immerse the main unit in water.
• Do not use water to rinse the main unit. Use dry cloth or sponge to
clean.
1 Clean all components with water after use.
2 Use the supplied brush to clean and brush off the pulps on the
lter. For other components, you can use sponge to clean off the
pulps.
3 Clean the exterior of the main unit with a moist cloth.
4 Use a dry cloth to wipe the appliance, make sure it is completely
dry and clean before storage.
7 Recipes
To give you an idea of the possibilities, you can go to www.kitchen.
philips.com.
Tip
•
Use fresh fruit and vegetables; they contain more juice. Fruits that
are particularly suitable for processing in the juicer are apples, pears,
watermelon, oranges, grapes, kiwi, strawberries, pineapple, cantaloupe,
and etc. Vegetables that are particularly suitable for processing in the
juicer are tomatoes, carrots, turnip, celery, cabbage, etc.
• You do not have to remove thin peels or skins. Only remove thick
peels, e.g. those of oranges, pineapples and uncooked beetroots. Also
remove the white pith of citrus fruits because it has a bitter taste.
• When you prepare apple juice, remember that the thickness of the
apple juice depends on the apple you are using. The juicier the apple
the thinner the juice. Choose an apple that produces the type of juice
you prefer.
Recipes Ingredients Making method
Mixed
vegetable fruit
juice 1
10 cherry
tomatoes,
3 oranges,
1 carrot
• Wash and clean all
ingredients. Remove the
stems of cherry tomatoes,
carrots, and strawberries.
Remove the peels of
oranges, water melon, and
cucumber.
• Cut all ingredients into
pieces which can t into the
feeding tube.
• Extracting juice out of
soft texture ingredients,
and then the rm texture
ingredients.
• After extracting, stir the
juice well before serving.
Mixed
vegetable fruit
juice 2
500g of
water melon,
10 strawberries,
½ stem of
cucumber
8 Troubleshooting
This chapter summarizes the most common problems you could
encounter with the appliance. If you are unable to solve the problem
with the information below, contact the Philips Consumer Care
Center in your country.
Problem Possible cause Solution
After connecting to
the power outlet
and press the “Start”
button, the juicer still
does not work.
The power plug is
not plugged properly
to the power socket.
Connect the power
plug properly to the
power socket.
Change the power
socket and try again.
Stop in the middle of
processing.
The voltage is too
low.
Check whether the
voltage is too low.
Too much ingredient
is added.
Disconnect from the
power, and take out
extra ingredients from
the juicer.
The juicer is running
too long.
This is normal. Wait
for the juicer to cool
down before next
use.
Too much noise
in the middle of
processing.
The driving shaft
and the lter are not
properly assembled,
which leads to a
vibration during
processing.
Assemble the driving
shaft and the lter
properly.
The motor in the
main unit is damaged.
Contact the Philips
Consumer Care
Center.
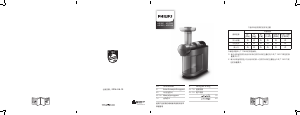
9 Product information
Motor power: 150 W
Continuous running time: No more than 20 minutes
Time interval before re-use: 20 minutes or more
Dimension (L x W X H)
• Juicer: 303x166x344mm (Both juicer collector and driving shaft
mounted onto the main unit)
• Packaging: 438x217x284mm
Weight
• Net weight: 4.06 kg
• Gross weight: 5.25 kg
For rated voltage and frequency information, refer to the type plate
on the product.
Product information is subjected to change without prior notice.
10 Guarantee and service
If you have a problem, need service, or need information, see
www.philips.com/support or contact the Philips Consumer Care
Center in your country.
11 Recycling
Do not throw away the appliance with the normal household
waste at the end of its life, but hand it in at an ofcial
collection point for recycling. By doing this, you help to
preserve the environment.
EN User manual
TH
คู่มือผู้ใช้
ZH-CN 用户手册


Praat mee over dit product
Laat hier weten wat jij vindt van de Philips HR1830 Sapcentrifuge. Als je een vraag hebt, lees dan eerst zorgvuldig de handleiding door. Een handleiding aanvragen kan via ons contactformulier.