4
English
1 Important
Read these instructions for use carefully before using the appliance and save them for future
reference.
Danger
• Do not immerse the motor unit in water nor rinse
it under the tap.
• Do not connect the appliance to a timer switch.
Warning
• Before you connect the appliance to the power,
make sure that the voltage indicated on the bottom
of the appliance corresponds to the local power
voltage.
• If the power cord, the plug, or other parts are
damaged, do not use the appliance.
• If the power cord is damaged, you must have it
replace by Philips, a service center authorized
byPhilips,orsimilarlyqualiedpersontoavoida
hazard.
• This appliance is not intended for use by persons
(including children) with reduced physical, sensory
or mental capabilities, or lack of experience and
knowledge, unless they have been given supervision
or instruction concerning use of the appliance by a
person responsible for their safety.
• For their safety, do not allow children to play with
the appliance.
• Be very careful when you handle the cutter,
especially when you remove it from the worm shaft
and during cleaning. The cutting edges are very
sharp!
• Before you remove any accessory, switch the
appliance off and unplug it.
• Donotuseyourngersoranobject(e.g.aspatula)
to push ingredients into the hopper while the
appliance is running. Only the pushers are to be
used for this purpose.
• Donotinsertyourngersinthemetaldrumwhile
the appliance is running.
Caution
• The appliance is intended for household use only.
• Before you connect the appliance to the mains,
make sure that the appliance is assembled correctly.
• Never use any accessories or parts from other
manufacturersorthatPhilipsdoesnotspecically
recommend. If you use such accessories or parts,
your guarantee becomes invalid.
• Always switch the appliance off by pressing the /
button.
• Do not let the appliance run unattended.
• Do not exceed the maximum operating time of
10 minutes at all applications.
• Do not switch the appliance to Reverse mode
when using the plastic hopper.
• Noise level: Lc = 87 dB [A]
Safety system
This appliance is equipped with overheat protection. If the appliance overheats, it switches
off automatically. Unplug the appliance and let it cool down until room temperature. Then,
put the mains plug back into the power outlet and switch on the appliance again. Please
contact your Philips dealer or an authorized Philips service center if the overheat protection
is activated too often.
The appliance is also equipped with mechanical protection. To protect the motor, the plastic
gear has been designed to break if bones or utensils are fed into the appliance. When this
happens, simply remove the gear and exchange it.
Electromagnetic elds (EMF)
ThisPhilipsappliancecomplieswithallstandardsregardingelectromagneticelds(EMF).If
handled properly and according to the instructions in this user manual, the appliance is safe
tousebasedonscienticevidenceavailabletoday.
Recycling
Your product is designed and manufactured with high quality materials and
components, which can be recycled and reused.
When you see the crossed-out wheel bin symbol attached to a product, it means the
productiscoveredbytheEuropeanDirective2002/96/EC:
Never dispose of your product with other household waste. Please inform yourself
about the local rules on the separate collection of electrical and electronic products.
The correct disposal of your old product helps prevent potentially negative
consequences on the environment and human health.
2 Introduction
CongratulationsonyourpurchaseandwelcometoPhilips!Tofullybenetfromthesupport
that Philips offers, register your product at www.philips.com.
With this product, you can
• mince meat
• make sausages
• make kebbe
• makecookies(HR2728only)
• cutvegetablesandgratecheese(HR2728,HR2729,HR2526only)
• crushice(HR2728only)
Tip
• For more recipes, go to www.kitchen.philips.com.
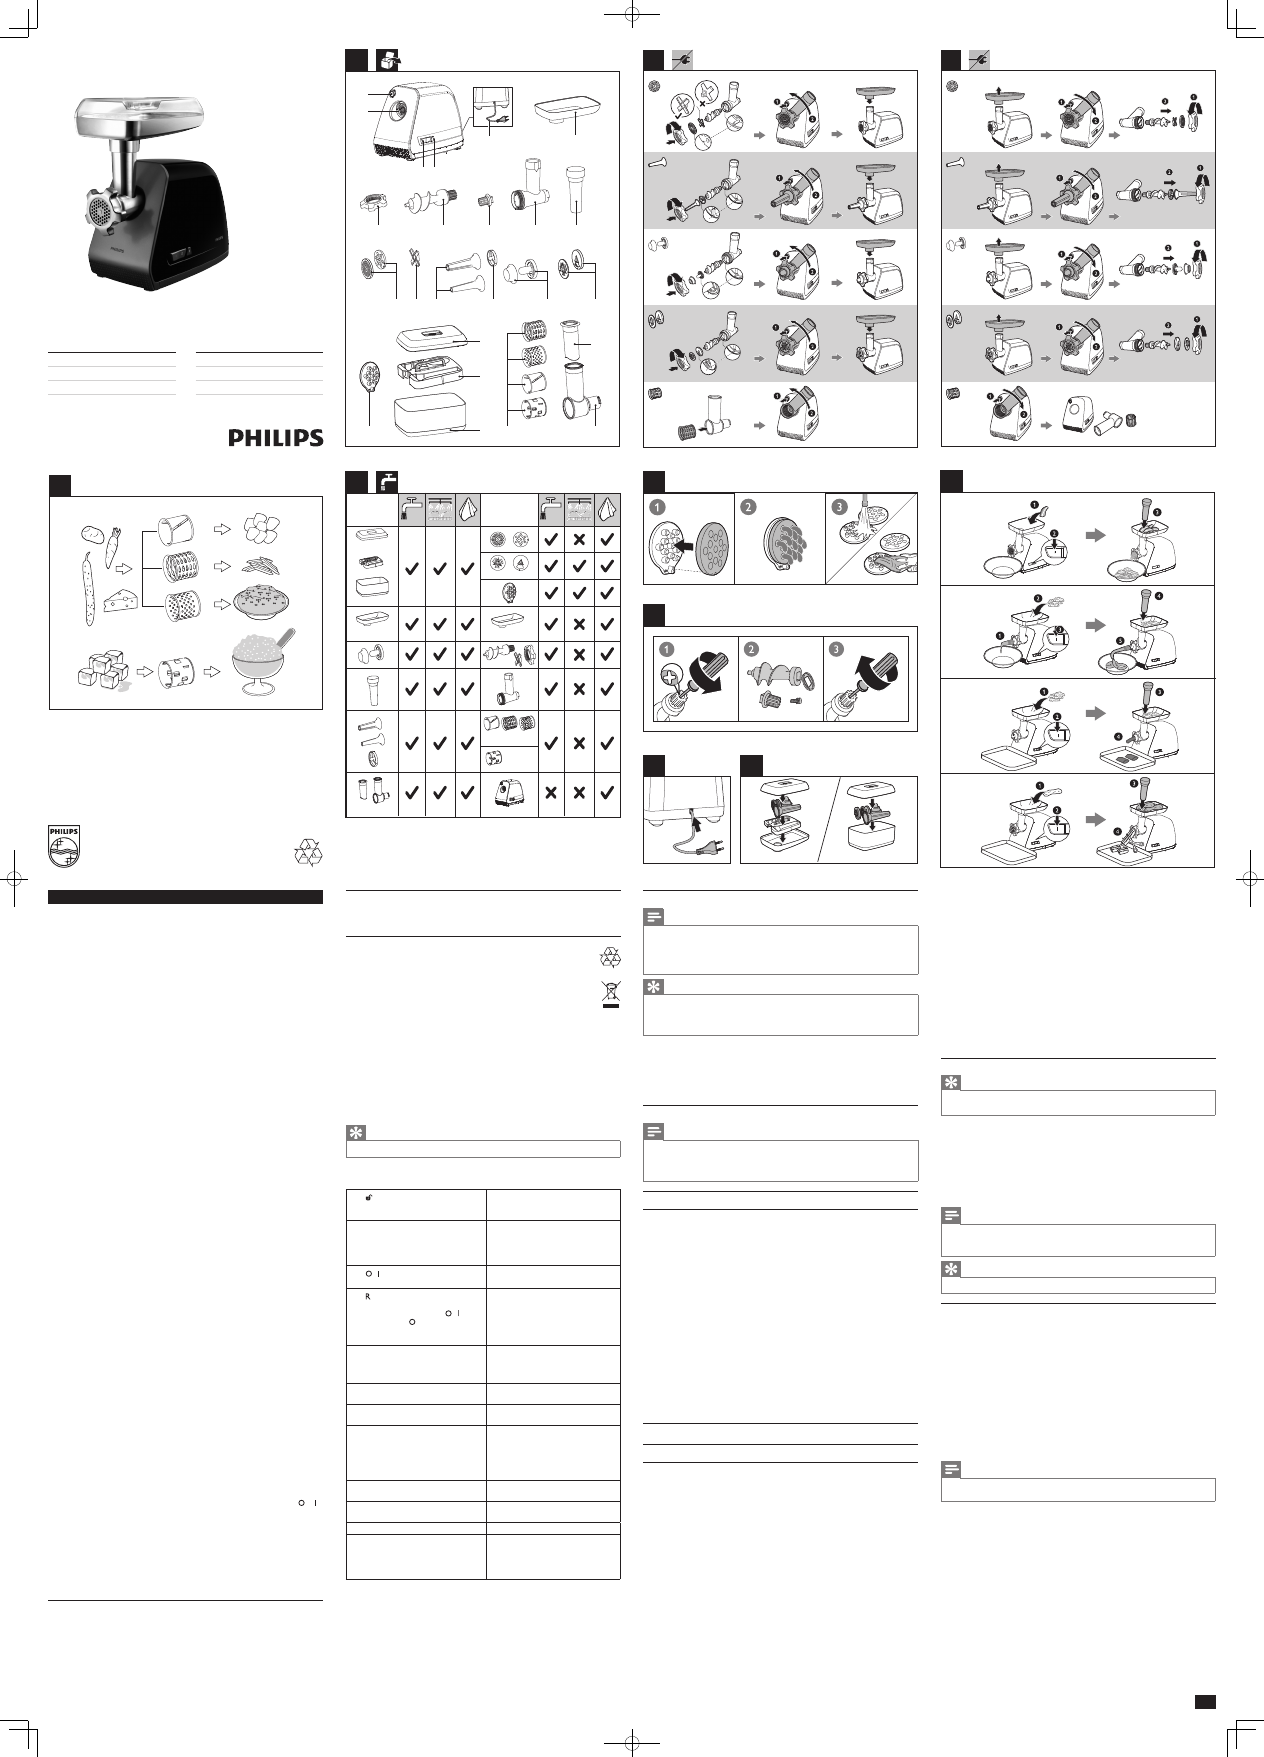
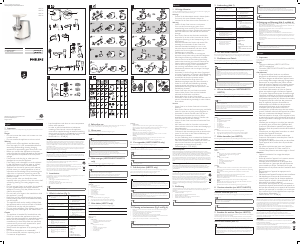
3 What’s in the box (Fig. 1)
a Hopper release button
• Pressandholditwhenyou
remove the hopper.
m Cutter/Knife
b Motor unit n Sausage horns
• A: Large sausage horn (diameter
of22mm)
• B: Small sausage horn (diameter
of12mm)
c /
• Switchofforontheappliance.
o Sausage separator
d (Reverse)
• Switchittoreversethemotor.
(only active when the / switch
is in the “ “ position)
• Releaseittostopthemotor
reverse.
p Kebbe maker
• A: Kebbe separator
• B: Kebbe shaper
e Power cord q Cookie maker (for HR2727 WEU
and HR2728)
• A:Cookieseparator
• B:Cookieshaper
f Feeding tray r Pusher for the plastic hopper
(HR2728, HR2729, HR2526 only)
g Pusher for the metal hopper s Plastic hopper (HR2728, HR2729,
HR2526 only)
h Metal hopper t Metal drums (HR2728, HR2729,
HR2526 only)
• A:Coarsegraterdrum
• B: Fine grater drum
• C: Slicer drum
• D: Ice drum (HR2728only)
i Extra gear for the worm shaft u Dust cover (HR2726, HR2727,
HR2728,HR2526 only)
j Worm shaft v Accessories tray (HR2726, HR2727,
HR2526 only)
k Screw ring w Accessories tray (for HR2728)
l Grinding discs
• A:Coarsegrindingdisc(diameter
of 8 mm)
• B: Fine grinding disc (diameter of
5mm)
x Innovative cleaning tool
4 Mince meat
Beforeyouusetheapplianceforthersttime,thoroughlycleanthepartsthatcomeinto
contact with food.
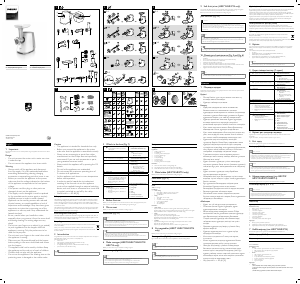
Beforeyoustart,makesureyouassembleaccordingtoFig.2-1.
For disassembly, refer to Fig. 3-1.
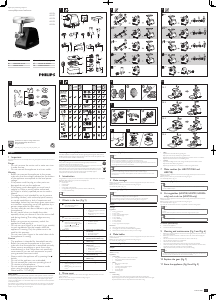
Mince meat (Fig. 10-1)
Note
• Never grind bones, nuts, or other hard items.
• Neverusefrozenmeat!Beforeyougrindthemeat,defrostitrst.
• Do not overload the appliance by pushing too much meat into the hopper.
• You can select the appropriate grinding disk for the preferred granularity of minced meat. You
canalsogrindmorethanoncefornertexture.
Tip
• Remove bones, gristle, and sinews out of the meat as much as possible.
• Beforeyourmakesausages,mincethemeatrst.(referto"Makesausages")
• If the hopper is stuck, switch off the appliance and then switch it to Reverse mode to clear
the stuck stuff.
5 Make sausages
Beforeyouusetheapplianceforthersttime,thoroughlycleanthepartsthatcomeinto
contact with food.
Beforeyoustart,makesureyouassembleaccordingtoFig.2-2.
Fordisassembly,refertoFig.3-2.
Make sausages (Fig. 10-2)
Note
• Makesurethattheprojectionsonthehopperalignwiththenotchesofthemotor.
• Do not block the air outlet grooves of the sausage horn.
• Do not make the sausages too thick in case the sausage skin is overstretched.
• Keep the sausage skin wet to prevent it from sticking on the sausage horn.
Recipe
Sausages
Ingredients:
• 4,500ggroundpork
• 5Tbsp.ofsalt
• 1 Tbsp. of ground white pepper
• 2Tbsp.ofrubbedsage
• 1 tsp. of ginger
• 1 Tbsp. of nutmeg
• 1 Tbsp. of thyme
• 470 ml ice water
• 1 Tbsp. of ground hot red pepper
Directions:
1 Mincethemeatwiththecoarsegrindingdisc.
2 Thoroughly mix the minced meat and other ingredients.
3 Follow the instructions above to make your own sausages.
6 Make kebbe
Beforeyouusetheapplianceforthersttime,thoroughlycleanthepartsthatcomeinto
contact with food.
Beforeyoustart,makesureyouassembleaccordingtoFig.2-3.
For disassembly, refer to Fig. 3-3.
Make kebbe (Fig. 10-3)
Recipe
Kebbe
Yield: 5-8servings
Ingredients:
• Outer casing
• 500glamborfat-freemutton,cutintostrips
• 500gbulgurwheat,washedanddrained
• 1 small onion
• Filling
• 400 g lamb, cut into strips
• 15mloil
• 2mediumonions,nelychopped
• 5-10mlgroundallspice
• 15mlplainour
• salt and pepper
Directions:
• Outer casing
1)Mincethemeat,wheat,andoniontogetherwiththenegrindingdisc.
2) Thoroughly mix the minced ingredients, and then mince the mixture twice again.
3) Use the kebbe maker to shape the mixture into kebbe casing.
• Filling
1)Mincethemeatwiththenegrindingdisc.
2) Fry the onion chops until they turn golden brown.
3)Addthemincedmeatandotheringredientsin,andthencookfor1-2minutes.
4)Drainoffexcessivefatandcoolthellingdown.
• Cooking
1)Pushsomellingintotheoutercasing,andthenpinchbothendstosealit.
2)Heattheoilfordeepfrying(190°C).
3) Deep fry the kebbe for 3-4 minutes, or until it turns golden brown.
7 Make cookies (for HR2727 WEU and
HR2728)
Beforeyouusetheapplianceforthersttime,thoroughlycleanthepartsthatcomeinto
contact with food.
Beforeyoustart,makesureyouassembleaccordingtoFig.2-4.
For disassembly, refer to Fig. 3-4.
Make cookies (Fig. 10-4)
Tip
• Align different holes of the cookie shaper with the hole on the cookie separator to make
cookies of different shapes.
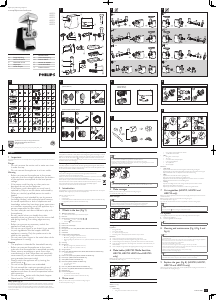
8 Cut vegetables (HR2728, HR2729, HR2526
only) and crush ice (HR2728 only)
Beforeyouusetheapplianceforthersttime,thoroughlycleanthepartsthatcomeinto
contact with food.
Beforeyoustart,makesureyouassembleaccordingtoFig.2-5.
Fordisassembly,refertoFig.3-5.
Fig. 4 indicates the foods that each drum is applicable to and the cutting shapes.
Note
• Only use the plastic hopper in combination with the metal drums and the pusher for plastic
hopper.
• Do not switch the appliance to Reverse mode when using the plastic hopper.
Tip
• You can also grate cheese.
Crush ice (HR2728 only)
1 Switch on the appliance.
2 Push the broken ice into the hopper.
9 Cleaning and maintenance (Fig. 5 and Fig. 6)
• Beforeyouusetheapplianceforthersttime,thoroughlycleanthepartsthatcome
into contact with food.
• Before you remove accessories or clean the motor unit, switch off and unplug the
appliance.
• Do not immerse the motor unit in water nor rinse it under the tap.
• Do not clean the metal parts in a dishwasher.
• Cleanthemainunitwithamoistcloth.
• Pass pieces of bread through the cutter housing to remove any meat left.
• Wash removable parts with a soft brush in soapy water, rinse them with clear water,
and then dry them with soft cloth or tissues immediately.
• Lightly brush the metal parts with fat or oil to prevent rusting.
Note
• Use the innovative cleaning tool to remove the remains stuck in the grinding discs. rinse them with
clear water, and then dry them with soft cloth or tissues immediately.
10 Replace the gear (Fig. 7)
11 Store the appliance (Fig. 8 and Fig. 9)
Register your product and get support at
HR2726
HR2727
HR2728
HR2729
HR2526
www.philips.com/welcome
Specifications are subject to change without notice
© 2013 Koninklijke Philips Electronics N.V.
All rights reserved.
HR2726_2727_2728_2729_2526_UM_WEU2_V1.0
1/2
3140 035 36091
NL Gebruiksaanwijzing
PT Manual do utilizador
TR Kullanım kılavuzu
EN User manual
ES Manual del usuario
IT Manuale utente
3-1
3-2
3-3
3-5
3-4
3
2
2-1
2-2
1
5
j i h g
f
c d
b
a
e
k
2-3
p q
on
B
A
A
B
A
B
A
B
s
2-5
t
r
A
B
C
D
u
w
v
l m
HR2728, 2729, 2526
HR2728
HR2727 WEU, HR2728
HR2728, 2729, 2526
HR2728
HR2726, 2727, 2526
HR2726, 2729, 2526
HR2726, HR2526,
HR2727, HR2728
HR2727, HR2728
2-4
7
8 9
HR2726, 2727, 2526 HR2728
6
x
10
10-1
10-2
10-3
10-4


Praat mee over dit product
Laat hier weten wat jij vindt van de Philips HR2727 Vleesmolen. Als je een vraag hebt, lees dan eerst zorgvuldig de handleiding door. Een handleiding aanvragen kan via ons contactformulier.