
GENERAL INSTRUCTIONS
WARNING AND SAFETY INSTRUCTIONS
1. Before installation and before using the Cooker Hood for the first time read the Operating
Instructions carefully. This way you will avoid the risk of accidents and damage to the
appliance.
2. The Cooker Hood must only be used for domestic household purposes.
3. Children should not be allowed to play with the Cooker Hood or tamper with the controls.
Please supervise its use by the elderly or the infirm.
4. Any installation work should be undertaken by a qualified electrician or a competent person.
5. It is dangerous to alter the specifications or modify the product in any way.
6. Repairs should only be carried out by an authorised engineer.
7. Do not fit the Cooker Hood over an appliance burning solid fuel, as this would contravene
safety regulations.
8. Do not use the Cooker Hood without the grease filter in place.
9. When the Hood is fitted for EXTERNAL EXTRACTION the ducting must NOT be connected
to a flue which is used for exhausting fumes from appliance supplied with energy other
than electric such as a central heating flue or water heating flue. If the room in which the
Cooker Hood is to be used contains a fuel burning appliance such as a central heating
boiler then its flue must be of the room sealed or balanced flue type. If other types of flue
or appliances are fitted special care must be taken to ensure that there is an adequate
supply of air to the room. This is because using the Cooker Hood at the same time as
another heating appliance which depends on the air in the room (i.e. gas, oil or coal fired
heaters etc.,) extracts the air which these types of heaters need for combustion. All
installations must comply with the local authorities requirements for the discharge of exhaust
air.
10. When the Cooker Hood is connected for INTERNAL RECIRCULATION with a Charcoal
Filter fitted the Cooker Hood can be used without any ventilation restrictions.
NOTE:
Charcoal Filters cannot be washed. They must be replaced, depending upon use, every 4-
6 months.
11. Always disconnect the Cooker Hood at the mains supply before opening and removing the
grill assembly or before any type of maintenance work.
12. Do keep heated areas of the hob covered over with pots and pans when using the hob and
Cooker Hood at the same time.
GENERAL
Before fitting the hood, make sure that the voltage indicated on the rating plate corresponds to
the mains voltage in your home.
This product has been designed to be used as an EXTERNAL EXHAUSTING Cooker Hood
but may also be installed for recirculation (WITH THE ADDITION OF A CHARCOAL FILTER).
RATING PLATE
This is situated on the hood under the grill. It shows the voltage, frequency, wattage, model
number, colour.
If you ever need to call a service engineer you must quote model number and colour.
TECHNICAL INFORMATION
Mains voltage 230 V 5O HZ
Motor 125W
ELECTRICAL CONNECTION
IMPORTANT:
ENSURE THAT THE ELECTRICITY SUPPLY IS SWITCHED OFF BEFORE CONNECTING.
This appliance must be connected by a competent person, using fixed wiring via a DOUBLE
POLE SWITCHED FUSED SPUR OUTLET.
We recommend that the appliance is connected by a qualified electrician, who is a member of
the N.I.C.E.I.C. and who will comply with the I.E.E. and local regulations.
WARNING: THIS APPLIANCE MUST NOT BE EARTHED.
DO NOT CONNECT EITHER WIRE TO THE EARTH TERMINAL. THE WIRES IN THE MAINS
LEAD ARE COLOURED IN ACCORDANCE WITH THE FOLLOWING CODE:
BLUE = NEUTRAL, BROWN = LIVE
Should the colours of the wires in the mains lead for the appliance not correspond with the
FUSE
ON
DOUBLE POLE
SWITCHED FUSED
SPUR OUTLET
USE A
3 AMP FUSE
coloured markings identifying the terminal in your spur box proceed as follows:
(1) The wire which is coloured blue must be connected to the terminal marked N (Neutral) or
coloured Black.
(2) The wire which is coloured brown must be connected to the terminal marked L (Live) or
coloured Red.
INSTALLATION-WARNING
Whether installed for external exhausting or for internal recirculation the Cooker Hood should
be placed at the correct height over a hob, as the heat generated may activate the Motor
Protection circuit which will switch the hood off, or even cause the hood to catch fire.
Height above gas hob - 750mm. minimum.
Height above electric hob - 650mm. minimum.
Never place the Cooker Hood over an eye -level grill.
If the cooker hood is installed for use above a gas appliance then the provision for ventilation
must be in accordance with tha Gas Safety (Installation & Use) Regulations 1984 and the
relevant Building Regulations. Detailed recommendations are contained in the following British
Standard Codes of Practice BS6172, BS5440 and BS6891 Current Edition.
SAFETY
A) Never leave a frying pan unattended during use as overheated fats and oils may catch fire.
B) To avoid the risk of fire cleaning of filter should be regularly carried out in accordance with
instructions, as clogging of fat on the synthetic filter can give rise to a fire hazard.
C) Do not prepare flambees or use flames under the Cooker Hood. NOTE that damage so
caused by this or any other as a result of failure to clean the filter could make the guarantee
void.
COOKER HOOD NOT WORKING
A) Check other electrical appliances nearby - in case there is a power failure.
B) Check plug/fuse (s).
C) Is the hood switched on? - Do not attempt to carry out repairs yourself particularly if you
suspect an electrical fault.
D) Has the hood become too hot and switched off?
E) If the hood still does not function - contact the Dealer from whom you purchased the
product with details of the fault who will make arrangements for repair or replacement..
THIS PRODUCT IS MANUFACTURED IN ITALY
The manufacturer reserves the right to alter specifications without notice.
PROOF OF PURCHASE
You will be required to produce your receipt should any request for service be made. We
suggest you attach it to this page, and keep this booklet in a safe place.
GUARANTEE
This product carries a 12 month Guarantee to cover against faulty workmanship of material
used in manufacture, provided such a defect appears in the product within 12 months from the
date of sale to the original purchaser. Please keep this booklet in a safe place. You will be
asked to produce it if you request a service under this Guarantee. You should also be prepared
to produce your receipt.
SERVICE
When you ring service the following information will be required, and it will be helpful if these
details are available before you call as it will assist the service staff to deal with your request
as quickly as possible.
A) Your name, address and postcode.
B) Your telephone number.
C) Model number and colour.
D) Date of purchase.
E) Clear and concise details of the fault.
CONDITIONS
a. The unit must be correctly installed and operated in accordance with the
manufacturers instructions and used for normal domestic purposes in England,
mainland Scotland or Wales.
b. The guarantee does not cover accidental damage, misuse or alterations which are
likely to affect these units.
c. The guarantee is invalid if the product is resold, installed by, tampered with or repaired
by any unauthorised person.
d. The guarantee in no way affects your statutory rights.
This appliance complies with the EEC directives EMC 89/336/EEC revised 92/31/EEC and
93/68/EEC.
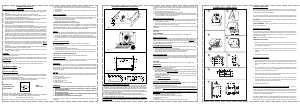
EXTERNAL EXHAUSTING-GENERAL INFORMATION
This appliance is provided with two air outlets, one at the top and one at the rear (see fig.1). Either
of these two may be used depending on the limitations imposed by the existing kitchen fitments.
The appliance is normally supplied with the top outlet open and provided with a connecting ring
C (see fig.1) onto which the external exhausting venting pipe, which should have an inner diameter
of 120 mm, must be fitted (not supplied). The rear air outlet is sealed by means of a blanking plug
A (See fig.1). If is intended to use the rear outlet, instead of the top outlet, the following easy
changes must be made to the appliance:
A) Remove the blanking plug A at the rear by gently easing it out with a screwdriver.
B) Then fit the blanking plug into the top outlet hole after first removing the connecting ring C.
C) Fit the connecting ring C to the rear outlet.
CHANGING THE COOKER HOOD FROM EXTERNAL EXHAUSTING TO INTERNAL
RECIRCULATION
If it is intended to use the Cooker Hood for internal recirculation it will be necessary to obtain from
the dealer a charcoal filter which will trap odours and purify the air. (Depending on use, it will be
necessary to replace the charcoal filter every 4-6 months). The following changes now need to be
made:
A) Seal the top and rear air outlets with the blanking plugs.
B) Open and hinge down the grill G (see fig.2).
C) Move the small lever Z from position A to position F (see fig.2).
D) Place the charcoal filter on the centre of the motor support, and when firmly located turn it 90°
(
1
/4 of a turn) until the “STOP” click is heard to lock it into position. (When you need to remove
the charcoal filter turn it in the opposite direction).
INSTALLATION-EXTERNAL EXHAUSTING
A) After deciding which air outlet to use ensure other air outlet sealed - as previously instructed.
B) Fit connecting ring C (see fig. 1) to the hole and couple it to the venting pipe (which must have
an inner diameter of 120 mm).
C) Ensure that the venting pipe is inclined at least 10° upwards to assist in the fume exhaustion,
and have no more than two 90° bends in its total run.
(NOTE:- Ensure connecting ring is correctly inserted through the outlet hole and coupled to the
venting pipe).
IMPORTANT: When fitting venting kits please follow assembly instructions provided by vent kit
manufacturer.
SAFETY WARNING:
Under no circumstances should you vent the hood through that of other appliances.
INSTALLATION ON A WALL
To mount the hood on a wall use the screws with the expanding plugs supplied. These must be
fixed to the wall 35 mm. above the position finally required for the Cooker Hood (remember - 750/
650 mm. from the cooking surface to the lowest part of the hood). The hood may now be hung on
the wall inserting the screws in the rear holes Z (see fig. 1) then firmly support the hood by
screwing in through rear holes Y (see fig. 1).
INSTALLATION UNDER A CUPBOARD
A) Drill 4 holes of 6 mm diameter in the bottom of the cupboard at the positions shown (see fig.
1) and one hole of 10 mm diameter for the mains lead.
B) If the Cooker Hood is to be used for external exhausting with the air outlet at the top then a
hole of 130 mm should be cut in the cupboard to allow for the outlet pipe.
C) Fix the hood beneath the cupboard by using 4 screws and washers.
USING THE COOKER HOOD
It is advisable to switch the Cooker Hood on a few minutes before cooking starts and that it be left
on for about 15 minutes after cooking is completed in order to exhaust all the odours. On the front
of the hood there are:- A) An on/off switch for the light. B) A switch to adjust the working speed. C)
Cooker Hood “ON” indicator light.
IMPORTANT
Flames could damage the filters so ensure that they do not come in contact with the hood.
MAINTENANCE
A) Before carrying out any sort of maintenance disconnect the hood from the mains supply.
B) Release and hinge down the grill G (See fig.2).
C) Remove the grease filter fixing clamps
D) Carefully extract the synthetic grease filter which should then be washed by hand in lukewarm
water and liquid detergent at least once a fortnight.
When clean squeeze gently but do not wring it out. Before replacing the synthetic grease filter
clean the filter holder in a warm detergent solution or with a damp cloth. Then replace the
synthetic grease filter when dry.
E) The inside and outside of the hood may also be cleaned with a damp cloth and/or warm
sudsy water.
note: NEVER USE ABRASIVES!
F) The hood must not be used without the grease filter.
CHARCOAL FILTER-INTERNAL RECIRCULATION ONLY
Charcoal filters cannot be washed. They must be replaced, depending upon use, every 4-6 months.
A) Disconnect the hood from the mains.
B) Release and hinge down the grill G (See Fig. 2).
C) Twist off charcoal filter from centre of motor support and replace with new charcoal filter - see
instructions under changing the Cooker Hood from external exhausting to internal recirculation.
D) Reassemble.
REPLACING THE BULB - NOTE: BULB REPLACEMENT IS NOT COVERED BY YOUR
GUARANTEE
A) Switch off the light switch on the front of the Cooker Hood.
B) Disconnect the hood from the mains supplly.
C) Release and hinge down grill G to gain access to light bulb.
D) Replace bulb (40 watt screw).
E) Refit grill.
F) Reconnect the hood to mains supply and switch “ON” Cooker Hood light.
520
480
37
Z
Y
A
Y
Z
205
23
21
150
C
Fig. 1
Fig. 2
Z
X
A
F
C
G
Fig. 3
45
45
256
240
224
480
500-600
458-558 45
150
37
150
520
480
54
ø120
ø120
80
STANDARD CONVENTIONAL COOKER HOOD
EXTERNAL EXHAUSTING
Insert the connecting ring B (see Fig.1) through hole A (see Fig.1) on to which the
external exhausting Venting pipe, which must have an inner diameter of 120mm,
must be fitted (Venting kit not supplied).
According to the positioning, the pipe, having no more than two 90° bends in the
entire run, is then directed to the most convenient outside wall or through the ceiling.
IMPORTANT - When fitting Venting kits please follow assembly instructions provided
by the Venting kit manufacturers.
SAFETY WARNING - Under no circumstances should the hood be vented through
that of other appliances.
INTERNAL RECIRCULATION
If it is intended to use the hood for internal recirculation it will be necessary to
obtain from the dealer a charcoal filter which will trap the odours and purify the air.
(Depending upon use, it will be necessary to change the charcoal filter at least
once every 4-6 months).
NOTE: The charcoal filter cannot be washed or regenerated.
PROCEED AS FOLLOWS:
A-
Take hold of knob Y and carefully lift the grill up and out of the groove behind
which it is retained. The grill is then free to remove by carefully pulling down and
out of the Hood (see Fig. 2).
B-
Place the charcoal filter on the centre of the motor support and when firmly
located turn it 90° (
1
/4 of a turn) until the «STOP» click is heard to lock it in
position.
C-
Carefully replace the grill.
FIXING THE FRONT PANEL
A-
It is necessary first to remove Grill (see Fig. 2) by taking hold of knob Y and
carefully lifting the Grill up and out of groove behind which it is retained. The
Grill is then completely free to remove by carefully pulling down and out of the
Hood.
B-
Remove sloping door front E (Fig. 4) by pulling inwards the plastic stops
connected to the special spring locking knobs H (Fig. 4) until the door is eased
forward out of its side retaining channels.
C-
Drill holes through sloping door front as indicated (see Fig. 5) then screw cabinet
door to front of hood door with screws provided.
D-
Replace completed door by first inserting it into upper slides and then pulling
the plastic stops on the spring locking knob H to allow entry into lower side
retaining channels and push until locking occurs.
E-
Carefully replace the Grill.
FITTING THE HOOD BETWEEN CUPBOARDS ON EITHER SIDE (See Fig. 6)
There are two holes on either side of the cooker hood. To gain access first remove
grill and sloping door front. This will allow for correct position of cooker hood against
cupboards on either side. Mark positions for the screws, remove cooker hood, drill
2 holes on each side where marked.
Should the cupboards not be considered strong enough angle frame L (Fig. 2) can
be removed from hood and used as additional support on the rear wall. Recheck
positioning of hood, screw angle frame L to wall, replace hood and screw into
B
A
M
C
E
H
T
A
G
B
C
Y
G
L
P
E
1
3
4
75
205
100
6
60
120
120
46
5
46
7
0 120
65
270
8
35
349
16
38,5
349
38,5
35
16
48,5 48,5
502
522
599
2
INTEGRATED COOKER HOOD


Praat mee over dit product
Laat hier weten wat jij vindt van de Prima LIA110 Afzuigkap. Als je een vraag hebt, lees dan eerst zorgvuldig de handleiding door. Een handleiding aanvragen kan via ons contactformulier.
beantwoord | Ik vind dit nuttig (0) (Vertaald door Google)