
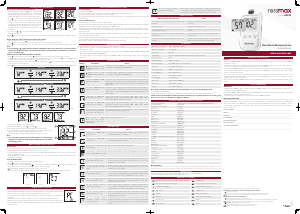
1. The time period for glucose results average
2. Meal ag (no meal / pre-meal / post-meal ).
3. The number used for time period based glucose results average.
4. The average glucose result calculated based on time period (upper left),
number of results (upper right) and meal ag (lower left).
5. The average glucose result calculated from all 14 day test results.
Note:
1. The consecutive 7/14/30 time period based glucose results average is
calculated from the test results obtained during the last consecutive
7/14/30 day periods.
Manufacturer of Blood Glucose Meter, Test Strip and Control Solution
Tyson Bioresearch, Inc.
5F., No. 16, 18, 20, 22, Kedong 3rd Rd., Zhunan Township, Miaoli County 35053, Taiwan
Medical Device Safety Service GmbH Schiffgraben 41, D-30175 Hannover, Germany
Manufacturer of Lancet and Lancing Device
Shandong Lianfa Medical Plastic Products Co., Ltd.
No.1 Shuangshan Sanjian Road 250200 Zhangqiu City, Jinan, Shandong PEOPLE’S REPUBLIC OF CHINA
Shanghai International Holding Corp. GmbH (Europe) Eiestraße 80, 20537 Hamburg, GERMANY
MEDIFUN CORPORATION (Lancing Device Only)
No.8, Shuyi Rd., South Dist., Taichung City, 40241, Taiwan (R.O.C.)
MDSS GmbH Schiffgroben 41,30175 Hannover, Germany
Other problems which may occur Action
A test strip has not been inserted into the meter
properly.
Review the instructions and re-insert a test strip
correctly.
Defective test strip. Replace with a new test strip.
A test strip remains in the test port for more than 2
minutes before testing.
Review the instructions and re-insert a test strip
correctly.
LCD display on the meter is blank when trying to
perform a test.
Please return the device to your local distributor or
service center.
The meter does not function after new batteries are
installed.
Please remove batteries and wait for 1 minute, reinstall
batteries to see if meter is working properly.
Authorised Representative in the European Community Manufacturer
Do not use if package is damaged In vitro diagnostic medical device
Temperature limitation Consult instructions for use
Batch code Sucient for
Use by Catalogue number
Keep dry Keep away from sunlight
Do not reuse Control
Serial Number Caution
Trouble Shooting
Explanations of Symbols
Operation Temperature 10°C ~ 40°C (50°F ~ 104°F)
Operation Humidity 10 ~ 90% RH
Hematocrit 0 ~ 70%
Test Sample Venous and Capillary Whole Blood (ngertip, palm, forearm)
Sample Volume 0.7 µL
Measuring Unit mg/dL or mmol/L
Measuring Range 20 ~ 600 mg/dL (1.1 ~ 33.3 mmol/L)
Test Time 5 seconds countdown
Memory Capacity 500 most recent results
External Output Micro USB Interface
Average 7/14/30 days average
Power supply 2 AAA batteries
Battery Life Approximately 1000 tests
Dimension 108L x 55W x 17H mm
Weight 52 g without batteries
Note: Please refer to the Test Strip Insert for the performance of system accuracy and precision.
Electromagnetic Compatibility
This Meter meets the electromagnetic compatibility requirements as per EN 61326-1 and EN 61326-2-6.
Caution: Strong electromagnetic elds may interfere with the proper operation of the meter. Do not use the
meter close to sources of strong electromagnetic radiation.
Interference substance Highest tested concentration with no signicant interference
Acetaminophen 4.25 mg/dL
Ascorbate(Ascorbic acid) 3 mg/dL
Bilirubin 25 mg/dL
Cholesterol 1200 mg/dL
Creatinine 10 mg/dL
Dopamine 2 mg/dL
EDTA 200 mg/dL
Galactose 500 mg/dL
Gentisic acid 2.5 mg/dL
Glutathione 3.07 mg/dL
Haemoglobin-HUMAN 3000 mg/dL
Heparin 5 IU/ml
Hydrogenated starch hydrolysates (HSH) 0.09 mg/dL
Ibuprofen 50 mg/dL
Icodextrin 750 mg/dL
Isomalt 0.09 mg/dL
Lactitol 0.09 mg/dL
L -DOPA(L-3-4 dihydroxyphenylalanine) 0.5 mg/dL
Maltose 2575 mg/dL
Maltitol 0.09 mg/dL
Mannitol 0.09 mg/dL
Methyldopa 2.5 mg/dL
Pralidoxime iodide (PAM) 5 mg/dL
Salicylate 50 mg/dL
Sodium Carbonate 37.5 mEq/L
Sorbitol 0.09 mg/dL
Tolbutamide 100 mg/dL
Tolazamide 6 mg/dL
Triglycerides 1525 mg/dL
Uric acid 8 mg/dL
Xylose 5 mg/dL
Xylitol 0.09 mg/dL
Warning Xylose
Xylose would result in the overestimation of blood glucose reading if the blood sample containing xylose with the concentration over 5 mg/
dL. Do not use this system during or shortly after receiving xylose absorption therapy since xylose may case inaccurate blood glucose results.
Specications
Tolerance summary of interference substance
• Transport and store at temperature -20°C ~ 50°C ( -4°F ~ 122 °F), Less than 90% RH
• Precision instrument, do not crash when being transported.
Caution:
• Rossmax HS200 Blood Glucose Monitoring System is designed for in vitro diagnostic use only and is not intended
to test on neonate.
• Any change or administer of medication based on the Rossmax HS200 blood glucose test results without the con-
sent advice of a physician or healthcare professional is not recommended.
• The Rossmax HS200 Blood Glucose Test Strip are designed for use with fresh venous whole blood or capillary whole
blood samples obtained from the ngertip, palm and forearm. DO NOT use samples other than venous whole
blood or capillary whole blood.
• False results may occur when performing the test while severely dehydrated, severely hypotensive, in shock or in
a hyperglycemic-hyperosmolar state. If you believe you are suering from any of the above symptoms, consult a
healthcare professional immediately.
• Please refer to Rossmax HS200 Blood Glucose Test Strip Package Insert to access further information on strip Limi-
tations.
IMPORTANT
• The Rossmax HS200 Blood Glucose Meter, Rossmax HS200 Blood Glucose Test Strip and Control Solution are in
conformity with the IVDD 98/79/EC.
• Rossmax HS200 Blood Glucose Monitoring System manufacturer warranty is valid only when used properly within
the guidelines of this User Manual provided.
• The Lancing device and Lancets are in conformity with the MDD 93/42/EEC.
Manufacturer Warranty
This instrument is covered by a 3 year guarantee from the date of purchase, batteries and accessories are not in-
cluded. The guarantee is valid only on presentation of the guarantee card completed by the dealer confirming date
of purchase or the receipt. Opening or altering the instrument invalidates the guarantee. The guarantee does not
cover damage, accidents or non-compliance with the instruction manual. Please contact your local seller/dealer or
www.rossmax.com.
Customer Name: ___________________________________________________________________________
Address: __________________________________________________________________________________
Telephone: ________________________________________________________________________________
E-mail address: _____________________________________________________________________________
Product Information:
Date of purchase: ___________________________________________________________________________
Store where purchased:
__________________________________________________________________________________________
Meter Storage
Limitations of the Procedure
Service and Warranty
Display Description Action
appears when the result
is HIGHER than the “HI” alert
setting.
The default setting is 180mg/dL or 9.5mmol/L and it can be changed
according to «Setting Up the HI/LO Alarms»
appears when the result
is LOWER than the “LO” alert
setting.
The default setting is 70 mg/dL or 3.2mmol/L and it can be changed
according to «Setting Up the HI/LO Alarms»
Test result is HIGHER than 600
mg/dL (33.3 mmol/L).
Repeat the test by using a new test strip. If the same message displays
again, the result is confirmed to be higher than the meter operating
range. Please consult your healthcare professional immediately for
further advice.
Test result is LOWER than 20
mg/dL (1.1 mmol/L).
Repeat the test by using a new test strip. If the same message displays
again, the result is confirmed to be lower than the meter operating
range. Please consult your healthcare professional immediately for
further advice.
Temperature is TOO HIGH
during the test procedure.
Large variation may occur between results due to high or low
temperature. Move to an environment (10˚C ~ 40˚C or 50˚F ~ 104˚F)
and wait for 30 minutes before re-testing.
Temperature is TOO LOW
during the test procedure.
Large variation may occur between results due to high or low
temperature. Move to an environment (10˚C ~ 40˚C or 50˚F ~ 104˚F)
and wait for 30 minutes before re-testing.
The preset alarm is ringing to
remind the user that it is time
to perform a blood glucose
test.
Please press any button to turn off the alarm or wait for the alarm to be
turned off automatically in 30 seconds.
Battery power is LOW.
Meter will only provide
approximately 10 more
measurements.
Replace with 2 AAA batteries.
Display Description Action
Temperature is TOO HIGH to
perform a test.
Move to an environment (10˚C ~ 40˚C or 50˚F ~ 104˚F) and wait
for 30 minutes before re-testing.
Temperature is TOO LOW to
perform a test.
Move to an environment (10˚C ~ 40˚C or 50˚F ~ 104˚F) and wait
for 30 minutes before re-testing.
Battery power is depleted for any
further usage.
Replace with 2 AAA batteries immediately.
This message is displayed when
your meter has NOT been coded.
Please return the device to your local distributor or service center.
An error message indicates a
problem with the test strip.
Please review the instructions and try again with a new test strip.
If the problem persists, please return the device to your local
distributor or service center.
An error message indicates a
problem with the test strip or
meter.
Please review the instructions and try again with a new test strip.
If the problem persists, please return the device to your local
distributor or service center.
An error message indicates a
problem with the meter.
Please remove batteries and wait for 1 minute, reinstall batteries
to see if meter is working properly. If the problem persists, please
return the device to your local distributor or service center.
An error message indicates a
problem with the test strip.
Please review the instructions and try again with a new test strip.
If the problem persists, please return the device to your local
distributor or service center.
An error message indicates a
problem with the meter.
Please remove batteries and wait for 1 minute, reinstall batteries
to see if meter is working properly. If the problem persists, please
return the device to your local distributor or service center.
An error message indicates a
problem with the test strip.
Please review the instructions and try again with a new test strip.
If the problem persists, please return the device to your local
distributor or service center.
An error message indicates
insucient volume of blood
sample for the test.
Review the instructions and try again with a new test strip, then
applying a sucient blood sample to the test strip. Please return
the device to your local distributor or service center if the problem
persists.
Display Messages
Error Messages
Initial Set-Up
Please visit the website at http://www.rossmax.com for the initial set-up instructions.
1. Download and install the applicable APP onto your mobile device.
2. Turn the meter (refer to “ Preparing Test Strip” section ), Bluetooth and the APP of mobile device on and follow set-
up and pairing instructions.
3. If the pairing is successful, once the measurement is done, the current measured reading will automatically be
transferred to the APP.
Transfer Memory data
1. Turn Bluetooth your mobile device and applicable APP on.
2. Press to turn on the meter (Fig. 49).
3. When the meter is switched ON, hold for 4 seconds to enter Bluetooth mode. will appear and ash on the
meter if the meter is not never paring with a mobile device. (Fig. 50).
4. stops blinking when the meter & mobile device is connected.
5. Press the button on APP to transfer data. The meter will display while data are being transferred (Fig. 51).
You can use PC Link to transfer test results to your personal computer. Obtain the required
software and micro USB cable to be ordered separately. Please visit the website at http://www.
rossmax.com for proceeding the downloading and installation process.
1. Follow the instructions provided with software to install the software into your personal
computer.
2. Connect the interface cable to a USB port on your computer while the meter is o.
3. Connect the other end of interface cable to the data port located on the side of the meter.
4. The word "PC" will appear on the display indicates that the meter is now in the communication
mode (Fig. 52).
General Cleaning
• Switch the meter OFF.
• Use a soft cloth moistened with water or a mild detergent, gently wipe the meter surface.
• Please avoid using alcohol or organic solvents in cleaning.
• Do not immerse the meter in water when cleaning. Do not allow water or cleaning uids into the meter, test port,
and data port.
Professional Disinfection
Applicable for people who use the blood glucose meter
• Cleaning solution and disinfecting solution: Clorox Bleach Germicidal Wipes ( Clorox Professional Products Company.
EPA Reg. No. 67619-12). Contact Clorox Company at 1-800-537-1415.
• Personal Protection: Sanitize hands, and then put on gloves before removing a germicidal wipe from the canister.
When handling items soiled with blood or body uids, use disposable latex gloves, gowns, masks and eye coverings.
• Meter: turn it o
• Wipe: Clorox Bleach Germicidal Wipes by thoroughly wetting the exterior of the meter, allow the surface to stay wet
for 1 minute then allow to air dry.
• Disposal of Infectious Materials: Use disposable gloves. Never reuse or re-wet a disposable wipe. Dispose of according
to local regulations for infectious waste disposal.
• Please refer to the Clorox Bleach Germicidal Wipes detailed usage instructions.
Please handle the meter with care. Dropping the meter may result in damage.
1. Do not expose the meter, test strips, and the Control Solution to extreme conditions such as high humidity, heat,
freezing cold, or dust.
2. The meter should be stored at room temperature in a dry and clean area. DO NOT STORE IN DIRECT SUNLIGHT OR
AREAS WITH HIGH HUMIDITY AND/OR DUST.
It is advised that you store all parts of Rossmax HS200 Blood Glucose Monitoring System in the carrying bag
provided.
How to view results stored in the memory
1. When the meter is o, press button to turn on the
meter. The Data and Time will be shown on (At the left-
upper corner. Firstly the year is shown for 1 second, and
then Month-Day will be shown on in the same area.)
2. Press to view previous results. “MEM” icon will be dis-
played on the top center area. Initially, the “year” will be
display on the top left corner (Fig.43). After 1 second
“month-day” will then be displayed on the top left cor-
ner and “time” will be displayed on the top right corner
(Fig. 44). The most recent memory results will be dis-
played rst.
3. You can press or to scroll forwards and backwards
through the results.
4. Press button to exit the stored test results or the meter will be shut o automatically after 2 minutes without
any action.
How to view the control solution test result in the memory
1. When the meter is o, press button to turn on the meter.
2. Press button again, and the latest control solution test result will be displayed (Fig. 45).
3. Press button to turn o the meter or the meter will be shut o automatically after 2 minutes without any action.
Note:
1. A result with or symbol indicates that the reading was taken out of the meter’s specied operation
temperature range and may not be accurate. This value is excluded from the 7/14/30 time period based
glucose results average.
View Time Periods Based Average Glucose Results
1. Press to turn the meter on, then Press button to view time periods based average glucose results.
2. 7/14/30 time periods based average glucose results marked with a no meal / pre-meal / post-meal and will
be displayed on screen in sequence when is pressed (Fig. 46 ~ 48 ).
3. When the meter displays 7 days with no meal status assigned, press button and the meter will then change to
view stored test results in memory.
4. Press button to turn o the meter or the meter will be shut o automatically after 2 minutes without any action.
Bluetooth Data Transfer (optional)
PC Data Transfer (optional)
Cleaning and Disinfection Procedure
Care and Storage
Recalling Values from Memory
(Fig. 49) (Fig. 50) (Fig. 51)
(Fig. 52)
(Fig. 44) (Fig. 45)(Fig. 43)
2
3
4
5
1
(Fig. 47) (Fig. 48)
All results
Results marked with (pre-meal)
Results marked with (post-meal)
(Fig. 46)
An error message indicates a
problem with the meter.
Please remove batteries and wait for 1 minute, reinstall batteries
to see if meter is working properly. If the problem persists, please
return the device to your local distributor or service center.
Rossmax Swiss GmbH, 9435 Heerbrugg, Switzerland, www.rossmax.com
Model: HS200
www.rossmax.com
Blood Glucose Monitoring System
Instruction Manual
IN5HS20000000XXXX
RM_IB_HS200_
EN_ver2122




Praat mee over dit product
Laat hier weten wat jij vindt van de Rossmax HS200 Bloedglucosemeter. Als je een vraag hebt, lees dan eerst zorgvuldig de handleiding door. Een handleiding aanvragen kan via ons contactformulier.