5 6
7 8 9
10 11 12
13 14 15 17
2 - Gr. 1: 9-18 kg
1
1 - Gr. 0: 0-18 kg
2 3 4
3-1 3-2
5
16
FC12SENA
Importer :
SENA E. i N. Grządka Sp. J.
Ptasia 12A, 26-600 Radom
Poland
tel. + 48 48 366-57-10
fax. + 48 48 366-57-32
Dziękujemy za zakup tego fotelika samochodowego z grupy 0–1. W
celu uzyskania pomocy związanej z tym produktem oraz wymiany ak-
cesoriów należy skontaktować się z naszym działem obsługi klienta.
INSTRUKCJE BEZPIECZEŃSTWA
PRZED ROZPOCZĘCIEM INSTALACJI NALEŻY DOKŁADNIE PRZECZYTAĆ NINIEJSZE
INSTRUKCJE. NIEPRAWIDŁOWA INSTALACJA FOTELIKA STANOWI ZAGROŻENIE
DLA BEZPIECZEŃSTWA DZIECKA.
NIGDY NIE NALEŻY UŻYWAĆ FOTELIKA DLA DZIECKA
SKIEROWANEGO TYŁEM DO KIERUNKU JAZDY, JEŻELI
PODUSZKA POWIETRZNA PRZED FOTELEM PASAŻERA JEST
WŁĄCZONA. MOŻE TO PROWADZIĆ DO ŚMIERCI LUB PO-
WAŻNYCH OBRAŻEŃ DZIECKA!
Fotelik może zostać zainstalowany w ułożeniu do przodu lub do tyłu z 3-punk-
towym pasem bezpieczeństwa zgodnym z normą UN/ECE nr 16 lub równoważ-
nym. Fotelika nie należy montować na siedzeniach skierowanych na bok lub
do tyłu. Zawsze należy pamiętać o zapięciu i odpowiednim wyregulowaniu
uprzęży dziecka. Nie należy uruchamiać samochodu bez uprzedniego spraw-
dzenia poprawności mocowania fotelika do siedzenia pasażera, jak przedsta-
wiono w niniejszej instrukcji. Należy pamiętać o sprawdzeniu, czy paski fotelika
są całkowicie napięte, a pas biodrowy uprzęży znajduje się w możliwie najniż-
szej pozycji, wspierając miednicę dziecka. Należy upewnić się, że pas siedze-
nia i paski uprzęży nie są skręcone. W celu zapewnienia maksymalnej ochrony
należy unikać luzu pomiędzy fotelikiem a siedzeniem pasażera. Zaleca się sto-
sowanie się do metod zalecanych w niniejszej instrukcji. Fotelik nie może być w
żaden sposób modykowany. Nie należy dodawać do niego żadnych elemen-
tów. Zaleca się wymianę fotelika samochodowego w przypadku poddania go
silnym wstrząsom lub uderzeniom oraz w przypadku zużycia. Należy regularnie
sprawdzać uprząż pod kątem znaków zużycia, zwłaszcza punkty mocowania
uprzęży, szwy i elementy regulujące. W żadnym wypadku nie należy pozosta-
wiać dziecka w foteliku bez opieki. Należy upewnić się, że żadna część fotelika
nie została przytrzaśnięta drzwiami lub składanym fotelem pasażera. Jeśli dany
samochód wyposażono w składane tylne siedzenie, należy upewnić się, że jest
ono poprawnie zablokowane w pozycji pionowej. Bezpośrednie wystawienie
na promienie słoneczne podnosi temperaturę wewnątrz pojazdu. Z tego po-
wodu zaleca się przykrycie fotelika, gdy nie jest używany, w celu uniknięcia
rozgrzania elementów, zwłaszcza mocowań, i oparzenia dziecka. Fotelika nie
należy używać bez pokrowca. Oryginalny pokrowiec należy zastępować je-
dynie pokrowcami zalecanymi przez producenta. W przypadku nagłej sytu-
acji musi istnieć możliwość szybkiego uwolnienia dziecka. W związku z tym nie
należy przykrywać klamry, która może zostać łatwo rozpięta. Należy nauczyć
dziecko, aby nie bawiło się klamrą. Zawsze należy pamiętać o sprawdzeniu,
czy w klamrze uprzęży i centralnym elemencie regulującym nie znajdują się
okruchy jedzenia i inne niepożądane elementy. Konieczne jest przymocowa-
nie bagażu i ostrych obiektów znajdujących się w samochodzie. Nieprzymoco-
wane obiekty mogą zranić dziecko w razie wypadku. W zimie należy upewnić
się, że dziecko nie ma na sobie zbyt obszernego ubrania. Nie wolno używać w
pozycji przodem do kierunku jazdy jeżeli dziecko waży mniej niż 9 kg.
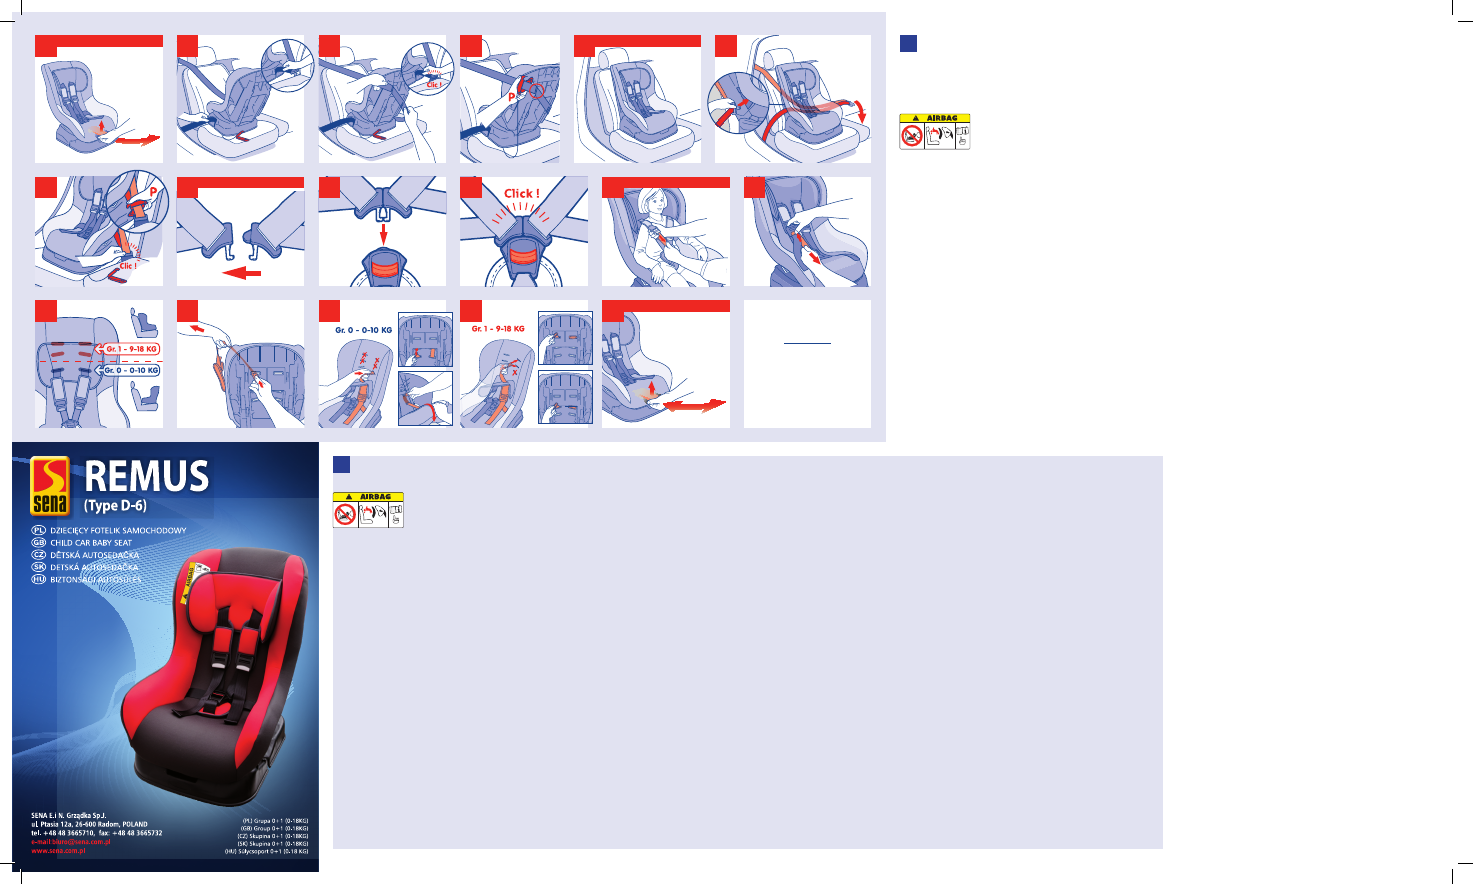
1.Grupa 0 Montowanie tyłem do kierunku jazdy. Od urodzenia do 10
kg wagi dziecka.
Montować przy pomocy 3 punktowych pasow samochodowych. Ustawić fo-
telik w pozycji maksymalnie odchylonej rys. 1. Ustawić fotelik na przednim lub
tylnym siedzeniu samochodu tyłem do kierunku jazdy .Wyciągnąć całkowicie
samochodowe pasy bezpieczeństwa i przesunąć część biodrową przez pod-
stawę fotelika rys. 2. Przesunąć część piersiową pasow przez szczeliny znajdują-
ce się w oparciu fotelika. Zapiąć pasy i naciągnąć je w kierunku mechanizmu
zwijacza rys. 3. Zapiąć klamrę (P) na piersiowej części pasa bezpieczeństwa
obok gornej szczeliny w oparciu fotelika , wg wskazań na rysunku rys. 4. Nale-
ży upewnić się czy pasy nie są poskręcane, uszkodzone i czy są odpowiednio
naciągnięte.
2.Grupa 1 . Montowanie przodem do kierunku jazdy . Od 9 do 18 kg
wagi dziecka.
Montować przy pomocy 3 punktowych pasow samochodowych. Ustawić fo-
telik na tylnym siedzeniu w pozycji siedzącej przodem do kierunku jazdy rys. 5.
Wyciągnąć pasy samochodowe i przesunąć je przez oparcie fotelika między
plastykową skorupą a pokrowcem rys. 6. Zapiąć pasy samochodowe. Nacią-
gnąć pasy pociągając za nie i jednocześnie naciskając na fotelik samocho-
dowy by dokładnie przylegał do siedzenia samochodowego rys. 7. Zapiąć
klamrę (P) na piersiowej części pasa samochodowego obok zamka pasow .
Należy upewnić się czy pasy nie są poskręcane, uszkodzone i czy są odpowied-
nio naciągnięte.
3.Pasy szelkowe fotelika samochodowego
3.1.Zapinanie klamry.
Na łożyć jedną końcowkę na drugą rys. 8. Wsunąć połączone końcowki do
otworu klamry , aż do usłyszenia pstryknięcia “klik”rys. 9 i 10. Aby odpiąć klamrę
należy nacisnąć na czerwony przycisk znajdujący się na klamrze.Należy regu-
larnie upewniać się czy klamra jest prawidłowo zapięta.
3.2.Regulacja pasow szelkowych.
Aby dociągnąć uprzęż: Pociągnij za paski regulacyjne znajdujące się na uprzę-
ży. Nie ma potrzeby naciskania przyciskow regulacyjnych 11.
Aby poluzować uprzęż: Naciśnij przyciski regulacyjne znajdujące się w gornej
części uprzęży, jednocześnie chwytając i pociągając dolną część uprzęży 12.
3.3.Regulacja wysokości pasow szelkowych.
Wysokość uprzęży można wyregulować w zakresie trzech ustawień 13. Aby do-
stosować wysokość szelek, wyciągnij jedną z taśm gornych szelek, obracając
metalową końcowkę pasa podtrzymującego znajdującą się z tyłu skorupy, a
następnie przeciągnij ją przez otwory skorupy oparcia i tapicerkę 14.
Powtorz tę czynność dla drugiej taśmy gornej. Włoż gorne taśmy szelek do
otworow w tapicerce i w skorupie znajdujących na wysokości dostosowanej
do wysokości dziecka, w zależności od wybranej konguracji: W konguracji
tyłem do kierunku jazdy (gr. 0, od 0 do 10 kg) : 15. W konguracji przodem do
kierunku jazdy (gr. 1, od 9 do 18 kg) : 16.
Zwrocić uwagę aby biodrowa część pasow szelkowych znajdowała się mozli-
wie nisko w celu odpowiedniego przytrzymania miednicy dziecka.
4.Montaż i demontaż pasow szelkowych i pokrowca fotelika.
Należy wykonać te same operacje jak przy ustawianiu wysokości pasow szelko-
wych zdejmując je całkowicie. Zdemontować pas kroczny przesuwając przez
skorupę i pokrowiec. Zdjąć pokrowiec i akcesoria będące na wyposażeniu w
zależności od modelu (osłony szelek, wkładki, zagłowki ). Aby założyć pokro-
wiec należy wykonać te same operacje w odwrotnej kolejności. Należy upew-
nić się czy pokrowiec jest właściwie zamontowany i czy pasy szelkowe nie są
poskręcane lub uszkodzone.
5.Ustawianie pozycji fotelika.
Fotelik posiada możliwość regulowania nachylenia zapewniającego dziecku
komfort. Do ustawienia pozycji należy używać dżwigni znajdującej się z przodu
fotelika pomiędzy podstawą a siedziskiem rys. 17. Po każdej zmianie pozycji
należy upewnić się czy pasy samochodowe mocujące fotelik są odpowiednio
napięte a pasy szelkowe są w odpowiedniej pozycji.
Porady dotyczące konserwacji
Wszystkie części tapicerowane można zdejmować. Niewielkie plamy można
usuwać przy użyciu wilgotnej gąbki zamoczonej w mydlinach lub spierać ręcz-
nie w mydlinach w temperaturze 30°. Nie należy używać wybielaczy, praso-
wać, prać w pralce ani wirować.
OSTRZEŻENIE
• Ten fotelik jest „uniwersalnym” urządzeniem przytrzymującym dla dzieci. Zo-
stał homologowany zgodnie z regulaminem EKG ONZ nr 44/04 i nadaje się do
ogólnego użycia w pojazdach, a także pasuje do większości (z nielicznymi wy-
jątkami) siedzeń samochodowych.
• Oświadczenie producenta samochodu, że samochód jest zgodny z „uniwer-
salnymi” urządzeniami przytrzymującymi dla dzieci zapewnia wyższe prawdo-
podobieństwo zgodności fotelika z siedzeniem.
• To urządzenie przytrzymujące dla dzieci sklasykowano jako „uniwersalne”
zgodnie z najostrzejszymi kryteriami homologacji, natomiast wcześniejsze mo-
dele nie odpowiadają takim (nowym) przepisom.
• Urządzenie może być stosowane jedynie w samochodach wyposażonych
w 3-punktowe pasy bezpieczeństwa o mocowaniu stałym lub przesuwnym,
zgodne z normą UN/ECE nr 16 lub równoważnymi standardami.
• W przypadku wątpliwości należy skontaktować się z producentem lub sprze-
dawcą urządzenia przytrzymującego.
Okres obowiązywania gwarancji
Gwarancja obowiązuje przez okres 12 kolejnych miesięcy. Gwarancja dotyczy wyłącznie
pierwszego właściciela i jest nieprzenoszalna. Należy zachować rachunek za zakupiony
wyrób. Na rachunku musi być wyraźnie widoczna data zakupu. W przypadku reklamacji
prosimy skontaktować się z jednostką , w którym nastąpiło zakupienie produktu. Gwarancja
na sprzedany towar konsumpcyjny nie wyłącza, nie ogranicza ani nie zawiesza uprawnień
kupującego wynikających z niezgodności towaru z umową.
PL
Thank you for purchasing this Group 0-1 car seat. If you require assistance with this product or if you wish to change
an accessory, please contact our customer service department.
SAFETY INSTRUCTIONS
PLEASE READ THESE INSTRUCTIONS CAREFULLY BEFORE BEGINNING THE INSTALLATION. IF THE SEAT IS
NOT INSTALLED CORRECTLY, YOUR CHILD’S SAFETY MAY BE AT RISK. DO NOT USE THIS CHILD SEAT ON
A PASSENGER SEAT FITTED WITH AN ACTIVE AIRBAG! DEATH OR SERIOUS INJURY CAN OCCUR.
The seat may be installed in a front-facing or rear-facing position with a 3-point safety belt to UN/ECE No.16 standard or
equivalent. Do not use it on side-facing or rear-facing seats. Always remember to fasten and correctly adjust the child’s
harness and never start the car without rst checking that the seat is properly xed to the passenger seat as shown in these
instructions. It is important to check that the straps of the seat belt are fully tightened and that the harness lap strap is po-
sitioned as low as possible to support your child’s pelvis. Check that the seat belt and harness straps are not twisted. For
maximum protection, there must be no slack between the car seat and the passenger seat. Please refer to the method rec-
ommended in these instructions. The seat must not be modied in any way and no elements should be added. It is recom-
mended that you replace this car seat if it has been subjected to a severe impact following an accident or in case of wear.
You should regularly check that the harness is not showing signs of wear; check in particular the harness points, the seams
and the adjustment devices. Never leave your child unattended in the seat. Check that no part of the seat is trapped in the
door or in a fold-down passenger seat. If your car has a fold-down rear seat, check that it is correctly locked in the vertical
position. Direct exposure to the sun increases the temperature inside vehicles. For this reason, you are advised to cover the
child’s car seat when not in use in order to prevent the elements, in particular the xations, from getting hot and burning
the child. Do not use your car seat without its cover and only replace it with a cover that has been recommended by the
manufacturer. In an emergency, the child must be able to be freed quickly. The buckle, which can be easily opened, must
therefore not be covered. Teach your child not to play with the buckle. Always remember to check that there are no scraps
of food or other remains in either the harness buckle or the central adjuster. Luggage and other heavy or sharp objects must
be xed down in the car. Objects that are not attached may injure a child in the event of an accident. In winter, make sure
that the child is not wearing over-bulky clothes. Do not use forward facing before the child’s weight exceeds 9 kg.
1. Group 0. Rear-facing position. From birth to 10 kg.
Use only with a three-point lap and diagonal seatbelt. Recline the child seat to its maximum position (g. 1). Place it on the
front passenger seat or on the back seat, with the back of child seat facing the road. Pull the vehicle seatbelt tight and
pass the lap part under the base of the child seat (g. 2). Pass the shoulder part of the vehicle seatbelt through the strap
holders on the back of the child seat. Fasten the seatbelt and pull it tight (g. 3). Position the lock-off P on the diagonal part
of the belt, behind the rear guide of the shell, as shown in diagram. Ensure that the seatbelt is not twisted or damaged and
that it is taut (g. 4).
2. Group 1. Forward-facing position. From 9 kg to 18 kg.
Use only with a three-point lap and diagonal seatbelt. Place the child seat in the upright position facing the road (g. 5). Pull
the vehicle seatbelt and pass the buckle through the back unit of the child seat between the plastic body and the foam
padding (g. 6). Fasten the seatbelt. Pull the seatbelt tight, at the same time pushing on the child seat in order to block
it against the vehicle seat (g. 7). Fix the plastic clip P onto the vehicle seatbelt, close to the buckle on the shoulder part.
Ensure that the seatbelt is not twisted or damaged and that it is taut.
3. The child seat harness
3.1. Fastening the buckle
Join the two ends of the buckle together (g. 8). Fasten the two ends in the buckle until they click (gs. 9 & 10). To unfasten,
press the red button on the buckle. Check regularly that the buckle is fastened correctly.
3.2. Adjustment of the harness
To tighten the harness: Pull on the adjusting straps positioned on the harness. You do not need to press on the adjuster but-
tons (g. 11). To loosen the harness: Press on the adjuster buttons positioned on the upper section of the harness, grasp the
lower section and pull simultaneously (g. 12).
3.3.Adjusting harness height according to the child’s shoulder height
The harness can be adjusted to three different heights (g. 13).To adjust the height of the harnesses, remove the upper sec-
tion of one of the harness straps by pivoting the metal anchor located behind the back rest and then pulling it through the
slots of the shell and cover (g. 14). Repeat the operation on the upper section of the second strap. Feed the ends of the
harness straps through the slots at identical level in both the cover and the shell, according to the chosen conguration: For
a rear-facing conguration (Gr. 0, from 0 to 10 kg) : (g. 15). For a front-facing position (Gr. 1, from 9 to 18 kg) : (g. 16). Make
sure that the straps under the stomach are as lowas possible, in order to support the pelvis.
4. Removal and reassembly of the harness and cover
Carry out the same steps as when adjusting the height of the harness but remove it completely. Remove the crotch buckle
by passing the strap through the seat base and the cover. Remove the cover as well as any fabric accessories, (according
to the model: sleeves, padding etc.). To reassemble, carry out the same steps in the reverse order. Ensure that the harness is
correctly tted and that the straps are not twisted or damaged.
5. Reclining the child seat
The child seat can be reclined for the child’s comfort. Use the handle located at the front of the child seat between the
base and the body (g. 17). Each time the reclining position is changed, ensure that the vehicle’s seatbelt is taut and that
the harness is in the correct position.
Maintenance advice
All the material parts can be removed. Slight stains can be removed using a damp sponge soaked in soapy water or it can
be washed by hand at 30° in soapy water. Do not use bleach, do not iron, do not machine wash, and do not tumble dry.
WARNING
• This car seat is a “Universal” child restraint system. It has been approved in accordance with regulation N°44/04, and is
suitable for general use in vehicles and is compatible with the majority (some exceptions) of vehicle seats.
• It is more likely that the seat is perfectly compatible if the vehicle manufacturer states that its vehicles are suitable for taking
“Universal” child restraint systems.
• This restraint system is classied as “Universal” in accordance with the strictest approval criteria, whereas earlier models do
not correspond to these new provisions.
• It can only be adapted to vehicles with 3-point safety belts that are either xed or have a roller mechanism and that have
been approved compliant with the UN/ ECE N° 16 or other equivalent standards.
• If in doubt, contact the manufacturer or retailer of the restraint system.
Warranty term:
The warranty period applies for a period of 12 consecutive months. The warranty only applies for the rst owner and is not
transferable. After purchasing the product, keep the purchase receipt. The date of purchase must be clearly visible on the
receipt.
GB


Praat mee over dit product
Laat hier weten wat jij vindt van de Sena Remus Autostoeltje. Als je een vraag hebt, lees dan eerst zorgvuldig de handleiding door. Een handleiding aanvragen kan via ons contactformulier.