
- 6 -Copyright © 2019, Fast ČR, a.s. 04/2019
EN
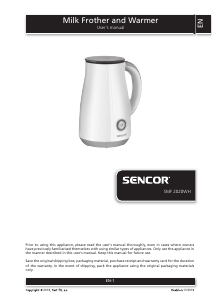
Milk frother and warmer
User'smanual
■ Prior to using this appliance, please read the user'smanual thoroughly, even in cases,
when one has already familiarised themselves with previous use of similar types of
appliances. Only use the appliance in the manner described in this user’smanual.
Keep this user'smanual in asafe place where it can be easily retrieved for future use.
■ We recommend saving the original cardboard box, packaging material, purchase
receipt and responsibility statement of the vendor or warranty card for at least the
duration of the legal liability for unsatisfactory performance or quality. In the event
of transportation, we recommend that you pack the appliance in the original box
from the manufacturer.
DESCRIPTION OF THE APPLIANCE
A1 Lid with apractical spout
A2 Stainless steel kettle with minimum
and maximum level marks
A3 Handle
A4 Frother base
A5 On/Off button
A6 Operating mode selection button
A7 Storage space for the frothing
attachment (located at the bottom
of the base)
A8 Anti-slip feet
A9 Frothing attachment with
removable spring
Before first use
1. Before first use, take the appliance and its accessories out of the packaging
material and remove all promotional labels and stickers. Check that neither the
appliance nor any of its parts is damaged.
2. Wash the kettle A2, lid A1 and the frothing attachment A9 in warm water with
asmall amount of kitchen detergent. Rinse with clean water and thoroughly wipe
dry.
3. Wipe the base A4 using asoft sponge lightly dampened in warm water and then
wipe dry with aclean wiping cloth.
4. Before storing the frother, make sure that all its parts are clean and dry.
Warning:
Do not submerge the base A4 in water or in any other liquid for
the purpose of cleaning it.
Frothing attachment
The milk frother is equipped with a frothing attachment A9, which serves to both
heat up the milk and to froth it up. The frothing attachment A9 is equipped with
aremovable spring.
If you wish only to heat the milk, remove the spring from the frothing attachment A9.
The movement of the frothing attachments A9 in the kettle A2 will ensure that the
milk does not burn and stick to the bottom or walls of the kettle A2.
If on the other hand you wish to froth the milk up, it is important to put the spring on
the frothing attachment A9. This will ensure arich and creamy foam.
Warning:
Do not use the milk frother without the frothing attachment
A9 installed. This risks damaging the milk frother and ruining
the milk.
USING THE MILK FROTHER
1. Place the milk frother in an even, stable and dry place at asufficient distance from
the power socket.
2. Remove the lid A1 from the kettle A2.
3. Put the frothing attachment A9 on to the central connector in the kettle A2.
Depending on the milk'sintended use, install or remove the spring of the frothing
attachment A9 – more in section "Frothing attachment" or "Operating mode
table".
4. Pour milk into the kettle A2. Always adhere to the minimum and maximum level
marks according to the selected mode.
5. Put on the lid A1. Make sure that the lid is correctly seated on the kettle A2.
Note:
The lid A1 is equipped with apractical spout that enables comfortable, safe
pouring of hot milk. Likewise, it is possible to add ingredients through it, e.g.
chocolate when preparing hot chocolate.
6. Place the kettle A2 into the base A4.
7. Insert the plug into apower socket, and the operating mode selection button A6
will be lit.
8. Press button A6 again to select the desired operating mode – see "Operating
mode table". Each time the button is pressed the backlight colour of button A6
will change.
9. Press the On/Off button A5, the button will be lit red and the milk frother will start.
10. When the milk is warmed up, the backlight button A5 will turn off and the milk
frother will stop automatically.
11. Disconnect the power plug from the power socket, take the kettle out of the base
A4 and prepare your favourite drink.
Note:
If you want arichly frothy milk with acreamy foam, we recommend that you
use cool half-cream milk. Also, before use, you can rinse out the kettle A2
with cold water and wipe it dry or put it into arefrigerator.
Operating mode table
Operating
mode
Backlight Max.
amount
Attachment Recommendations
COOL Blue 150 ml Attachment
with spring
Frothing milk without
heating
Suitable for making ice
coffee, frappé, etc.
BABY Green 300 ml Attachment
without
spring
Heat milk to
atemperature suitable for
infants and small children
FOAM Violet 150 ml Attachment
with spring
Frothing and heating milk
Suitable for making
cappuccino, latté, etc.
HOT Red 300 ml Attachment
without
spring
Milk heated to maximum
temperature (approx.
68°C)
Suitable for making hot
cocoa or chocolate.
Automatic shut-off
The milk frother will automatically turn off after about 10 minutes of inactivity. When
you wish to use the milk frother, put on the kettle and use button A6 to select an
operating mode. When button A6 is lit, the milk frother is turned on again.
Overheating protection
The milk frother is equipped with asafety thermal fuse that protects it against damage
caused by the overheating of the milk frother. In the event that such asituation occurs,
the fuse will be triggered and the operation of the milk frother will be stopped. If this
happens, disconnect the power plug from the power socket and allow the milk frother
to cool down. Then connect the power plug back into the power socket and you will
be able to use the milk frother again.
CLEANING AND MAINTENANCE
Disconnect the power plug from the power socket and allow the appliance to cool
down before cleaning it.
For cleaning, do not use cleaning products with an abrasive effect, solvents, etc. that
could damage the surface of the appliance. No part of this appliance is intended for
washing in adishwasher.
Warning:
To prevent the risk of injury by electrical shock, do not
submerge the appliance, power cord or power plug in water or
any another liquid.
We recommend rinsing the kettle A2, lid A1 and the frothing attachment A9
immediately after use. Subsequently, wash the kettle A2, lid A1 and the frothing
attachment A9 in warm water with asmall amount of kitchen detergent. Rinse with
clean water and thoroughly wipe dry.
Wipe the base A4 using asoft sponge lightly dampened in warm water and then wipe
dry with aclean wiping cloth.
Storage
When not using the appliance for an extended period of time, disconnect the power
plug from the power socket, allow the appliance to cool down and clean it according
to the instructions provided above.
The frothing attachment A9 can be placed in the storage compartment A7 at the
bottom of the base A4.
Before storing it, check that the appliance and all its accessories are thoroughly clean
and dry.
Store the appliance in adry, clean and well-ventilated location not exposed to extreme
temperatures and out of children'sreach.
TECHNICAL SPECIFICATIONS
Rated voltage range ........................................................................................................220 – 240 V~
Rated frequency........................................................................................................................50/60 Hz
Rated power input ............................................................................................................. 550 – 650 W
We reserve the right to change text and technical specifications.


Praat mee over dit product
Laat hier weten wat jij vindt van de Sencor SMF 4000BK Melkopschuimer. Als je een vraag hebt, lees dan eerst zorgvuldig de handleiding door. Een handleiding aanvragen kan via ons contactformulier.
beantwoord | Ik vind dit nuttig (0) (Vertaald door Google)
beantwoord | Ik vind dit nuttig (0) (Vertaald door Google)