FORWARD
BACKWARD
POWER LIGHT
ON OFF
LEFT RIGHT
FORWARD
BACKWARD
POWER LIGHT
ON OFF
LEFT RIGHT
FORWARD
BACKWARD
POWER LIGHT
ON OFF
LEFT RIGHT
FORWARD
BACKWARD
POWER LIGHT
ON OFF
LEFT RIGHT
FORWARD
BACKWARD
POWER LIGHT
ON OFF
LEFT RIGHT
FORWARD
BACKWARD
POWER LIGHT
ON OFF
LEFT RIGHT
FORWARD
BACKWARD
POWER LIGHT
ON OFF
LEFT RIGHT
FORWARD
BACKWARD
POWER LIGHT
ON OFF
LEFT RIGHT
FORWARD
BACKWARD
POWER LIGHT
ON OFF
LEFT RIGHT
FORWARD
BACKWARD
POWER LIGHT
ON OFF
LEFT RIGHT
ENGLISH 5
ENGLISH 7
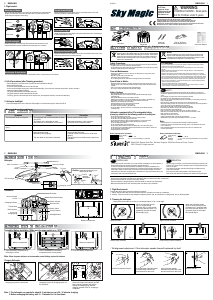
6. Environment for Flight
7. Flying Aids for Beginners
6 ENGLISH
8 ENGLISH
8.1 Basic Control
8.2 Flight control
8.3 Trimmer adjustment
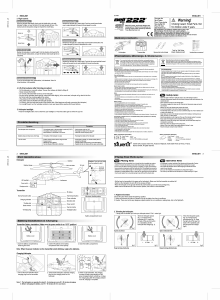
5. Flight Technique & Tips
10. Trouble Shooting
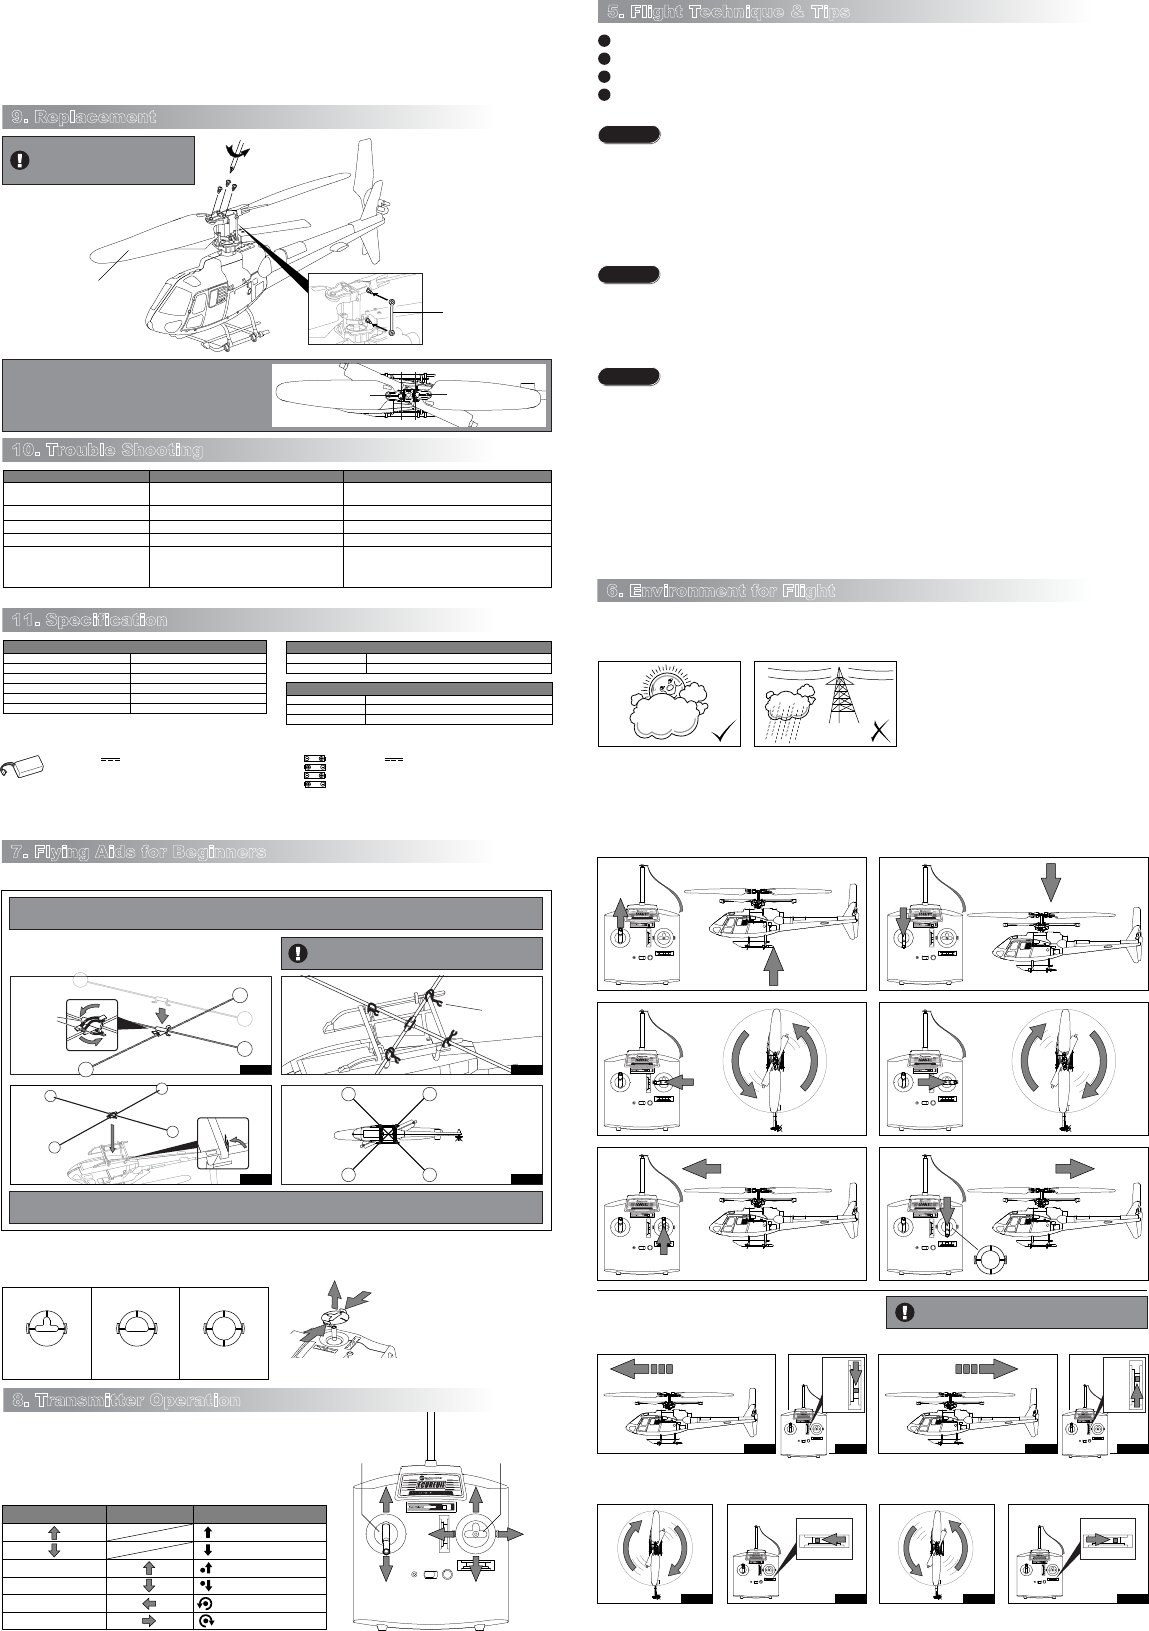
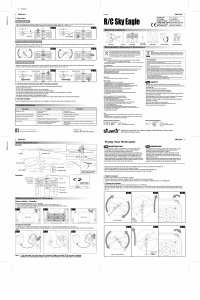
9. Replacement
11. Specification
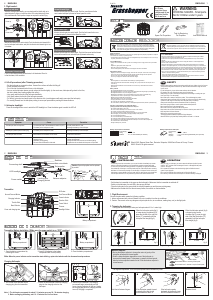
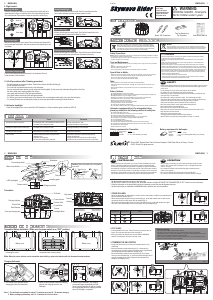
8. Transmitter Operation
fig. 14 fig. 15
Throttle stick Direction stick
Movements
Hover up
Hover up
Suspending the helicopter
Suspending the helicopter
Suspending the helicopter
Suspending the helicopter
Hover down
Hover down
Forward
Forward
Backward (with guide plate 3 only)
Yaw left
Yaw right
Backward
- Screw the antenna on transmitter.
- Set the band on transmitter to the same one as the helicopter. The band allocation is printed
underneath the helicopter.
- Set both trimmers to their middle positions.
- Set the left control stick on transmitter to MINIMUM throttle, and then set the power on.
- Set the ON/OFF switch on helicopter to “ON”, the power indicator will flash.
- Place the helicopter on the ground with the tail point towards you and the nose facing away from you.
- Position the helicopter on a smooth and level surface and at least 1m away from the pilot before lift-off.
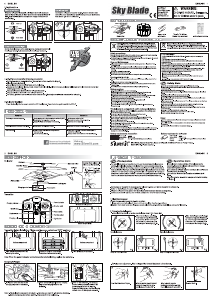
7.1 Training Gear
7.2 Guide Plate Replacement
Main rotor blade
Throttle Stick Direction Stick
- Put the helicopter on a smooth surface. Uneven floor surface will affect its lifting off.
- Slowly increase the throttle.
- DO NOT look at the transmitter but focus on the helicopter.
- As soon as the helicopter leaves ground, reduce the throttle slightly. (in the worst case, helicopter will go back to the floor,
but that is better than crashing against the ceiling)
- VERY gently add the throttle if the helicopter goes down.
- VERY gently reduce the throttle if the helicopter goes up.
- For turning, give short and small inputs to the right control stick. (most beginners will easily over control the helicopter)
- For moving forward, direct the helicopter to more open space before pushing the right stick.
- Press the “LIGHT” button to switch on the light at the nose of helicopter.
3. LIFT-OFF PROCEDURE (after Trimming procedure):
- Push the throttle up gently to raise your helicopter about 0.5 to 1 meter high.
- When the helicopter turns clockwise involuntarily(fig. 18), adjust the yaw trimmer towards 'LEFT' until the helicopter flies straight (fig. 19).
- When the helicopter keeps turning counter clockwise (fig. 20), adjust the yaw trimmer towards 'RIGHT' until the helicopter flies straight (fig. 21).
2. Yaw trimmer (Left / Right)
- Push the throttle up gently to raise your helicopter about 0.5 to 1 meter high.
- When the helicopter moves forward involuntarily (fig. 14), adjust the pitch trimmer towards 'BACKWARD' until the involuntary movement stops. (fig. 15)
- When the helicopter moves backward involuntarily (fig. 16), adjust the pitch trimmer towards 'FORWARD' until the involuntary movement stops. (fig. 17)
- Outdoor: It's better in a sunny day, and in calm wind or slight breeze.
- We suggest you to play it on grass to protect your helicopter when it impacts on ground.
- Do not play your helicopter when it is raining, snowing, or near high power cable.
1. Pitch trimmer (Forward / Backward)
fig. 16 fig. 17
fig. 10
fig. 11 fig. 13
Precaution: Because of its light weight, it may be blown away under strong wind.
- Position the helicopter on a smooth and level surface and at least 1m away from the pilot before lift-off.
- After you crash your helicopter you need to switch the ON/OFF to “OFF” and then check for damages. If there is no damage
slide the ON/OFF switch to “ON” again to restart the helicopter.
- Never attempt to fly with antenna of the transmitter not fully extended. If the transmitter is used while the antenna is not fully
extended, the radio wave will not reach the helicopter and it could take a crash.
- Never operate ON/OFF switch of the helicopter without ensuring that the battery level indicator of the transmitter lights up. If
the helicopter power is switched on while the transmitter is not functioning, there is a risk that unintended movement of the
helicopter will occur.
- Make sure the antenna is tightened and tested before playing. If the antenna were to loosen and detach during flying, then no
signal can be transmitted and the helicopter will crash.
- Parents: Please read the operating instructions carefully with your children prior to the first use.
- Pay attention! Do not fly helicopter near persons and animals.
- Always keep your eyes on helicopter and prevent it from landing or crashing near your head, your body, or on other people.
- Never take apart or attempt to modify the product. This could damage the product.
- Always keep rotating parts away from your hands, hair or face to avoid injury. Stand during operation in order to get out of
the way of helicopter quickly if necessary.
- Always switch the helicopter and the transmitter to the “OFF” position when not flying.
- Never allow young children to use this product without adult supervision.
- Never use this product if it has damaged parts.
- Never hold or throw any objects into the running rotors.
- Keep hands, hair and loose clothes away from the propeller when the power switch is ON.
- Keep instructions for future reference.
- Warning! Do not touch the running propeller.
- Training by experienced adults is required for flying helicopter.
- Attention! Risk of eye injuries! Keep a safety distance of at least 1 m.
TIP! SAFETY
TIP! OPERATION
TIP! CONTROLLING
- For controlling the sticks on transmitter, try not to push the sticks immediately to any extreme positions. It should be like
steering a bicycle rather than pressing computer game sticks.
- For the novice pilot (after the trimming procedure is completed), it is highly recommended to focus exclusively on
learning to control the left control stick first. If the helicopter turns around by itself there is no need to keep it straight.
For the first flight, it is important to learn to keep the helicopter at a constant altitude of around 1 meter with small inputs
on the left control stick. Once the pilot masters this, he may start learning to take control with the right control stick.
The training gear is to attach to the skid of the helicopter to decrease the chance
of inflicting damage to the helicopter while landing/ crushing.
1. Bind the two plastic supports with the rubber bands. (fig.10)
2. Affix the training gear to the skid by the provided binding wires. (fig.11-13)
Two additional direction stick guide plates are included.
They can be very useful for beginners. The guide plates restrict the movement of the
direction stick to simplify the control and decrease the possibility of over-control by the
user.
It is recommended that beginner should get used to control the helicopter with guide
plates 1 installed before moving onto guide plates 2 and then guide plates 3.
To replace the guide plate:
1. Turn off both the transmitter and
the helicopter.
2. Lift up the installed guide plate
by pressing the two handles
inward.
3. Insert the desirable guide plate.
Yaw left Yaw right
Rubber band
binding
wires
Guide plate 1
(Built-in)
Guide plate 2 Guide plate 3
Only allows straight
left, right and forward
movements.
Only allows 180-degree
forward left-to-right
movements.
Allows 360-degree
movement.
fig. 12
Finish!
! Great flight in weak wind environment, even better when there is no wind.
! To lift-off, the helicopter’s head must face the wind.
! Must maintain full throttle if out of control.
! A good pilot flies the helicopter close-by and low.
fig. 18 fig. 19 fig. 20 fig. 21
Battery requirement for Transmitter:
Battery requirement for Helicopter:
Power Supply :
Rating : DC 7,4 V , 22 W
Batteries : 1 x 7,4 V Li-Poly Rechargeable Battery Pack (included)
Capacity : 300 mAh
Power Supply :
Rating : DC 6 V , 1,2 W
Batteries : 4 x 1,5 V "AA"/LR6/AM3 (not included)
Note: 1. Maintain the altitude of the helicopter to around 1 meter when training gear is attached.
2. After you master piloting the helicopter with the training gear, you can take it off. However, please be reminded that the helicopter will fly faster and
be more responsive without the training gear. Practise again without the train gear before flying the helicopter outdoor.
Cautions: Practise flying when there is no wind.
Try to clear the area of as many obstacles as you can before practice. Keep clear distance from children and pets.
Do not practise near electrical apparatus or power cable.
Highly recommended to start fly the
helicopter with training gear!
With guide plate 3 only
FORWARD
BACKWARD
FORWARD
BACKWARD
LEFT RIGHT LEFT RIGHT
GOOD PILOT FLIES THE
HELICOPTER CLOSE-BY
AND LOW!
MUST MAINTAIN FULL THROTTLE
IF OUT OF CONTROL!
Stabiliser linkage
Symptom Cause Correction
Suddenly stop and drop down when flying.
Propeller can't move. - ON/OFF Switch is “OFF”.
- Weak Battery.
- Set switch to “ON”.
- Re-charge the battery pack.
- Re-charge the battery pack.- Weak power.
The power indicator on transmitter blinking. - Change new batteries in transmitter.- Weak power of transmitter.
Helicopter does not react. - Reset the correct channel.- Channel selection on transmitter is not correct.
- Another radio control device using the same frequency
and channel is operated near your helicopter.
- Out of the control range of distance.
- Move to another place where without radio
frequency interference from another device.
- Ensure the antenna is fully extended. The control
range for helicopter is up to 25 meters.
Loss of control.
Transmitter
Channel
Frequency
Modulation
Control range
Battery low detection
Power saving mode
A & B
27.145 MHz
AM
Up to 25 meters
Power indicator blinks once each second
Power indicator off
Battery Charger
Power adaptor (input power)
Charging rate
100-240 V, 50 Hz / 60 Hz
12 V, 1 A
Helicopter
Gryo
Gyro control
Battery pack
Built-in
Heading-lock
7.4 V, 300 mAh LiPo battery (included)
2
5
1
3
4
6
IMPORTANT!
After replacement of the main rotor blades. The 6 screws
on the main rotor blades may be loosening after several
flights with crashes. Tighten them one by one using the
screwdriver accordingly.

Praat mee over dit product
Laat hier weten wat jij vindt van de Silverlit Eurocopter ECUREUIL AS350 Radiobestuurbare helikopter. Als je een vraag hebt, lees dan eerst zorgvuldig de handleiding door. Een handleiding aanvragen kan via ons contactformulier.
beantwoord | Ik vind dit nuttig (0)