
4-125-804-33(1)
AIR-SW10Ti
©2009 Sony Corporation Printed in China
Wireless
Audio System
GB
Operating Instructions
AIR-SW10Ti.GB.4-125-804-33(1)
WARNING
To reduce the risk of fire or electric shock,
do not expose this apparatus to rain or
moisture.
To reduce the risk of fire, do not cover the ventilation
opening of the apparatus with newspapers, tablecloths,
curtains, etc. Do not place the naked flame sources such
as lighted candles on the apparatus.
To reduce the risk of fire or electric shock, do not expose
this apparatus to dripping or splashing, and do not place
objects filled with liquids, such as vases, on the apparatus.
As the main plug is used to disconnect the unit from the
mains, connect the unit to an easily accessible AC outlet.
Should you notice an abnormality in the unit, disconnect
the main plug from the AC outlet immediately.
The unit is not disconnected from the mains as long as it
is connected to the AC outlet, even if the unit itself has
been turned off.
Do not install the appliance in a confined space, such as a
bookcase or built-in cabinet.
Do not expose batteries or apparatus with battery-
installed to excessive heat such as sunshine, fire or the
like.
The nameplate is located on the bottom exterior of the
main unit (ATS-SW10Ti).
Notice for customers: the following
information is only applicable to
equipment sold in countries applying EU
directives.
The manufacturer of this product is Sony Corporation,
1-7-1 Konan Minato-ku, Tokyo, 108-0075 Japan.
The Authorized Representative for EMC and product
safety is Sony Deutschland GmbH, Hedelfinger Strasse
61, 70327 Stuttgart, Germany.
For any service or guarantee matters, please refer to the
addresses given in separate service or guarantee
documents.
Disposal of Old Electrical &
Electronic Equipment
(Applicable in the European
Union and other European
countries with separate
collection systems)
This symbol on the product or on its packaging indicates
that this product shall not be treated as household waste.
Instead it shall be handed over to the applicable
collection point for the recycling of electrical and
electronic equipment. By ensuring this product is
disposed of correctly, you will help prevent potential
negative consequences for the environment and human
health, which could otherwise be caused by inappropriate
waste handling of this product. The recycling of materials
will help to conserve natural resources. For more detailed
information about recycling of this product, please
contact your local Civic Office, your household waste
disposal service or the shop where you purchased the
product.
Applicable accessories: Remote commander, Wireless
Transceiver EZW-RT10A
Disposal of waste batteries
(applicable in the European
Union and other European
countries with separate
collection systems)
This symbol on the battery or on the packaging indicates
that the battery provided with this product shall not be
treated as household waste.
On certain batteries this symbol might be used in
combination with a chemical symbol. The chemical
symbols for mercury (Hg) or lead (Pb) are added if the
battery contains more than 0.0005% mercury or 0.004%
lead.
By ensuring these batteries are disposed of correctly, you
will help prevent potentially negative consequences for
the environment and human health which could
otherwise be caused by inappropriate waste handling of
the battery. The recycling of the materials will help to
conserve natural resources.
In case of products that for safety, performance or data
integrity reasons require a permanent connection with an
incorporated battery, this battery should be replaced by
qualified service staff only. To ensure that the battery will
be treated properly, hand over the product at end-of-life
to the applicable collection point for the recycling of
electrical and electronic equipment.
For all other batteries, please view the section on how to
remove the battery from the product safely. Hand the
battery over to the applicable collection point for the
recycling of waste batteries.
For more detailed information about recycling of this
product or battery, please contact your local Civic Office,
your household waste disposal service or the shop where
you purchased the product.
License and Trademark Notice
“S-AIR” and its logo are trademarks of Sony Corporation.
iPod is a trademark of Apple Inc., registered in the U.S.
and other countries.
iPhone is a trademark of Apple Inc.
The Bluetooth word mark and logos are owned by the
Bluetooth SIG, Inc. and any use of such marks by Sony
Corporation is under license. Other trademarks and trade
names are those of their respective owners.
All other trademarks and registered trademarks are of
their respective holders. In this manual,
TM
and
®
marks are
not specified.
Features
AIR-SW10Ti is an “S-AIR” compatible packaged product
that consists of one S-AIR main unit and one subwoofer.
You can enjoy high quality sound by connecting the
subwoofer wirelessly. The subwoofer can be used only
with this main unit.
In addition, connecting the S-AIR main unit (hereafter
called “main unit”) to optional S-AIR sub units (hereafter
called “sub units”) using “S-AIR” technology, you can use
each unit in a remote location.
For example, you can install optional sub units, one in a
study room and the other in a bedroom, and install the
system in the living room. You can then listen to music
from the system located in the living room by controlling
the sub units.
Up to 10 optional sub units can be connected to a main
unit.
S-AIR (Sony Audio Interactive Radio
frequency)
Recent times have seen the rapid spread of DVD
media, Digital Broadcasting, and other high-quality
media.
To ensure that the subtle nuances of these high-quality
media are transmitted with no deterioration, Sony has
developed a technology called “S-AIR” for the radio
transmission of digital audio signals with no
compression, and has incorporated this technology
into the EZW-RT10A.
This technology transfers digital audio signals with no
compression using the 2.4 GHz band range of ISM
band (Industrial, Scientific, and Medical band), such as
wireless LANs and Bluetooth applications.
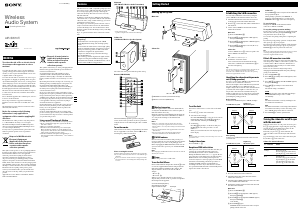
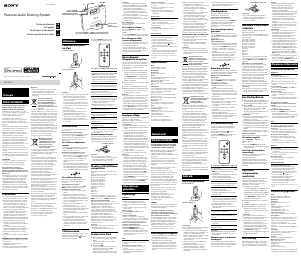
Getting Started
Main unit
(ATS-SW10Ti / Wireless Audio Transmitter)
T
U
N
I
N
G
B
A
N
D
F
U
N
C
T
I
O
N
V
O
L
U
M
E
S
T
A
N
D
B
Y
* Touch sensitive buttons
Operation using the touch sensitive button that beeps.
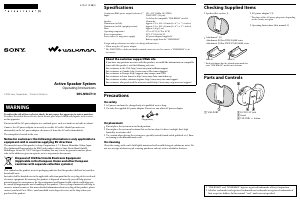
Subwoofer
(SA-WA10R / Wireless Speaker System)
The subwoofer can be placed with the speaker side up.
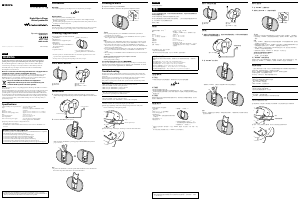
Remote (RM-ANU070)
This manual mainly explains operations using the
remote, but the same operations can also be performed
using the buttons on the unit having the same or similar
names.
To use the remote
Slide and remove the battery compartment lid, and insert
the two supplied R03 (size AAA) batteries, side first,
matching the polarities shown below.
Notes on using the remote
With normal use, the batteries should last for about six months.
Do not mix an old battery with a new one or mix different types
of batteries.
If you do not intend to use the remote for a long period of time,
remove the batteries to avoid damage from battery leakage and
corrosion.
Hooking up the system
Main unit
A
N
T
E
N
N
A
E
Z
W
-
R
T
1
0
A
S
T
A
N
D
B
Y
D
A
V
/
A
B
C
Wall socket
Subwoofer
Wall socket
EZW-RT10A
A
S
-
A
I
R
I
D
P
A
I
R
I
N
G
B
C
FM/DAB lead antenna (extend horizontally)
Wireless transceiver (EZW-RT10A)
Wireless transceiver
Insert the supplied wireless transceiver (EZW-RT10A)
securely into the EZW-RT10A slot on the rear panel of
main unit and the subwoofer.
Check the orientation of the mark when inserting the
supplied wireless transceivers (EZW-RT10A). Failure to
do so may result in damage to the main unit and
subwoofer.
Notes
Make sure to turn off the main unit and the subwoofer when
inserting or removing the supplied wireless transceivers (EZW-
RT10A). Failure to do so may result in damage to the main unit and
subwoofer.
Do not touch the terminals of the supplied wireless transceivers
(EZW-RT10A).
Do not insert any device other than the supplied wireless
transceivers (EZW-RT10A) into the EZW-RT10A slot.
FM/DAB antenna
Find a location and an orientation that provide good
reception, and then set up the antenna. Keep the antenna
away from the power cord to avoid picking up noise.
Before unplugging the FM/DAB antenna, make sure the
system is turned off to preserve your own FM and DAB
settings.
Note
When unplugging the FM/DAB antenna from the main unit, hold the
antenna by the connector.
Power
Connect the power cord to a wall socket.
To use the iPod/iPhone
Insert a Universal Dock Adapter into the Dock before
use. Use the supplied Universal Dock Adapter with the
main unit for iPhone and iPhone 3G as follows. The
adapter number is shown on the bottom of Dock
Adapter.
‒ iPhone :
‒ iPhone 3G :
When you use other iPod models, use the supplied
adapter with your iPod model, or purchase a compatible
Dock Adapter from Apple Inc.
To remove the Dock Adapter, pull it up
with your fingernail or a flat object
using the slot inside the adapter.
Dock Adapter
Connector
Establishing the S-AIR connection
You can easily establish the connection by setting the
same S-AIR ID for the main unit and the subwoofer.
1 Check that the wireless transceivers are inserted
securely in the main unit and the subwoofer.
2 Press / on the main unit and the subwoofer to
turn them on.
3 Set the same S-AIR ID for the main unit and the
subwoofer as follows:
Main unit
Press SYSTEM MENU .
Press / repeatedly until “S-AIR” appears,
then press ENTER
.
Press / repeatedly until “S-AIR ID” appears,
then press ENTER
.
Press / repeatedly to select “A,” “B” or “C,”
then press ENTER
.
Subwoofer
Set the S-AIR ID selector on the rear panel to the
same S-AIR ID as the main unit.
Tip
The S-AIR ID is set at the factory to “A.”
4 Confirm the connection status.
Once connection between the main unit and the
subwoofer is established, the S-AIR indicator on
the subwoofer lights up.
Tip
You can also connect up to 10 optional sub units to the main unit. In
this case, set the S-AIR ID to the same ID as the main unit.
For details on the S-AIR ID of the sub unit, refer to the Operating
Instructions supplied with the sub unit.
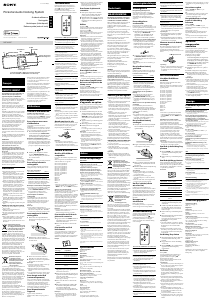
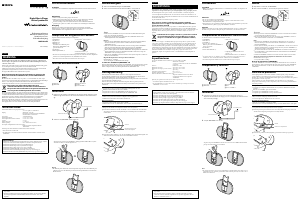
Identifying the subwoofer with your main
unit (Pairing operation)
It is easy to set the same S-AIR ID for the main unit and
the subwoofer to establish the connection.
However, if a neighbor has an AIR-SW10Ti system with
the same S-AIR ID as your S-AIR main unit, the
neighbor may be able to hear the audio transmitted from
your main unit on the neighbor’s subwoofer. Also, you
may be able to hear the audio transmitted from your
neighbor’s main unit on your subwoofer. To prevent this,
you can identify the subwoofer with your main unit by
performing the pairing operation.
Before pairing
Connection is established by the S-AIR ID (example).
Your AIR-SW10Ti system
Neighboring
AIR-SW10Ti system
ID: A
Subwoofer
Main unit Main unit
ID: A
ID: A
ID: A
Subwoofer
After pairing
Connection is established between the subwoofer and
your main unit.
Your AIR-SW10Ti system
Neighboring
AIR-SW10Ti system
Pairing
ID: A
Subwoofer
Main unit Main unit
ID: A
ID: A
ID: A
Subwoofer
Not
connected
1 Place the main unit near the subwoofer.
2 Check that the power of the main unit and the
subwoofer is turned on.
3 Check that the S-AIR ID of the main unit is the same
as the S-AIR ID of the subwoofer.
4 Perform the pairing operation of the main unit and
the subwoofer as follows:
Main unit
Press SYSTEM MENU .
Press / repeatedly until “S-AIR” appears,
then press ENTER
.
Press / repeatedly until “PAIRING” appears,
then press ENTER
.
“OK?” flashes.
Press ENTER again.
“PAIRING” flashes and the main unit is ready for
pairing with the subwoofer.
Subwoofer
Press PAIRING on the rear panel of the subwoofer
using a pointed object.
When pairing is performed, “COMPLETE” is
displayed on the main unit for 2 seconds and the
PAIRING indicator on the subwoofer lights up.
To cancel pairing
Change the S-AIR IDs of the main unit and the
subwoofer to different S-AIR IDs.
To stop the pairing operation midway
It takes a few seconds to complete the pairing of the main
unit and subwoofer after pressing PAIRING on the
rear panel of the subwoofer in step 4.
You can undo the pairing setting before completing the
pairing.
If you have done the pairing operation of only the main
unit, repeat to of step 4 again.
If you have done the pairing operation of both the main
unit and subwoofer, repeat to of step 4 and press
PAIRING on the rear panel of the subwoofer.
Tip
You can also pair the main unit with optional sub units. For details
on turning on the pairing function, refer to the Operating
Instructions supplied with the sub unit.
If the S-AIR connection is unstable
Since the S-AIR product uses radio waves that share the
same frequency (2.4 GHz) as other wireless systems, such
as wireless LAN or Bluetooth devices, interference or
poor transmission may result if you use other wireless
devices near the system.
In this case, the connection may be improved by
changing the RF CHANGE (Radio Frequency Change)
setting on the main unit.
1 Press SYSTEM MENU .
2 Press / repeatedly until “S-AIR” appears, then
press ENTER
.
3 Press / repeatedly until “RF CHANGE” appears,
then press ENTER
.
4 Press / repeatedly to select the desired
setting.
The default setting is underlined.
AUTO
Normally select this setting. The main unit changes
the RF CHANGE setting to “ON” or “OFF”
automatically.
ON
The main unit transmits sound by searching for the
best channel for transmission.
OFF
The main unit transmits sound using a fixed channel
for transmission. When you select this setting, select
the S-AIR ID that provides the best connection.
5 Press ENTER to exit the system menu.
Turning the subwoofer on/off in sync
with the main unit
When the subwoofer is on or in power save mode, press
/ on the main unit to begin using the system. By
pressing / on the main unit to turn it off, the
subwoofer will enter power save mode.
Each time you press / on the main unit, the
subwoofer will be turned on/off in sync with the main
unit.
You can check the power status of the subwoofer by the
/ indicator on the subwoofer.
Subwoofer status indication
/indicator
Status
Green Power on
Orange Power save mode
You can turn on the subwoofer by
pressing / on the main unit.
Red Standby mode
You cannot turn on the subwoofer
by pressing / on the main
unit. To turn on the subwoofer,
press / on the subwoofer.
To set the clock
Use buttons on the remote to set the clock on the main
unit.
1 Press / to turn on the main unit.
2 Select the clock set mode.
Press CLOCK/TIMER to select the clock set mode.
If “PLAY SET” flashes, press / repeatedly to
select “CLOCK,” and then press ENTER .
3 Set the time.
Press / repeatedly to set the hour, then press
ENTER . Use the same procedure to set the
minutes.
When you turn off the unit, the clock display appears
in the display.
Note
The clock settings are lost when you disconnect the power cord or if a
power failure occurs.
To adjust the volume
Press VOLUME +/– .
Reception of DAB radio station
When you turn on the system for the first time after you
purchase the system, DAB Automatic Scan starts
automatically and creates a list of available services.
During the DAB Automatic Scan, “****” appears. Do not
press any button on the main unit or the remote during
DAB Automatic Scan. Scanning is interrupted and
service list may not be created properly. To run the DAB
Automatic Scan manually, perform the procedure of
“Running the DAB Automatic Scan manually” in
“Listening to the radio.” If you have moved to another
area, perform the DAB Automatic Scan manually and re-
register the contents of broadcasts.


Praat mee over dit product
Laat hier weten wat jij vindt van de Sony AIR-SW10Ti Speakerdock. Als je een vraag hebt, lees dan eerst zorgvuldig de handleiding door. Een handleiding aanvragen kan via ons contactformulier.