Handleiding Sony Bravia KLV-24P413D LCD televisie

Handleiding voor je Sony Bravia KLV-24P413D LCD televisie nodig? Hieronder kun je de handleiding gratis bekijken en downloaden als PDF in het Nederlands en/of Engels. Dit product heeft 13 veelgestelde vragen, 0 comments en heeft 0 stemmen. Is dit niet de handleiding die je zoekt, neem dan contact met ons op.

Is je product kapot en biedt de handleiding geen oplossing meer? Dan kun je voor reparatie gratis terecht bij Repair Café.

Handleiding

Loading…

© 2017 Sony Corporation Printed in India
Customer support
@
http://www.sony.co.in/
(TEL: 1800-103-7799)
KLV-29P423D / KLV-24P413D / KLV-24P423D / KLV-22P413D
Operating Instructions
Television
4-581-143-32(1)
Checking the
accessories
Table-Top Stand (1)*
Fixing screws for Table-Top Stand (M4 × 14) (3)
Remote control (1)
AC power cord (mains lead) (1)
AC adapter (1)
Size AAA batteries (2)
Operating Instructions (this manual) and other
documents
* Refer to the supplied Table-Top Stand leafl et to assemble
the Table-Top Stand.
1: Attaching the Table-
Top Stand
If using an electric screwdriver, set the tightening torque at
approximately 1.2 N·m (12 kgf·cm).
Thick and
soft cloth
Detaching the Table-Top Stand
from the TV
~
Do not remove the Table-Top Stand for any reason other
than to wall-mount the TV.
Thick and soft cloth
2: Mounting the TV on
the wall
Follow the instruction guide provided with the Wall-Mount
Bracket for your model. Suffi cient expertise is required in
installing this TV, especially to determine the strength of
the wall for withstanding the TV’s weight.
The length of the screw for Wall-Mount Bracket differs
depending on the Wall-Mount Bracket thickness. Please
see below illustration.
22"/24"/29" TV: 6.5 mm ~ 11 mm
Screw (M4)
Wall-Mount Bracket
TV’s rear cover
Be sure to store the unused screws and Table-Top Stand
in a safe place until you are ready to attach the Table-Top
Stand. Keep the screws away from small children.
Attach the Wall-Mount Bracket (not supplied)
using the screws (not supplied)
Screw (not supplied)
Soft cloth
Wall-Mount Bracket
(not supplied)
If using an electric screwdriver, set the torque at
approximately 1.5 N·m {15 kgf·cm}.
Precautions
Detach the Table-Top Stand from the TV. For details, refer
to (Detaching the Table-Top Stand from the TV).
Wall mount location
B
A
Dimension A (mm) B (mm)
22 100 100
24 100 100
29 100 100
3: Connections
Picture Quality
AV composite cable
Antenna (aerial) cable
Component cable HDMI cable
SD HD
Standard defi nition (SD) videos have
picture signals with a vertical resolution of
480 (NTSC) or 576 (PAL/SECAM) lines.
High defi nition (HD) videos have picture
signals with a vertical resolution of 720 or
1,080 lines.
If Cable, Connectivity, and other External Devices are defective or not done correctly, it may cause TV
showing symptoms below;
TV Auto OFF/ON @ TV No Audio @ TV No Picture
Cables Condition
Make sure the cables at A, B, and C are in good condition and not defective
Cables Connectivity
Make sure the cables and connectors at A, B, and C are inserted and connected correctly
Set Top Box (STB)
Make sure the STB is working fi ne and no issue from the Service Provider
Connecting an antenna (aerial)/
cable
Antenna (aerial) cable (not supplied)
Connecting an antenna (aerial)/
cable and VCR
AV cable
(not
supplied)
Antenna (aerial) cable
(not supplied)
VCR
Connecting audio/video devices/
Set top box
AV cable
(not supplied)
Antenna
(aerial)
cable (not
supplied)
PC Cable
(not supplied)
* KLV-29P423D /
KLV-24P423D only
PC *
DVD recorder/Set top box
x Connecting MHL device (KLV-29P423D /
KLV-24P423D only)
Use authorized
MHL cable with
MHL logo (not
supplied)
MHL device
The MHL (Mobile High-Defi nition Link) enables the TV
to communicate with a connected MHL-compatible
device. The TV can charge the connected MHL-
compatible device while playing photo/music/video
from it. You can use the TV remote control to control the
connected MHL-compatible device.
~
If “Auto Input Change (MHL)” is set to “On”, the TV
automatically switches to HDMI2/MHL (
KLV-29P423D /
KLV-24P423D only) when MHL-compatible device is
connected to HDMI2 / MHL (KLV-29P423D / KLV-24P423D
only) jack. The availability of “Auto Input Change (MHL)”
depends on whether the MHL-compatible device can
support this feature.
You can continue normal usage of the connected MHL-
compatible device (such as receiving calls) depending on
its capability.
Some remote control functions may not be available
depending on features of the connected MHL-compatible
device. Please refer to the device manual for details.
This product is offi cially MHL-certifi ed for operation
with other MHL-certifi ed devices. If you encounter any
problems when using the MHL function, please consult the
device manufacturer for support.
4: Preventing the TV
from toppling over
Anchor bolts (M4) (not supplied)
Strong cord
(not supplied)
5: Performing the
initial setup
1
~
When the TV is in standby mode (the "/1 (standby)
indicator on the TV front panel is off ), press "/1 on the
remote to turn on the TV.
Make sure that the TV is completely turned off before
unplugging the AC power cord (mains lead) or DC
cable. Unplugging the AC power cord (mains lead) or
DC cable while the TV is turned on may cause the TV to
malfunction.
2
Follow the instructions on the screen.
~
You can also tune channels manually.
Language options vary depending on model.
Select “Home” from “Location” for the best TV settings to
use the TV in the home.
3
To select TV position:
“Settings”
“Set-up”
“AV Set-up”
“TV Position”
~
To exit “Set-up” menu:
Overview of the
TV controls and
indicators
Front View
Power/Standby indicator
Lights off when in standby.
Lights up in green when
the TV is turned on.
Flashes while the remote is
being operated.
~
Do not put anything over the sensor, doing so may affect
its function.
Back View
Power
Turns the TV on or
switch to standby
mode.
CH/INPUT
Press button until
Rr Programme +/-”
appears and selects
channels with Volume
button.
Press button until “Rr
Input select” appears
and selects input
source with Volume
button.
Volume
• Adjusts volume.
• Moves through
options up or down
when selecting
channels or input
source.
Overview of the remote control
Turns the TV on or switch to standby
mode.
Selects the language.
Selects the desired wide mode.
Displays information about the
programme/input.
Selects, adjusts or confi rmed
selected items.
Displays a list of shortcuts to some
setting menus.
Returns to the previous channel or
input watched (for more than 15
seconds).
In TV mode: Selects the next or
previous channel.
Operates USB compatible
equipment that is connected to
the TV.
Dual Sound.
Selects input source.
Switches to a TV display when
displaying external input.
In TV mode: Selects channels.
Available when operation guide
appears on the screen.
Returns to the previous screen.
In USB mode: Stops the playback.
Mutes or restores sound.
Adjusts volume.
Displays or cancels the menu.
Sets the desired time frame to turn
off TV automatically.
x To change the Wide Mode
For TV, Video, Component or HDMI (except PC input)/ MHL For PC or HDMI PC Input (PC timing)
Wide Zoom* Normal Full Zoom* Normal Full 1 Full 2
* Parts of the top and bottom of the picture may be cut off.
~
Some options may not be available depending on the signal source.
Introduction
Thank you for choosing this Sony product. Before operating the TV,
please read this manual thoroughly and retain it for future reference.
~
The illustrations used in this manual may differ depending on your
TV model.
The illustrations of the remote control used in this manual are of the
RMT-TX112P unless otherwise stated.
Before operating the TV, please read Safety Information. Retain this
manual for future reference.
Location of the identifi cation label
Labels for TV Model No. and Power Supply rating are located on the
rear of the TV.
Labels for the AC adapter Model No. and Serial No. are located on the
bottom of the AC adapter.
Disposal of the TV set
Disposal of Old Electrical & Electronic
Equipment (Applicable in the European
Union and other European countries with
separate collection systems)
Disposal of the TV set
Disposal of Old Electrical & Electronic
Equipment (Applicable in Republic of
India)
This symbol and its variations indicate that this product and its
components, consumables, parts or spares thereof shall not be treated
as household waste and may not be dropped in garbage bins. Product
owners are advised to deposit their product at the nearest collection
point for the recycling of electrical and electronic equipment. Your
co-operation shall facilitate proper disposal and help prevent potential
negative consequences/hazards to the environment and human health,
which could otherwise be caused by inappropriate waste disposal
including improper handling, accidental breakage, damage and/ or
improper recycling of e-waste. The recycling of materials will help
to conserve natural resources. For more detailed information about
recycling of this product, please contact your local civic offi ce, your
household waste disposal service provider or the store where you made
the purchase. You may contact our company’s toll free number in India
for assistance.
Toll Free: 1800-103-7799
Visit: www.sony.co.in for product recycling
Reduction in the Use of Hazardous Substances in Electrical &
Electronic Equipment (Applicable in Republic of India)
This product and its components, consumables, parts or spares
comply with the hazardous substances restriction of India’s E-Waste
(Management) Rules. The maximum allowable concentrations
of the restricted substances are 0.1% by weight in homogenous
materials for Lead, Mercury, Hexavalent Chromium, Polybrominated
Biphenyls (PBB) and Polybrominated Diphenyl Ethers (PBDE), and
0.01% by weight in homogenous materials for Cadmium, except for
the exemptions specifi ed in Schedule II of the aforesaid Rules.
Trademark information
The terms HDMI and HDMI High-Defi nition Multimedia Interface, and
the HDMI Logo are trademarks or registered trademarks of HDMI
Licensing LLC in the United States and other countries.
Manufactured under license from Dolby Laboratories. Dolby and the
double-D symbol are trademarks of Dolby Laboratories.
“BRAVIA” and are trademarks of Sony Corporation.
MHL, Mobile High-Defi nition Link and the MHL Logo are trademarks or
registered trademarks of MHL Licensing, LLC.
Blu-ray Disc is a trademark.
ATTENTION:
This product is qualifi ed for the BEE Star rating in the ‘Home’ Mode.
The Objectives of Star Labeling Program is designed to promote
energy effi cient products and practices.
When the television is initially set up, it is designed to meet the BEE
Star Labeling requirements while maintaining optimum picture quality.
Changes to certain functionalities of this television (TV Guide,
Picture/sound etc) may change the power consumption.
Depending upon such changed setting (eg., Retail mode), the
power consumption may vary which possibly could exceed the
stated energy consumption.
To reset the television to Star rating qualifi ed settings, select ‘Home’
mode from the initial set-up procedure in ‘factory settings’ under the
‘Set-up’ menu.
* Attention statement is subject matter of BEE, and
applicable if functions is available
** “Home mode” conditions are as per BEE guideline only
Viewing pictures from the connected
equipment
Turn on the connected equipment, then press on the remote control or CH/INPUT on the TV to display the
connected equipment list.
Rear View
*
1
Terminals and labels may vary depending on TV model.
HDMI IN supports only KLV-22P413D.
HDMI IN 1 and HDMI IN 2 support only KLV-24P413D.
HDMI IN 1 and HDMI IN 2 / MHL support only KLV-29P423D / KLV-24P423D.
*
2
Terminals and labels may vary depending on TV model.
*2
DF
*2
G
D
C
B
*2
A
*1 *2
E
*2
A HDMI IN, HDMI IN 1, HDMI IN 2 / MHL and HDMI IN 2 (Home Theatre systems, Camcorder, Blu-ray Disc
player, DVD player, PC with HDMI output and Mobile device).
Connect to the HDMI IN jack if the equipment has an HDMI jack.
If the equipment is compatible with MHL, connect the MHL jack of the equipment to HDMI 2 / MHL jack
(KLV-29P423D / KLV-24P423D only) through a MHL - HDMI cable (not supplied).
~
The HDMI jacks can support PC timing in HDMI PC mode. Refer to (PC input signal reference chart for HDMI IN 1, 2) next
to “PC settings”.
Be sure to use only an authorized HDMI cable bearing the HDMI logo, or an authorized MHL cable bearing the MHL logo.
B (Digital still camera, Camcorder, USB storage media)
Access photo/music/video fi les stored on a USB device.
C AUDIO OUT
/ (Stereo systems, Headphone)
Connect with an audio cable or headphones. You can listen to TV sound through your stereo system or headphones.
You can select “Variable” or “Fixed” in the “Audio Out” menu.
D
AC IN 110 V – 240 V AC, 50/60 Hz
Connect AC adapter to the (
) jack.
~
Be sure to fi x adapter plug in hook.
E VIDEO IN /COMPONENT IN/AUDIO (DVD player, VCR, Video game equipment, S VHS/Hi8/DVC
camcorder, DVD player with component output)
Connect to the VIDEO IN
jack and the AUDIO jacks. If you connect mono equipment, connect to the L
(MONO) jack.
For better picture quality, component connection is recommended if your DVD player has a component video
output. Connect to the COMPONENT IN jacks.
F
PC IN*
* KLV-29P423D and KLV-24P423D only.
G
PC / HDMI AUDIO IN*
Connect to the
PC / HDMI AUDIO IN. It is recommended to use an audio input (stereo minijack).
* KLV-29P423D and KLV-24P423D only.
Using Menu
Functions
EXIT
Favourites
Photo Frame Mode
Photo
Music
Video
FM Radio
Applications
Media
Settings
1
2
3
4
To exit Home menu:
To navigate menu:
To enter:
1 Favourites
Store up to 18 channels or external inputs.
x To add a current channel or external inputs
into Favourites list
1
“Favourites”
red
OR
2
“Add to Favourites”
x To watch a channel or external input
TV 9
Favourites
Select
Add Delete
Confi rm Exit
~
To exit Favourites List:
When you run the “Auto Tuning”, only the programme
channels in your Favourites list will be cleared.
2 Applications
Photo Frame Mode
(KLV-29P423D / KLV-24P423D only)
Display Photo, Music and Clock calendar at the same
time.
x To enter Photo Frame Mode
“Applications”
“Photo Frame Mode”
~
To exit Photo Frame mode: /
x To select Photo/
Music
x To select Display
Mode
In Photo Frame Mode
“Image
Selection”/ “Music
Selection”
In Photo Frame Mode
“Display Mode”
~
You are also able to select Photo/Music/Display Mode
from
t “Settings” t “Set-up” t ”Photo Frame
Settings”.
A
B
C
Download de handleiding in het Nederlands en/of Engels (PDF, 0.71 MB)
(Denk aan het milieu en print deze handleiding alleen als dat echt noodzakelijk is)

Loading…

Beoordeling

Laat ons weten wat je van de Sony Bravia KLV-24P413D LCD televisie vindt door een beoordeling achter te laten. Wil je je ervaringen met dit product delen of een vraag stellen? Laat dan een bericht achter onderaan de pagina.
Bent u tevreden over de Sony Bravia KLV-24P413D LCD televisie?
Ja Nee
Beoordeel dit product als eerste
0 stemmen

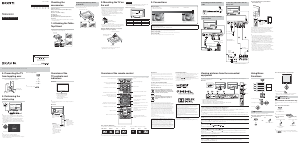
Praat mee over dit product

Laat hier weten wat jij vindt van de Sony Bravia KLV-24P413D LCD televisie. Als je een vraag hebt, lees dan eerst zorgvuldig de handleiding door. Een handleiding aanvragen kan via ons contactformulier.

Meer over deze handleiding

We begrijpen dat het prettig is om een papieren handleiding te hebben voor je Sony Bravia KLV-24P413D LCD televisie. Je kunt de handleiding bij ons altijd downloaden en daarna zelf printen. Indien je graag een originele handleiding wilt hebben, raden we je aan contact op te nemen met Sony. Zij kunnen wellicht nog voorzien in een originele handleiding. Zoek je de handleiding van Sony Bravia KLV-24P413D LCD televisie in een andere taal? Kies op de homepage je taal naar keuze en zoek daarna op het modelnummer om te zien of we deze beschikbaar hebben.

Specificaties

Merk Sony
Model Bravia KLV-24P413D
Categorie LCD televisies
Bestandstype PDF
Bestandsgrootte 0.71 MB

Alle handleidingen voor Sony LCD televisies
Meer handleidingen voor LCD televisies

Veelgestelde vragen over Sony Bravia KLV-24P413D LCD televisie

Ons supportteam zoekt dagelijks naar nuttige productinformatie en antwoorden op veelgestelde vragen. Als er onverhoopt toch een onjuistheid tussen onze veelgestelde vragen staat, laat het ons dan weten via het contactformulier.

Hoe koppel ik een universele afstandsbediening aan mijn televisie? Geverifieerd

Om je universele afstandsbediening te koppelen heb je zowel het modelnummer en het merk van de afstandsbediening als die van de televisie nodig. In de handleiding van de afstandsbediening is een lijst te vinden met merken en/of modelnummers met een bijbehorende code.

Ik vind dit nuttig (2079) Lees meer

Ik wil een speaker aansluiten op mijn LCD televisie via HDMI, welke poort moet ik gebruiken? Geverifieerd

Hiervoor dient de HDMI-ARC poort gebruikt te worden, die specifiek gemaakt is voor het aansluiten van audioapparatuur.

Ik vind dit nuttig (1401) Lees meer

Maakt het uit op welke HDMI poort ik mijn apparatuur aansluit? Geverifieerd

In principe kun je apparatuur zoals een blu-ray speler of game console op elke HDMI poort aansluiten. Het apparaat is vervolgens te gebruiken door in het menu van de televisie de desbetreffende poort te selecteren.

Ik vind dit nuttig (740) Lees meer

Hoe meet ik hoeveel inch mijn LCD televisie is? Geverifieerd

Het meten van hoeveel inch een LCD televisie is gebeurt door de diagonale afstand te meten van bijvoorbeeld de linker bovenhoek naar de rechter onderhoek van het scherm (niet de rand). Een inch is 2,54 centimeter, dus bij een gemeten afstand van 99 centimeter heeft u een LED televisie van 39 inch.

Ik vind dit nuttig (528) Lees meer

Werkt mijn afstandsbediening ook op andere modellen televisie van hetzelfde merk? Geverifieerd

Vaak werkt een afstandsbediening van een televisie ook op vergelijkbare modellen van hetzelfde merk. Het is echter ongebruikelijk dat hij op alle modellen van dat merk werkt. Universele afstandsbedieningen zijn daar beter voor geschikt.

Ik vind dit nuttig (305) Lees meer

Wat is het verschil tussen LCD en LED? Geverifieerd

Beide maken gebruik van een LCD scherm dat zelf geen licht geeft. Het verschil zit in de verlichting achter het scherm. Bij LCD wordt hiervoor gebruik gemaakt van CCFL (cold-cathode fluorescent lamp) en bij LED van LED lampjes.

Ik vind dit nuttig (278) Lees meer

Kan ik een dode pixel zelf repareren? Geverifieerd

Er is een verschil tussen een dode pixel en een vaste pixel. Een vaste pixel is nog wel gekleurd en kan eventueel verholpen worden door precies op de pixel een lichte druk uit te oefenen tot de pixel zichzelf herstelt. Een dode pixel is altijd zwart of wit en is niet zelf te repareren.

Ik vind dit nuttig (265) Lees meer

Waar staat HDMI voor? Geverifieerd

HDMI staat voor High-Definition Multimedia Interface. HDMI is een aansluiting om hoge kwaliteit beeld en geluid van het ene apparaat naar het andere te sturen.

Ik vind dit nuttig (244) Lees meer

Waarom staan er letters bij de cijfers op de afstandsbediening? Geverifieerd

Het kan mogelijk zijn dat het voor bepaalde instellingen van de televisie nodig is om letters in te voeren. Er staan doorgaans drie letters of andere tekens op een knop. Wanneer letterinvoer nodig is, kan er 1 keer op die knop gedrukt worden worden de eerste letter, 2 keer gedrukt voor de tweede letter en 3 keer gedrukt voor de derde letter. Zo kan er tekst geschreven worden met een minimaal aantal knoppen.

Ik vind dit nuttig (224) Lees meer

Wat is de contrast ratio? Geverifieerd

De contrast ratio geeft aan hoe ver de witste wit van de zwartste zwart zit. Een contrast ratio van bijvoorbeeld 400:1 betekent dat het zwartste zwart in beeld 400 keer donkerder is dan de witste wit. Een hoge contrast ratio draagt bij aan de scherpte van het beeld.

Ik vind dit nuttig (199) Lees meer

Wat is de optimale kijkafstand voor mijn televisie? Geverifieerd

Dit hangt deels af van persoonlijke voorkeur, maar als vuistregel kan worden uitgegaan dat de optimale kijkafstand ongeveer 3x de diagonale lengte van de televisie. Bij een televisie van 60 inch (152cm) is de optimale kijkafstand 180 inch of ongeveer 4.5 meter.

Ik vind dit nuttig (195) Lees meer

Hoe kan ik mijn LCD televisie goed schoonmaken? Geverifieerd

Zet de televisie uit en veeg stof en vuil voorzichtig van het scherm met een microvezeldoek. Gebruik geen papier, dit kan krassen veroorzaken. Druk niet te hard anders beschadig je de pixels op het scherm. Gebruik een speciaal schoonmaakmiddel voor beeldschermen of maak het zelf door 1 deel azijn te mengen met 1 deel water. Maak de microvezeldoek vochtig met wat schoonmaakmiddel en wrijf het beeldscherm zorgvuldig schoon. Zorg ervoor dat de doek niet te nat is. Maak lastige vlekken schoon met ronddraaiende bewegingen. Droog het beeldscherm af met een tweede, droge microvezeldoek om strepen te voorkomen.

Ik vind dit nuttig (193) Lees meer

Waar staat LCD voor? Geverifieerd

LCD staat voor Liquid Crystal Display en is een technologie waarbij vloeibare kristallen in staat zijn om de polarisatierichting van licht te draaien en zo kleuren weer te geven.

Ik vind dit nuttig (185) Lees meer
Handleiding Sony Bravia KLV-24P413D LCD televisie

Gerelateerde producten

Gerelateerde categorieën