
A
B
C
12
3
4
A
1
2
3
4
AB
1–a 1–b
23
AB
TUNING
BAND
FM
MW
SW1
SW2
FUNCTION
RADIO
TAPE
RADIO OFF
STOP/EJECT
FUNCTION
RADIO
TAPE
RADIO OFF
MIN MAX LOW HIGH
TONEVOLUME
TUNING
FINE TUNING
MIN MAX LOW HIGH
TONEVOLUME
Power Sources Sources d’alimentation Fuentes de
alimentación
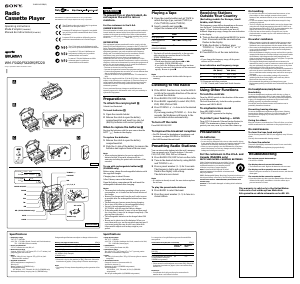
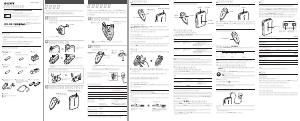
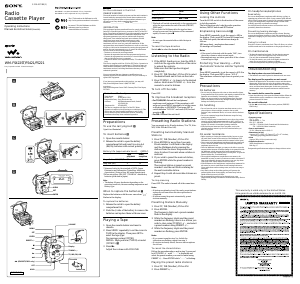
Batteries (see Fig. A)
Insert four R20 (size D) batteries.
Notes
•The player cannot be operated on batteries
when the mains lead is connected to the
player.
•When the OPR/BATT indicator grows faintly,
replace all the batteries with new ones.
House Current (see Fig. B)
Connect the supplied mains lead to the AC
IN jack.
Note
For critical recordings, operating the player on
AC power is recommended.
Adjusting the voltage (see Fig. C)
Be sure to set the VOLTAGE SELECTOR (on
the rear) to your local power supply before
connecting the mains lead.
For customers supplied with an AC
plug adaptor
Use it if the plug of the mains lead does not
fit your mains.
Playing a Tape
Use only TYPE I (normal) tape.
Lecture d’une cassette
Utilisez une cassette normale (TYPE I)
uniquement.
Reproducción de una
cinta
Utilice solamente cintas TYPE I (normal).
1 Ponga FUNCTION en TAPE/RADIO
OFF.
2 Inserte un cassette grabado.
3 Presione 9 PLAY.
4 Ajuste el volumen y el tono.
Operaciones adicionales
Para parar la reproducción, presione
p6 STOP/EJECT (consulte la figura A).
Para realizar una pausa/reanudar la
reproducción después de la misma,
presione P PAUSE.
Para hacer que la cinta avance
rápidamente, presione 0 CUE/FF.
Para rebobinar la cinta, presione
) REVIEW/REW.
Cuando finalice la cinta
La tecla enganchada, 0 CUE/FF,
) REVIEW/REW, o 9 PLAY, se
desenganchará automáticamente (función de
desactivación automática).
Para localizar el punto deseado
(localización progresiva/regresiva)
Mantenga presionada 0 CUE/FF o
) REVIEW/REW durante la reproducción.
Cuando encuentre el punto deseado
escuchando el sonido a gran velocidad,
suelte la tecla presionada para renudar la
reproducción.
Para escuchar en privado
Conecte un auricular a la toma @ (auricular).
Cuando esté utilizando el
radiocassette
El indicador OPR/BATT (funcionamiento/
estado de las pilas) permanecerá encendido.
La intensidad de la iluminación señalará el
estado de las pilas.
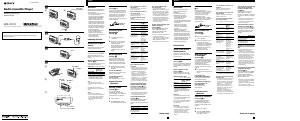
Listening to the Radio Recording
Use only TYPE I (normal) tape.
Ecoute de la radio Radiorrecepción
1 Ponga FUNCTION en RADIO.
2 Seleccione la banda deseada.
3 Sintonice la emisora.
Para sintonizar en la banda de SW:
Utilice FINE TUNING hasta obtener
la mejor recepción posible.
4 Ajuste el volumen y el tono .
Para desconectar la alimentación de la
radio (consulte la figura A)
Ajuste de la antena
(consulte la figura B)
Enregistrement
Utilisez une cassette normale (TYPE I)
uniquement.
Grabación
Utilice solamente cintas TYPE I (normal).
1–a Para grabar de la radio, ponga
FUNCTION en RADIO, seleccione la
banda deseada, y sintonice la
emisora.
1–b Para grabar a través del micrófono
incorporado, ponga FUNCTION en
TAPE/RADIO OFF, y cante o hable
ante el micrófono incorporado.
2 Inserte un cassette en blanco.
3 Presione r REC.
9 PLAY se enganchará
automáticamente.
Para parar la grabación
(consulte la figura A)
Cuando finalice la cinta, r REC y 9 PLAY
se desengancharán automáticamente.
Cuando grabe a través del micrófono
incorporado
No podrá escuchar el sonido a través del
auricular.
El nivel de grabación se ajustará
automáticamente.
El ajuste del volumen y del tono no afectará
el nivel de grabación. Sin embargo, estos
controles cambiarán los niveles del sonido
oído a través de los altavoces o del auricular.
Para evitar el borrado accidental de
una cinta (consulte la figura B)
Rompa la(s) lengüeta(s) de la cara A y/o B.
Para volver a grabar en este cassette, cubra el
(los) orificio(s) con cinta adhesiva.
To mains
Vers le secteur
A una toma de la red
To AC IN
Vers AC IN
A AC IN
Side A
Face A
Cara A
Tab for side A
Ergot pour la face A
Lengüeta para la cara A
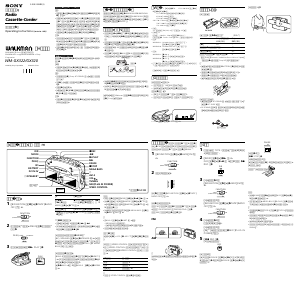
1 Set FUNCTION to TAPE/RADIO
OFF.
2 Insert a recorded tape.
3 Press 9 PLAY.
4 Adjust the volume and tone.
Additional operations
To stop play, press p6 STOP/EJECT (see
Fig. A).
To pause/resume play after pause, press
P PAUSE.
To fast forward, press 0 CUE/FF.
To rewind, press ) REVIEW/REW.
When the tape reaches the end
The depressed button 0 CUE/FF,
) REVIEW/REW or 9 PLAY is released
automatically (Auto shut-off function).
To locate a desired position
(CUE/REVIEW)
Keep pressing 0 CUE/FF, or
) REVIEW/REW during play. At the
desired point found by listening to the high-
speed sound, release the pressed button to
restart playing.
For private listening
Connect the earphone to the @ (earphone)
jack.
When the player is in use
The OPR/BATT (operation/ battery)
indicator lights. Intensity of glow shows
battery level.
1 Réglez FUNCTION sur TAPE/
RADIO OFF.
2 Insérez une cassette enregistrée.
3 Appuyez sur 9 PLAY.
4 Réglez le volume et le timbre.
Autres fonctions
Pour arrêter la lecture, appuyez sur
p6 STOP/EJECT (voir fig. A).
Pour faire une pause/annuler la pause,
appuyez sur P PAUSE.
Pour avancer rapidement la bande,
appuyez sur 0 CUE/FF.
Pour rebobiner, appuyez sur ) REVIEW/
REW.
Quand la bande est terminée
La touche enclenchée 0 CUE/FF,
) REVIEW/REW ou 9 PLAY se libère
automatiquement (fonction d’arrêt
automatique).
Pour localiser un passage particulier
(avance ou revue)
Appuyez en continu sur 0 CUE/FF ou
) REVIEW/REW pendant la lecture. Au
point souhaité que vous pouvez localiser en
écoutant le son rapide, libérez la touche pour
poursuivre la lecture.
Pour écouter en privé
Raccordez les écouteurs à la prise @
(écouteurs).
Pendant le fonctionnement du lecteur
Le voyant OPR/BATT (fonctionnement/
piles) est allumé. L’intensité du voyant
indique la tension des piles.
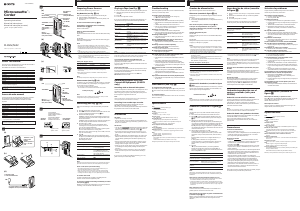
1–a To record from the radio, set
FUNCTION to RADIO, select the
desired band, and tune in a radio
staion.
1–b To record from the built-in
microphone, set FUNCTION to
TAPE/RADIO OFF, and sing or
speak into the built-in microphone.
2 Insert a blank tape.
3 Press r REC.
9 PLAY is depressed automatically.
To stop recording (see Fig. A)
When the tape reaches the end, r REC and
9 PLAY are released automatically.
While recording from the built-in
microphone
You cannot monitor the sound through the
earphone.
The recording level is adjusted
automatically
Adjusting the volume or tone will not affect
the recording level. However, these controls
will change the sound levels you hear
through the speakers or earphone.
To prevent a tape from being
accidentally recorded over (see Fig.
B)
Break off the cassette tabs from side A and/
or B. To reuse the tape for recording, cover
the tab hole with adhesive tape.
1–a Pour enregistrer à partir de la
radio, réglez FUNCTION sur
RADIO, sélectionnez une gamme et
accordez une station de radio.
1–b Pour enregistrer à partir du
microphone intégré, réglez
FUNCTION sur TAPE/RADIO OFF
et chantez ou parlez devant le
microphone.
2 Insérez une cassette vierge.
3 Appuyez sur r REC.
9 PLAY est autmatiquement
enchenchée.
Pour arrêter l’enregistrement
(voir fig. A)
Quand la bande est terminée, les touches
r REC et 9 PLAY se libèrent
automatiquement.
Pendant l’enregistrement à partir du
microphone intégré
Vous ne pouvez pas écouter le son par les
écouteurs.
Le niveau d’enregistrement est réglé
automatiquement
Le réglage du volume ou du timbre n’a
aucun effet sur le niveau d’enregistrement.
Cependant, le son que vous entendez par les
haut-parleurs ou les écouteurs est modifié.
Pour éviter d’enregistrer
accidentellement une cassette (voir fig.
B)
Brisez les ergots de la cassette pour la face A
et/ou B. Pour pouvoir réenregistrer sur cette
cassette, recouvrez l’orifice d’un morceau de
ruban adhésif.
FUNCTION
RADIO
TAPE
RADIO OFF
STOP/EJECT
PLAY
STOP/EJECT
FUNCTION
RADIO
TAPE
RADIO OFF
BAND
FM
MW
SW1
SW2
MW
PO
SW
OC
FM
PLAY REC
STOP/EJECT
MIC
FUNCTION
RADIO
TAPE
RADIO OFF
Mains lead (supplied)
Cordon d’alimentation
secteur (fourni)
Cable de alimentación
de CA (suministrado)
I
Pilas (consulte la figura A)
Inserte cuatro pilas R20 (tamaño D).
Notas
•El radiocassette no podrá alimentarse con las
pilas cuando tenga conectado el cable de
alimentación de CA.
•Cuando el indicador OPR/BATT
(funcionamiento/estado de las pilas) se
ilumine débilmente, reemplace todas las pilas
por otras nuevas.
Corriente de la red
(consulte la figura B)
Conecte el cable de alimentación de CA
suministrado a la toma AC IN.
Nota
Para grabaciones importantes, se recomienda
alimentar el radiocassette con CA.
Ajuste de la tensión
(consulte la figura
C)
Cerciórese de ajustar el selector VOLTAGE
SELECTOR (de la parte posterior) a la
tensión de la red antes de conectar el cable
de alimentación.
Para los clientes a los que se les haya
suministrado adaptador de enchufe
de alimentación de CA
Utilícelo si el enchufe de CA no entra en la
toma de la red.
Piles (voir fig. A)
Insérez quatre piles R20 (format D).
Remarques
•Le lecteur ne peut pas fonctionner sur les piles
tant que le cordon d’alimentation secteur est
raccordé.
•Quand le voyant OPR/BATT luit faiblement,
remplacez toutes les piles par des neuves.
Courant secteur (voir fig. B)
Raccordez le cordon d’alimentation secteur
(fourni) à la prise AC IN.
Remarque
Pour effectuer un enregistrement important,
nous vous recommandons d’alimenter le
lecteur sur le courant secteur.
Réglage de la tension (voir fig. C)
Veillez à régler le selecteur de tension
(VOLTAGE SELECTOR) à l’arrière de
l’appareil sur la tension du courant secteur
local avant de brancher le cordon
d’alimentation secteur.
Quand un adaptateur secteur de fiche
est fourni
Utilisez-le si la fiche du cordon ne rentre pas
dans la prise secteur.
1 Set FUNCTION to RADIO.
2 Select the desired band.
3 Tune in a radio station.
To tune in an SW band: Use FINE
TUNING for better SW reception.
4 Adjust the volume and tone.
To turn off the radio (see Fig. A)
Aerial adjustment (see Fig. B)
1 Réglez FUNCTION sur RADIO.
2 Sélectionnez une gamme.
3 Accordez une station de radio.
Quand vous accordez les ondes
courtes (OC), utilisez l’accord précis
(FINE TUNING) pour améliorer la
réception.
4 Réglez le volume et le timbre.
Pour éteindre la radio (voir fig. A)
Pour régler l’antenne (voir fig. B)
PLAY
TONE
VOLUME
OPR/BATT
STOP/EJECT FUNCTION
TONE
VOLUME
BAND
TUNING
FINE TUNINGFUNCTION
REC
STOP/EJECT
FUNCTION
TUNING
BAND
MIC
VOLTAGE SELECTOR
110 – 127V 220 – 240V


Praat mee over dit product
Laat hier weten wat jij vindt van de Sony CFM-D1 Cassetterecorder. Als je een vraag hebt, lees dan eerst zorgvuldig de handleiding door. Een handleiding aanvragen kan via ons contactformulier.