
Operations
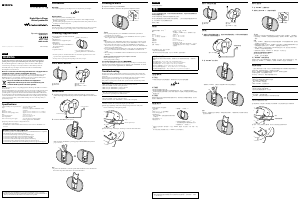
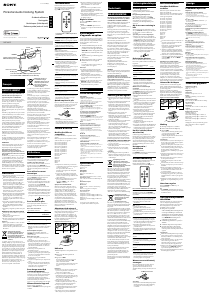
How to handle an iPod
To set an iPod
To remove an iPod
Notes
An iPod in a case or cover can be set in this unit.
However, if the case or cover interferes with the
connection, remove the case or cover before setting the
iPod on the Dock Connector.
When placing or removing the iPod, hold it at the same
angle as the Dock Connector on the unit. Do not pull
the iPod forward too far.
When placing or removing the iPod, hold the unit
securely.
Do not twist or bend the iPod, as this may result in
connector damage.
Remove the iPod when transporting it; otherwise, a
malfunction may result.
If the iPod does not reach the supporter on the front of
the unit, attach the supplied cushion below the supporter.
To turn the unit on/off
Press (On/Standby).
The power indicator lights up when the unit is turned on.
Adjusting the volume
Press VOLUME +/− (VOL +/− on the remote).
Operating an iPod on the
Dock
1 Press the Docking Tray on the front of the unit to
open.
After use, close the Docking Tray by pushing it until
locked.
2 Set the iPod on the Dock Connector.
The Dock Connector can be tilted slightly.
For details, see “How to handle an iPod.”
3 Press .
4 Press iPod to activate the function for iPod.
“iPod” appears in the display.
5 Press .
The iPod begins to play back.
If the iPod does not start playing back, operate directly
on the iPod.
You can operate the connected iPod via this unit or the
iPod itself.
To Press
Pause playback
To resume play, press
again.
Go to the next track
(forward)
Go back to the previous track
(backward)*
Locate a point while listening to
the sound
(forward) or
(backward) while
playing and hold until
you find the desired
point.
Go back to the previous menu
MENU on the remote
Select a menu item or a track
for playback
(up)/ (down) on
the remote
Execute the selected menu item
or begin playback
ENTER on the remote
* During playback, this operation returns you to the beginning of
the current track. To go back to the previous track, press twice.
Notes
If a pop-up message appears on the display of the iPod
touch, iPhone, or iPad, see “About App.”
Some operations may differ or may not be available on
some models of iPod.
If the battery of the iPod is extremely low, charge it for a
while before operation.
Sony cannot accept responsibility in the event that data
recorded to an iPod is lost or damaged when using the
iPod connected to this unit.
For details of environmental conditions for operating an
iPod, check the website of Apple Inc.
To remove the iPod
For details, see “How to handle an iPod.”
To charge an iPod
You can use the unit as a battery charger for an iPod when
the power is supplied by the AC adaptor.
Charging begins when the iPod is connected to the unit.
The charging status appears in the display on the iPod. For
details, refer to the user’s guide of the iPod.
Tips for charging an iPod with the rechargeable
battery
With the function for iPod activated, if the battery
indicator is level 1 or 2, charging will start. If the battery
indicator is level 3 or 4, to start charging, press and hold
iPod. (For details, see “To use the rechargeable battery.”)
Charging will terminate when the unit turns off
automatically. (For details, see “Auto power off.”)
To terminate charging, press and hold iPod. This
operation will terminate playback. To restart charging,
press and hold iPod again.
Operating by wireless
music streaming
By using the Bluetooth connection, you can listen to the
sound from an iPod or other Bluetooth device with the
unit wirelessly.
Pairing
What is pairing?
Bluetooth devices need to be “paired” with each other
beforehand.
Once Bluetooth devices are paired, there is no need for
pairing again, unless pairing information is deleted.
Bluetooth indicator
Status Bluetooth indicator
(blue)
Bluetooth off Off
Bluetooth on but not
connected
Flashes slowly
Pairing mode Flashes quickly
Connected or communicating Lights up
To pair with an iPod
Keep the iPod and the unit within 1 meter of each other for
this operation.
1 Press .
2 Press BLUETOOTH ( on the remote) to turn on
the Bluetooth function when the Bluetooth
indicator is off.
“Bluetooth” appears in the display.
The Bluetooth indicator flashes slowly.
3 Press and hold BLUETOOTH ( on the remote).
When pairing starts, a double-beep sound will be heard
and the Bluetooth indicator will flash quickly.
Pairing mode of the unit is activated.
4 Perform the pairing procedure on the iPod to
detect the unit. Select “Settings
General
Bluetooth” and turn on the Bluetooth function.
Example: iPhone 4S
A list of detected devices appears on the display.
The unit is displayed as “RDP-X280iP.”
If “RDP-X280iP” is not displayed, repeat from step 3.
5 Select “RDP-X280iP” on the display of the iPod
while the Bluetooth indicator flashes quickly.
When “Connected” appears on the display of the iPod,
pairing and connection are complete.
Example: iPhone 4S
Notes
The operation and display may differ depending on the
model of iPod and/or software version. For details, refer
to the user’s guide of the iPod.
Pairing mode is canceled after about 5 minutes. If
pairing mode is canceled halfway, start over from step 3.
If pairing is not complete, start over from step 3.
To pair with another iPod, repeat steps 1 to 5.
In step 3, if a double-beep sound is not heard or the
Bluetooth indicator does not flash quickly, press and
hold BLUETOOTH (
on the remote) again.
If you turn off the unit or the iPod before the Bluetooth
connection is complete, pairing information will not be
memorized, and pairing will not be completed.
Notes on pairing with a Bluetooth device other than
iPod
When pairing with a Bluetooth device other than iPod,
after step 3, pass code input may be required in your
Bluetooth device. In this case, input “0000.”
The operation and display may differ depending on the
Bluetooth device and/or software version. For details,
refer to the user’s guide of the Bluetooth device.
To listen to sound
Keep the iPod and the unit within 10 meters of each other
for this operation.
Check the following before operating the unit.
The Bluetooth function of the iPod is on.
Pairing of the unit and the iPod is complete. If pairing is
not completed, perform pairing again. (See “To pair with
an iPod.”)
1 Press .
2 Press BLUETOOTH ( on the remote) to turn on
the Bluetooth function.
The last connected iPod will be reconnected
automatically when the Bluetooth function is turned
on.
3 Select your desired music, video, game, etc., to
play on the iPod. For details, refer to the user’s
guide of the iPod.
Tips
If the last connected iPod does not reconnect
automatically, press BLUETOOTH ( on the remote). If
it still does not reconnect, select the model name of this
unit from the iPod. (Perform steps 4 to 5 in “To pair
with an iPod.”)
To connect an alternative iPod, which has previously
been paired with this unit, press BLUETOOTH ( on
the remote) to disconnect the currently connected iPod.
Then select the model name of the unit from the
alternative iPod you want to connect.
While listening to music from an iPod via Bluetooth
connection, you can charge the iPod on the Dock only if
the AC adaptor is connected.
If the volume level is low, adjust the volume of the unit
first. If the volume is still too low, adjust the volume of
the Bluetooth device.
To finish listening
Terminate the Bluetooth connection by any of the
following operations.
Turn off the unit.
Turn off the iPod.
Press BLUETOOTH ( on the remote), iPod or AUDIO
IN.
Operate the iPod to terminate the connection. For
details, refer to the user’s guide of the iPod.
To clear the list of models already-
paired and memorized in the unit
1 Press .
2 Press BLUETOOTH ( on the remote) to turn on
the Bluetooth function.
3 Press and hold BLUETOOTH and VOLUME – at
the same time on the unit.
“CLEAR” appears in the display.
Notes
You can perform step 3 to clear the list even during
Bluetooth connection.
This operation cannot be performed when the unit is
pairing.
To pair with this unit again, delete the model name of
this unit from the iPod and perform pairing again. (See
“To pair with an iPod.”)
Connecting optional
components
You can enjoy the sound from an optional component,
such as a portable digital music player, through the
speakers of this unit. Be sure to turn off the power of each
component before making any connections.
1 Firmly connect the line output jack of the
portable digital music player (or other
component) to the AUDIO IN jack on the back of
the unit, using a suitable audio connecting cable
(not supplied).
2 Press to turn on the unit.
3 Press AUDIO IN to activate the Audio-in
function.
“AUDIO IN” appears in the display.
4 Turn the connected component on.
5 Play the connected component.
The sound from the connected component is output
from the speakers of this unit.
Notes
The necessary type of audio connecting cable depends
on the optional component. Be sure to use the correct
type of cable.
If the volume level is low, adjust the volume of the unit
first. If the volume is still too low, adjust the volume of
the connected component.
Other useful functions
Power Off Hold function
You can set the Power Off Hold function to avoid
unintentionally powering on while carrying the unit.
To set the Power Off Hold function
Remove the iPod from the Dock Connector, and then press
and hold on the unit when the AC adaptor is
disconnected.
“HOLD” flashes twice and the display turns off. The unit
cannot be turned on by pressing while the Power Off
Hold function is set.
To cancel the Power Off Hold
function
Press and hold on the unit.
“RELEASE” flashes twice and the Power Off Hold function
is canceled. The unit will turn on automatically.
Tip
The Power Off Hold function will be canceled if you
connect the AC adaptor to the unit or set an iPod on the
Dock Connector.
Selecting audio emphasis
(equalization)
You can adjust the emphasis of the sound.
Press SOUND repeatedly to select the desired audio
emphasis.
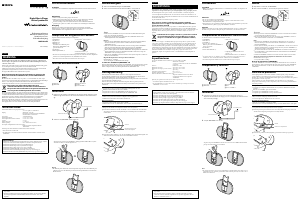
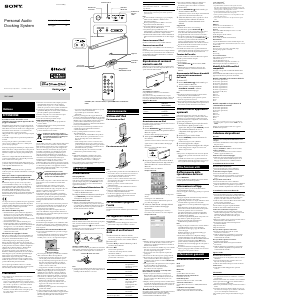
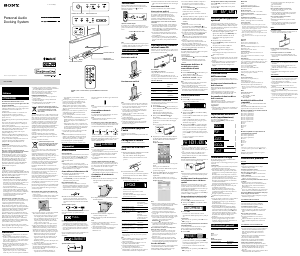
Power indicator Bluetooth indicator
Supporter
Dock Connector
Docking Tray
Display
Remote sensor
VOLUME + (VOL + on the remote control) and buttons have a tactile dot.
About App
A dedicated Dock App for iPod touch/iPhone/iPad
available at Apple App Store.
Search for “D-Sappli” and download the free App to find
out more about the functions.
Features
D-Sappli includes various timer functions: Alarm, Music
Play Timer and Sleep Timer.
You can set up to 10 alarms, using songs in iPod or
Preset Sound in D-Sappli for the alarm sound.
Music Play Timer allows you to play/pause desired
music at a desired time. Sleep Timer allows you to
specify a time at which to stop music playback. Alarm,
Music Play Timer and Sleep Timer work in combination
with the power supply of the unit.
Alarm, Music Play Timer and Sleep Timer are available
only when D-Sappli is activated.
D-Sappli can display a list of Radio Preset Stations
programmed in this unit.
You can rename the Radio Preset Stations, and change
their preset numbers on the D-Sappli. Preset numbers
and order will also be changed accordingly in the unit.
D-Sappli also includes a clock display enlarge feature.
Notes
If the App to link with this unit is not downloaded to the
iPod touch/iPhone/iPad, a pop-up message prompting
you to download D-Sappli may appear repeatedly.
Deactivate the App’s link function to stop the pop-up
message.
To deactivate the App’s link function: Connect the AC
adaptor, and then press / to turn off the unit. Remove
the iPod touch/iPhone/iPad from the Dock Connector.
While holding down , also press and hold / on the
unit for at least 2 seconds. (“App OFF” appears in the
display to show that the App’s link function has been
deactivated.)
To re-activate the App’s link function, repeat the above
steps. (“App ON” appears in the display to show that the
App’s link function has been activated.)
iPod/iPhone/iPad
Startup Guide

Praat mee over dit product
Laat hier weten wat jij vindt van de Sony RDP-X280IP Speakerdock. Als je een vraag hebt, lees dan eerst zorgvuldig de handleiding door. Een handleiding aanvragen kan via ons contactformulier.