
3-867-579-13 (1)
Video Cassette Recorder
Operating Instructions
SLV-SP70R
©1999 by Sony Corporation
Getting Started
Step 1
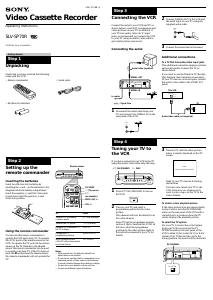
Unpacking
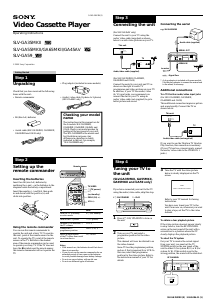
Check that you have received the following
items with the VCR:
• Remote commander
• R6 (Size AA) batteries
Step 2
Setting up the
remote commander
Inserting the batteries
Insert two R6 (size AA) batteries by
matching the + and – on the batteries to the
diagram inside the battery compartment.
Insert the negative (–) end first, then push
in and down until the positive (+) end
clicks into position.
Using the remote commander
You can use this remote commander to
operate the VCR and a Sony TV. To operate
this VCR, point at the remote sensor on the
VCR. To operate the TV, point at the remote
sensor on the TV. Buttons in the shaded
area of the remote commander can be used
to operate your Sony TV. If the TV does not
have the g symbol near the remote sensor,
this remote commander will not operate the
TV.
To
Turn the TV to standby
or active mode
Turn on the TV power
Increase (+) or decrease (–)
the TV volume
Change the TV
programme position
Select an input source
of the TV either from aerial
in or from line in
Notes
• With normal use, the batteries should last
about three to six months.
• If you do not use the remote commander for an
extended period of time, remove the batteries
to avoid possible damage from battery leakage.
• Do not use a new battery with an old one.
• Do not use different types of batteries.
Remote sensor
a (TV power)
?/1
(on/standby)
TV/VIDEO
PROG (CH) +/–
VOL +/–
Press
?/1 (on/standby)
a (TV power)
VOL +/–
PROG (CH) +/–
TV/VIDEO
Step 3
Connecting the VCR
Connect the aerial to your VCR and TV as
shown below to watch TV programmes and
video pictures on your TV. In addition, if
your TV has audio/video (A/V) input
jacks, we recommend you connect the VCR
to your TV using an audio/video cable to
get a better picture and sound.
Connecting the aerial
to mains
1 Disconnect the aerial cable from your
TV and connect it to AERIAL IN on the
rear panel of the VCR.
: Signal flow
AERIAL IN
AERIAL OUT
Aerial cable (supplied)
2 Connect AERIAL OUT of the VCR and
the aerial input of your TV using the
supplied aerial cable.
3 Connect the mains lead to the mains.
Additional connections
To a TV that has audio/video input jacks
This additional connection improves picture
and sound quality. Connect the TV as
shown below.
If you want to use the Trinitron TV Synchro
Play function, this connection is necessary.
(If your TV has two or more inputs, connect
the audio/video cable to the VIDEO IN 1
jacks.)
1 Press ?/1 ON/STANDBY to turn on
the VCR.
2 Turn on your TV and select a
programme position for the video
picture.
This channel will now be referred to as
the video channel.
Some TV has the programme position,
such as 0, that is reserved for a VCR. In
this case, select that programme
position for the video picture. Refer to
the instruction manual of your TV for
details.
Step 4
Tuning your TV to
the VCR
If you have connected your VCR to the TV
using the audio/video cable, skip this step.
3 Tune the TV until the video picture
below is clearly displayed on the TV
screen.
Refer to your TV manual for tuning
instructions.
You have now tuned your TV to the
VCR. From now on, whenever you
want to play a tape, set the TV to the
video channel.
To obtain a clear playback picture
If the video picture does not appear clearly
in step 3 above, turn the RF CHANNEL
screw on the rear panel of the VCR with a
screwdriver to a position where the TV
clearly displays the playback picture.
To select the TV system
For your TV to receive the correct signal
from your VCR you must set the TV
SYSTEM switch on the rear panel of the
VCR to either G (for system B/G) or K (for
system D/K). If this switch is set to the
wrong position, the sound will be distorted.
Audio/video cable (not supplied)
This VCR
TV
?/1 ON/STANDBY · PLAY
RF CHANNEL
• Aerial cable
AUDIO VIDEO
LINE IN
LINE OUT
IN
VIDEO
AUDIO
PAL NTSC
AERIAL
IN
OUT
AERIAL
IN
OUT
TV SYSTEM
K
G
SONY
VIDEO CASSETTE PLAYER



Praat mee over dit product
Laat hier weten wat jij vindt van de Sony SLV-SP70R Videorecorder. Als je een vraag hebt, lees dan eerst zorgvuldig de handleiding door. Een handleiding aanvragen kan via ons contactformulier.