WARNING
To reduce the risk of fire or electric shock, do not expose this apparatus to
rain or moisture.
To avoid electrical shock, do not open the cabinet. Refer servicing to
qualified personnel only.
Do not install the appliance in a confined space, such as a bookcase or built-in
cabinet.
To reduce the risk of fire or electric shock, do not place objects filled with liquids,
such as vases, on the apparatus.
Connect the AC power adaptor to an easily accessible AC outlet. Should you
notice an abnormality in the AC power adaptor, disconnect it from the AC outlet
immediately.
Notice for customers: the following information is only applicable to
equipment sold in countries applying EU directives
The manufacturer of this product is Sony Corporation, 1-7-1 Konan, Minato-ku,
Tokyo, 108-0075 Japan. The Authorized Representative for EMC and product
safety is Sony Deutschland GmbH, Hedelfinger Strasse 61, 70327 Stuttgart,
Germany. For any service or guarantee matters, please refer to the addresses given
in separate service or guarantee documents.
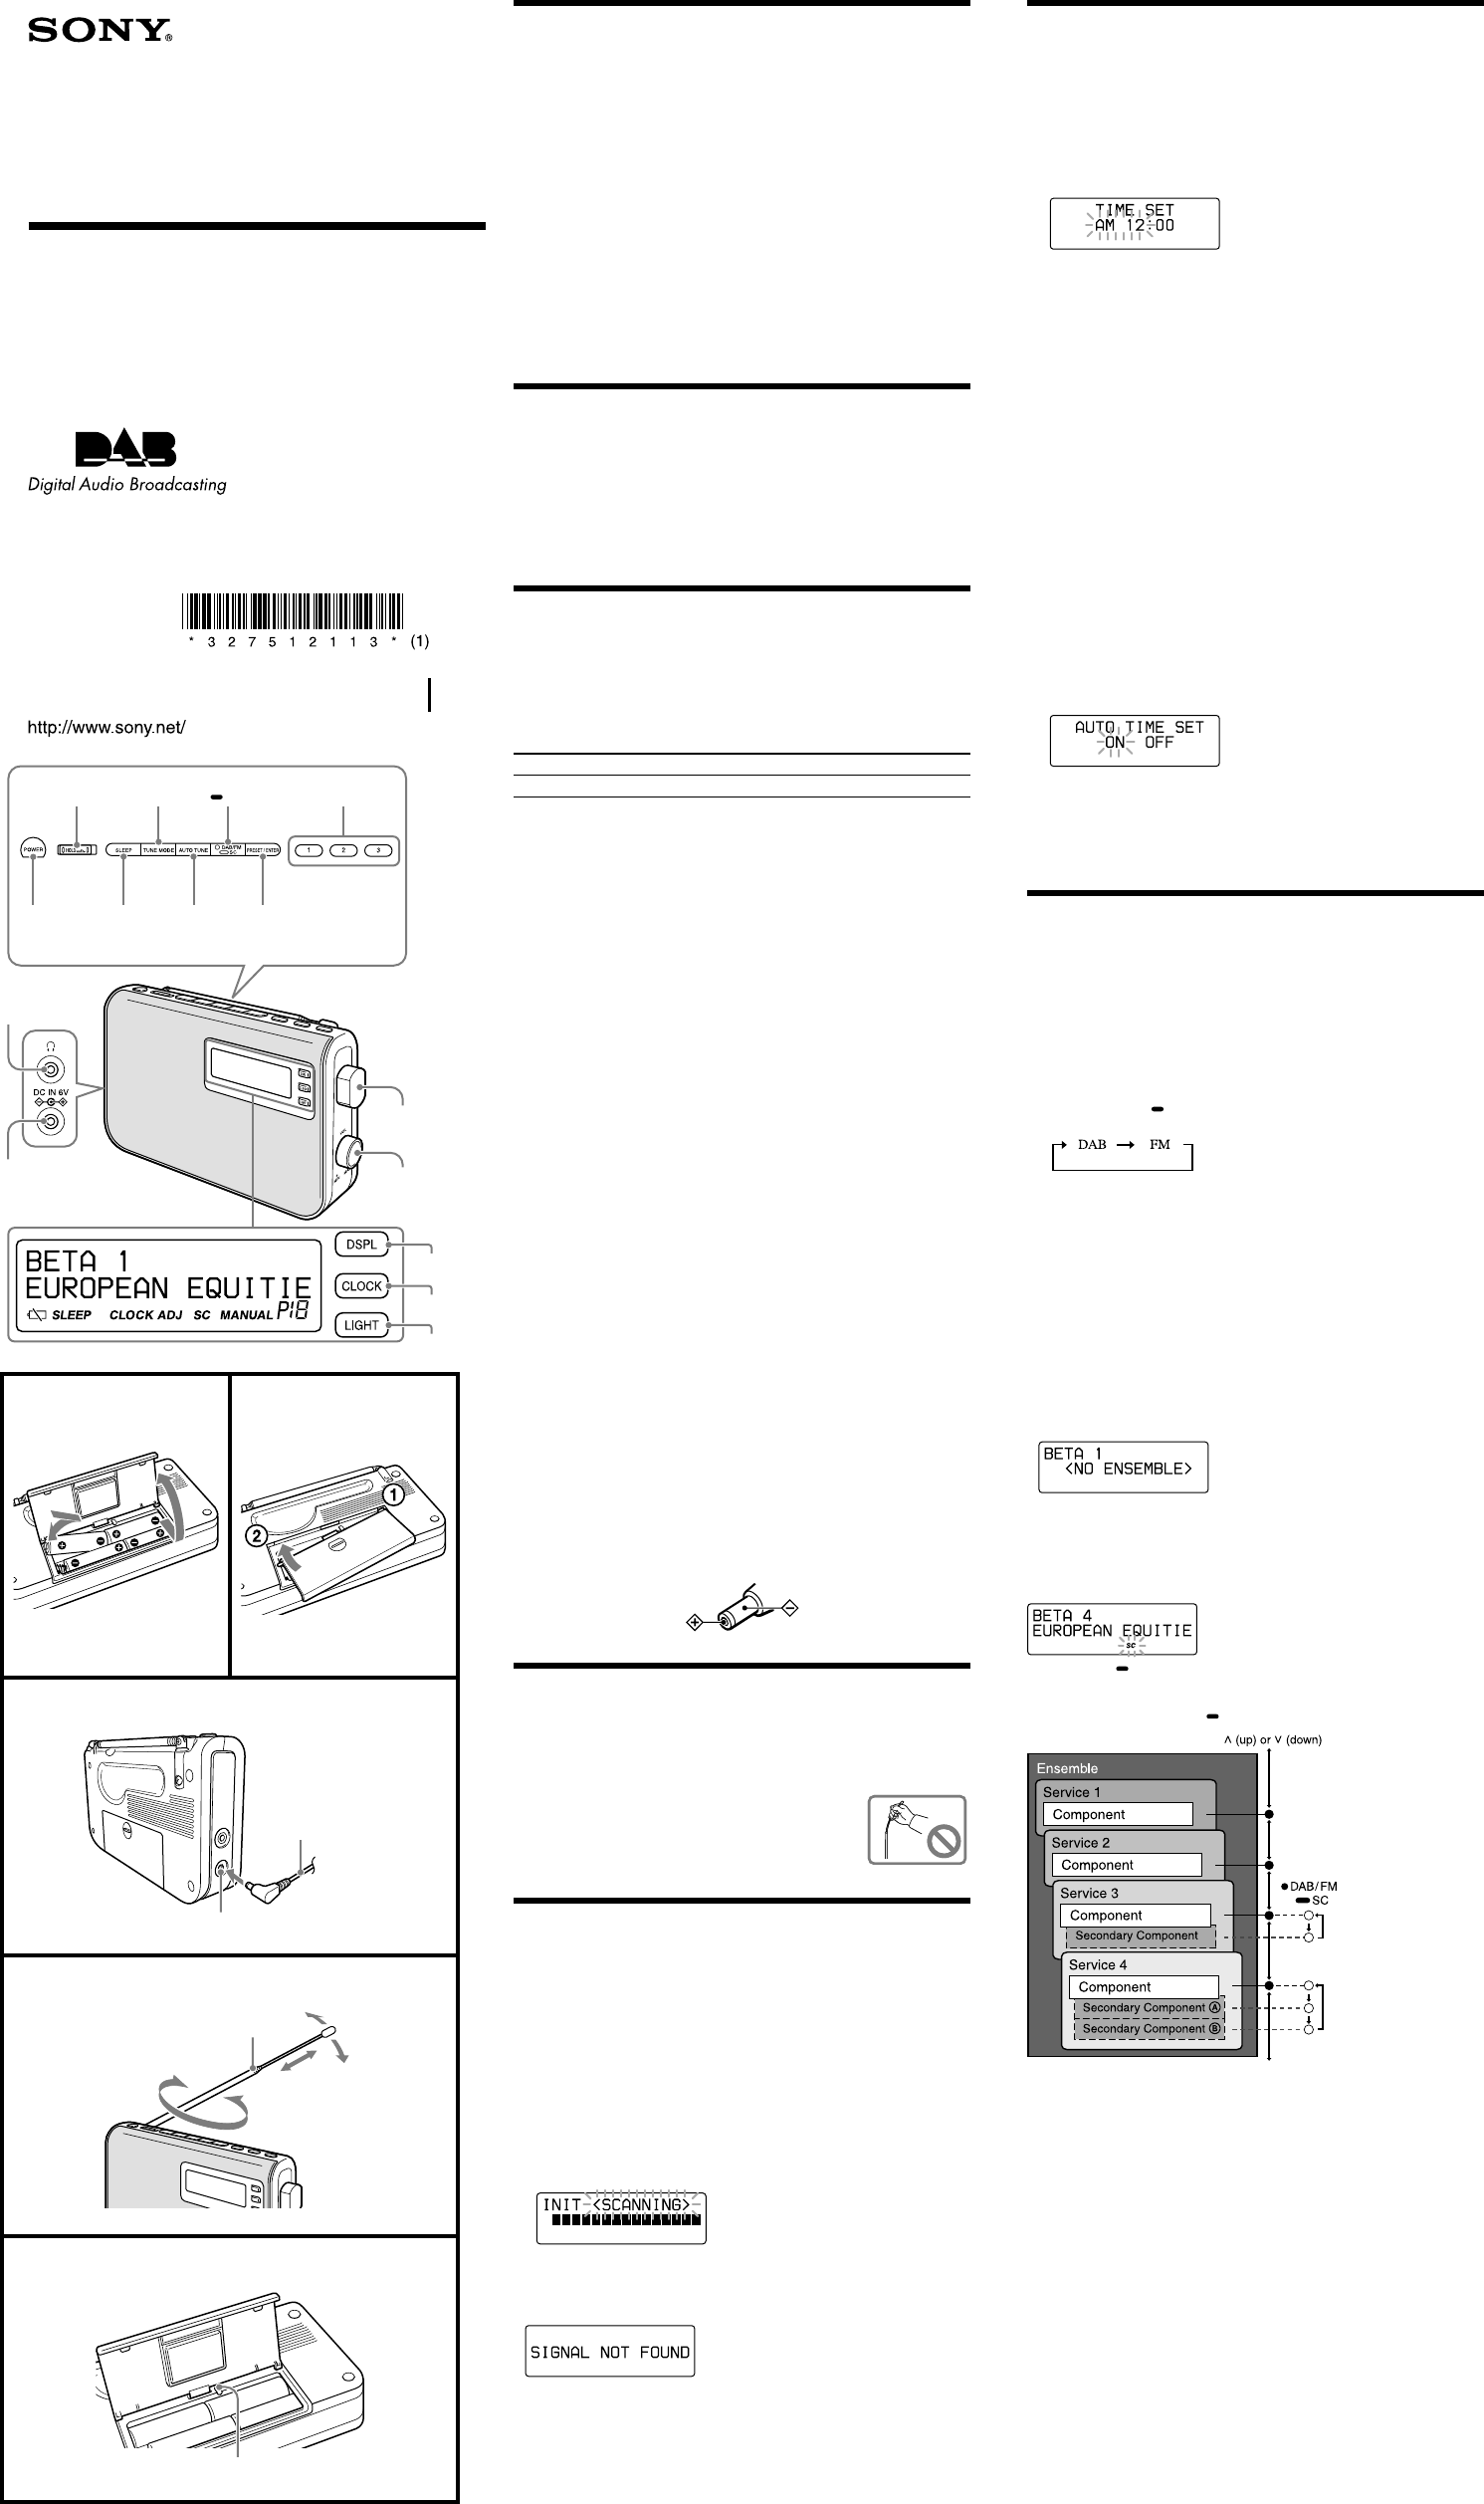
Features
DAB(Band-III) Digital Radio.
Easy view, 2-line character dot LCD display.
Simple operation for station selection.
Three Direct preset station buttons.
Sleep timer and clock display.
Stereo headphone jack.
Battery (LR6 × 4) or mains operated.
Choosing power sources
Installing batteries (See fig. )
1 Open the battery compartment at the rear of the unit.
2 Install four LR6 (size AA) alkaline batteries (not supplied),
observing polarity, and then close the lid.
Battery Life (Approx. hours) (JEITA*)
When using DAB FM
Sony alkaline LR6 (size AA) 8.5 8
* Measured by JEITA (Japan Electronics and Information Technology Industries
Association) standards. The actual battery life may vary depending on the
circumstance of the unit.
Knowing when to replace the batteries
When the batteries become weak, the sound becomes weak and distorted.
When the batteries are completely exhausted, “
” appears on the display and the
power is turned off.
When “
” appears, replace all batteries with new ones. After the batteries are
replaced, press POWER to turn the indication off.
Notes on replacing the batteries
Do not take more than about 1 minutes to replace the batteries, otherwise the
clock, any lists of receivable broadcasts for DAB scan, preset favourite services
and all settings will be initialized. Should that happen, set the functions again.
If the batteries are replaced while the power is on, the unit may revert to the
factory setting.
Notes on batteries
Do not attempt to recharge dry batteries.
Do not carry batteries with coins or other metallic objects. It can generate heat if
the positive and negative terminals of the batteries are accidentally contacted by
a metallic object.
If you are not going to use the unit for a long time, remove the batteries to avoid
damage from battery leakage and corrosion.
Do not use different types of batteries at the same time.
When you replace the batteries, replace all with new ones.
If the battery compartment lid comes off
(See fig. )
The battery compartment lid is designed to come off when opened with excessive
force. To put it back on, see the illustration.
Insert the right hinge of the lid into the right hole of the unit.
Insert the left hinge in the left hole of the unit.
Using house current (See fig. )
Connect the AC power adaptor (supplied) to the DC IN 6 V jack firmly, and plug
it into a wall outlet.
Notes on the AC power adaptor
When operating the unit with the internal batteries, remove the AC power
adaptor from the wall outlet and the DC IN 6 V jack. Make sure that the plug of
the external power source is disconnected before operating the unit.
Use the supplied Sony AC power adaptor only. The polarity of the plugs of other
manufacturers may be different. Failure to use the supplied AC power adaptor
may cause the unit to malfunction.
Improving the reception
(See fig. )
DAB Band-III/FM:
Extend the telescopic aerial and adjust the length and the angle for best reception.
Note
Adjust the direction of the aerial by holding the bottom of it.
The aerial can be damaged when you move the aerial with
excessive force.
Initial setting for the DAB
When the batteries are installed, or when the AC power adaptor is plugged in for
the first time after purchase (or after resetting), the unit will automatically scan
and create a list of receivable broadcasts.
If you wish to scan for the DAB broadcasts again, or when the unit is reset, do the
following:
1 Adjust the aerial accordingly.
2 Press POWER to turn on the radio.
3 Hold down AUTO TUNE for more than 2 seconds.
“
” appears in the display.
4 Press PRESET/ENTER.
No sound will be heard, and “
” appears in the display. DAB scan
takes about 30 ~ 90 seconds. When finished, the unit receives the first service
in alphabetical order stored by the DAB scan.
Notes
If you do not operate within 65 seconds, the initial scan mode will be cancelled.
If no broadcasts are found by the DAB scan, “
” appears in
the display.
To cancel the DAB scan halfway, press
AUTO TUNE. Any services received
before you cancel are added to the list of receivable services.
If the batteries are removed for a certain period, the received history list will be
deleted, requiring you to scan again.
If you set the initial setting, any DAB services registered as
PRESET are erased.
If you change the unit’s location of use, or want to add a new service after the
initial setting, press and release AUTO TUNE. “
” appears in
the display and the unit will automatically scan and create a list of receivable
services.
DAB/FM DIGITAL
RADIO
Operating Instructions
XDR-S55DAB
© 2007 Sony Corporation Printed in China
Setting the clock
“AM 12:00” (or “0:00”) will blink in the display when the batteries are installed or
the AC power adaptor is plugged in, and then POWER is pressed for the first time
after purchase, or after resetting.
1 Hold down CLOCK for more than 2 seconds to show the time set
display.
2 Turn
(up)/
(down) to select “
” and press PRESET/ENTER.
The hour indication starts blinking.
Example: 12-hour system.
3 Turn
/
to set the hour, and then press PRESET/ENTER.
The minute indication starts blinking.
4 Turn
/
to set the minute, then press PRESET/ENTER.
The clock starts operating, and “
” starts blinking.
Tips
To set the current time rapidly, hold
/
.
To set the current time exactly to the seconds, adjust the minute function in step
4 and then press PRESET/ENTER to synchronize it with a time signal (such as
the telephone time signal).
The clock system varies depending on the model purchased. For example, in the
24-hour system, “0:00” is indicated as midnight, and “12:00” is indicated as
noon.
Notes
If you do not operate within 65 seconds while setting the clock, the clock setting
mode will be cancelled.
To cancel the clock setting mode halfway, press
CLOCK.
To show the current time as DAB is received, press
DISPLAY.
(See “Changing the display”).
Setting the clock auto adjustment function
This function enables the built-in clock of this unit to automatically synchronize
with any DAB data being received.
1 Hold down CLOCK for more than 2 seconds to show the time set
display.
2 Turn
/
to select “
” and press PRESET/ENTER.
“CLOCK ADJ ” lights and DAB data adjusts the clock as it is received.
Notes
If DAB is not available (depending on area), you can disable this function.
If this function is active while adjusting the clock manually, DAB data will
adjust the clock the next time the unit receives it.
Operating the radio
The unit can receive DAB services and FM stations, both of which feature
PRESET and MANUAL modes - DAB services also feature ALPHABETICAL
mode.
ALPHABETICAL: To select a stored service in alphabetical order.
PRESET: To select preset services. “P ” appears in the display.
MANUAL: To adjust the frequency incrementally.
1 Press POWER to turn on the radio.
When the unit is turned on again, the last band you listened to is received.
2 Press •DAB/FM SC repeatedly to select the desired band.
Each press changes the band as follows:
3 Press TUNE MODE to select the desired mode.
4 Turn
/
to tune to the desired service or station.
Two short beeps sound when the lowest ensemble of DAB or the minimum
frequency of FM is received during tuning.
5 Adjust the volume using VOLUME.
Notes in FM usage
The channel step is set to 0.05 MHz on FM.
When a stereo broadcast is received in FM, “
” appears in the display.
Notes in DAB usage
Before receiving DAB broadcasts, one or more ensembles should be stored in
the list by the DAB scan. (See “Initial setting for the DAB”).
If there are no services, you can choose only
MANUAL mode.
“
” appears when the ensemble for the selected service cannot
be received.
If a selected service finishes broadcasting, sound stops and “
”
appears. In this case, turn
/
to select another service.
About the SC (Secondary Component)
If the selected primary component has a secondary component, “SC ” blinks on
the display.
Press •DAB/FM SC for more than 2 seconds to receive the desired secondary
component. “SC ” appears while the secondary component is received.
Turn
/
or pressing •DAB/FM SC does the following:
Note
When the selected secondary component is finished, the unit returns
automatically to the primary component.
3-275-121-13(1)
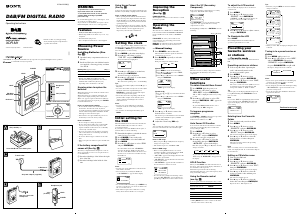
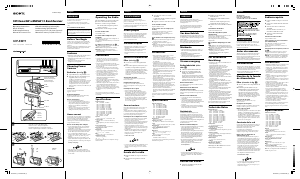
POWER
Headphone
jack
VOLUME
PRESET 1, 2, 3
AUTO TUNE SLEEP
•DAB/FM
SCTUNE MODE
PRESET/ENTER
/
dial
DC IN 6V
HOLD
LIGHT
DISPLAY
CLOCK
Continue to next page
Insert the side of the
battery first.
LR6 (size AA) × 4
AC power adaptor
(supplied)
DC IN 6V
Aerial
RESET button


Praat mee over dit product
Laat hier weten wat jij vindt van de Sony XDR-S55DAB Radio. Als je een vraag hebt, lees dan eerst zorgvuldig de handleiding door. Een handleiding aanvragen kan via ons contactformulier.