ESPAÑOL
Indicaciones de segu-
ridad
¡Por favor, lea atentamente
las Instrucciones de uso y
después guárdelas a mano!
No olvide adjuntar estas
instrucciones si entrega el
aparato a otra persona.
Esta máquina ha sido dise-
ñada para uso doméstico o
para su uso en entornos no
industriales equiparables a
los domésticos. El uso en
entornos equiparables a los
domésticos comprende,
p.ej. su utilización en salas
para empleados de tiendas,
ocinas, entornos rurales y
otros entornos industriales,
así como su utilización por
huéspedes de pensiones,
pequeños hoteles y aloja-
mientos similares.
¡Peligro de electro-
cución y de incendio!
Conectar y utilizar el aparato
sólo según los datos de la
placa de características.
El aparato no debe ser ma-
nejado por niños menores
de ocho años.
Estos aparatos pueden ser
manejados por niños de
ocho o más años y por per-
sonas con facultades físi-
cas, sensoriales o mentales
disminuidas o bien con fal-
ta de experiencia y / o de
conocimientos si lo hacen
bajo supervisión o si han
sido instruidas acerca del
uso seguro del aparato y si
han comprendido los peli-
gros que se pueden derivar
de su manejo. Los niños no
deben jugar con el aparato.
Las operaciones de limpie-
za y mantenimiento a cargo
del usuario no deben ser
realizadas por niños sin la
debida vigilancia.
Utilícelo sólo si el cable de
alimentación y el propio
aparato están exentos de
daños.
Desenchufar la clavija des-
pués de cada uso o en caso
de fallo.
Para evitar riesgos, el aparato
sólo debe ser reparado
(p.ej. cambio de un cable
de alimentación dañado)
por nuestro servicio de
asistencia técnica.
El cable de alimentación no
debe
● ponerse en contacto con
piezas calientes;
● pasarse sobre bordes
afilados;
● usarse para el transporte.
El elemento de calenta-
miento se calienta. Toque el
aparato sólo por el mango.
Utilice el aparato sólo en
cabellos secos, en ningún
caso en cabellos sintéticos.
Coloque el aparato sólo en
superficies resistentes al ca-
lor.
Evitar el contacto con la
piel.
No usar cerca
de bañeras, la-
vabos u otros
recipientes lle-
nos de agua.
¡Peligro de muerte!
El aparato no debe entrar
nunca en contacto con agua.
Existe peligro incluso con
el aparato desconectado,
por lo tanto, después de
su uso y cuando se realice
una pausa mientras se use,
desenchufar la clavija.
El montaje de un interruptor
de corriente de defecto hasta
30 mA ofrece protección
adicional en la instalación
doméstica. Consulte con un
electricista.
No deje que los niños
jueguen con el embalaje.
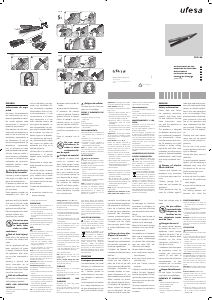
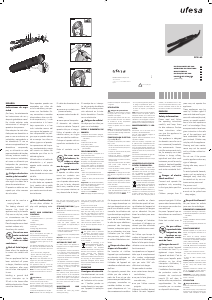
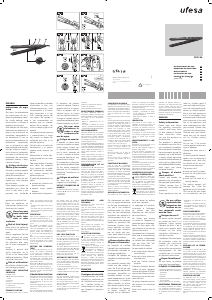
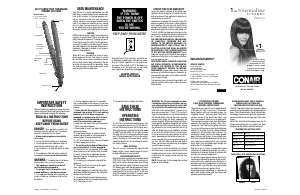
PIEZAS Y ELEMENTOS DE
MANEJO
1. Interruptor de encendido/apagado
2. Selector de temperatura +/–(min
100°C - máx 200°C)
3. Display
4. Placas montadas de forma flexible
5. Clip para el cable
6. Bolsa para guardar el aparato
(termoestable)
FUNCIONAMIENTO
Enchufe el aparato y colóquelo sobre
una superficie recta y resistente al calor.
Encienda el aparato con el interruptor
1; en el display 3 se iluminará la
temperatura preajustada de 150°C.
Ahora puede ajustar la temperatura
deseada en el selector de temperatura
2 en 10 pasos desde 100ºC hasta
200ºC.
El aparato se calienta, la temperatura
ajustada parpadea en el display.
El aparato está listo para funcionar
cuando la temperatura ajustada deja de
parpadear.
Temperaturas recomendadas para
conseguir un alisado y un brillo
perfectos:
Tipo de
cabello
Estructura
Temperatura
recomendada
crespo sano 180°C
rizado sano 180°C
ondulado
sano 160°C
crespo delicado 160°C
rizado delicado 160°C
ondulado
delicado 150°C
crespo dañado 140°C
rizado dañado 140°C
ondulado
dañado 140°C
Esta información ha sido recopilada en
condiciones de laboratorio, el ajuste
puede variar en los diferentes cabellos.
Conservación del color: el color del
cabello se protege y se mantiene durante
más tiempo sólo a temperaturas < 180°C
y a las temperaturas recomendadas más
arriba.
UTILIZACIÓN
¡Peligro de quemaduras!
El aparato no debe entrar en contacto
en ningún caso con la piel (el cuero
cabelludo o las orejas).
El alisador de pelo permite tanto alisar
los cabellos como rizarlos.
– Utilice el aparato sólo en cabellos
secos.
Nota: el cabello fino reacciona con
especial rapidez al tratamiento con las
placas. Tenga en cuenta las temperatu-
ras recomendadas para su tipo de ca-
bello, véase «Puesta en servicio».
La distribución uniforme del calor por
las placas protege extraordinariamente
el cabello.
El resultado es un cabello liso, con un
brillo intenso y sedoso.
Importante: no detenga nunca el apa-
rato más de 2 segundos en el mismo
lugar.
Alisar cabellos (dibujo A)
El aparato es apropiado para cabello
largo y corto.
• Divida el cabello peinado liso en
mechones de la misma anchura
(aprox. 5 cm).
• Coloque un mechón entre las placas
en la raíz del cabello (dibujo a).
• Presione las placas y tire suave y
uniformemente hasta las puntas
(dibujo b).
• Proceda del mismo modo con todos
los mechones. Espere a que se enfríe
bien el cabello antes de terminar de
peinarlo.
Sugerencia: si el pelo llega a la altura
de los hombros, el aparato se debe
utilizar durante aprox. 10 segundos en
cada mechón.
Rizar cabellos (dibujos B, C y D)
Existen tres métodos para rizar el
cabello. En todos ellos, el cabello seco
se divide en mechones de la misma
anchura, de aprox. 2 cm. Cuanto más
finos sean los mechones más fuerte será
el rizo.
Rizos con volumen en todo el cabello
• Mantenga el alisador en posición
horizontal, coloque el mechón entre
las placas y ciérrelas.
• Gire el alisador 180º y enrolle una vez
el mechón en la placa superior.
• Presione fuertemente las placas y tire
uniformemente hasta las puntas.
• Abra las placas.
Rizos con volumen en parte del
cabello
• Mantenga el alisador en posición
horizontal, coloque el mechón entre
las placas y ciérrelas.
• Gire el alisador 180º y enrolle el
mechón una vez en la placa inferior.
• Presione fuertemente las placas y tire
uniformemente hasta las puntas.
• Abra las placas.
Tirabuzones para peinados de fiesta
• Mantenga el alisador en posición
vertical, coloque el mechón entre
la parte inferior de las placas y
ciérrelas.
• Gire el alisador 180º y enrolle el
mechón una vez en la placa aún no
envuelta.
• Presione fuertemente las placas y tire
uniformemente y en diagonal hacia
abajo hasta las puntas.
• Abra las placas.
Nota: tenga en cuenta que el rizo no se
vuelve a alisar.
Sugerencia para mantener el peinado
durante más tiempo: vuelva a enrollar
el rizo aún caliente y fíjelo con una pinza
hasta que se enfríe.
Atención: El mejor y más adecuado
ajuste de temperatura depende
principalmente de la velocidad a la
que el aparato se pasa por el pelo
(los valores especificados se refieren a
aprox. 2cm/seg.):
• en cabellos cortos (aprox. 10 cm de
largo) el aparato se debería pasar
uniformemente por cada mechón
durante aprox. 5 seg.
• en cabellos a la altura del hombro
(aprox. 20 cm de largo) el aparato
se debería pasar uniformemente por
cada mechón durante aprox. 10 seg.
• en cabellos largos (40 cm de largo)
el aparato se debería pasar unifor-
memente por cada mechón durante
aprox. 20 seg.
• si el aparato se utiliza con una mayor
rapidez, se necesita una temperatura
más alta (se consigue el mismo
resultado, pero el cabello se daña
más).
APAGADO AUTOMATICO
Por razones de seguridad, este aparato
dispone de una desconexión automá-
tica.
• El aparato se apaga automáticamente
aprox. 60 - 70 minutos después de
encenderlo o tras el último ajuste del
selector de temperatura 2 y el display
se oscurece.
Nota: para volver a encender el aparato,
pulse el interruptor ON/OFF 1.
MANTENIMIENTO Y LIM-
PIEZA
Desconectar de la red antes de la
limpieza y del almacenamiento.
Una vez haya finalizado, apague el
aparato y déjelo enfriar.
Sujete el cable de alimentación con el
clip para el cable 5.
Antes de limpiarla, compruebe que
la plancha esté completamente fría.
Limpie la carcasa exterior con un paño
seco. Las placas pueden limpiarse
con un paño ligeramente humedecido
para eliminar los restos de los productos
de peluquería.
No introduzca este aparato en agua. No
utilice una limpiadora a presión.
No guarde el aparato hasta que se haya
enfriado.
ADVERTENCIAS DE DEPO-
SICIÓN / ELIMINACIÓN:
Para su transporte, nuestras mer-
cancías cuentan con un embalaje
optimizado. Este consiste -por princi-
pio- en materiales no contaminantes
que deberían ser entregados como
materia prima secundaria al servicio
local de eliminación de basuras.
46-12
100% recycled paper
INSTRUCCIONES DE USO
ES
OPERATING INSTRUCTIONS
GB
MODE D'EMPLOI
FR
INSTRUÇõES DE USO
PT
HASZN LATI UTAS T S
HU
AR
PP5139
Elimine el embalaje respetando
el medio ambiente. Este aparato
está marcado con la Directiva
europea 2012/19/CE relativa al
uso de aparatos eléctricos y electrónicos
(Residuos de aparatos eléctricos y
electrónicos). La directiva proporciona
el marco general válido en todo el
ámbito de la Unión Europea para la
retirada y la reutilización de los residuos
de los aparatos eléctricos y electrónicos.
Infórmese sobre las vías de eliminación
actuales en su distribuidor.
ENGLISH
Safety information
Please read and follow
the operating instructions
carefully and keep them
for later reference. Enclose
these instructions when
you give this appliance to
someone else.
This appliance is designed
for domestic use or for use in
non-commercial, household-
like environments. House-
hold-like environments inclu-
de, for example, use in staff
kitchens in shops, ofces,
agricultural and other small
businesses, as well as use by
guests at bed-and-breakfast
establishments, small hotels
and similar residential facili-
ties.
Danger of electric
Connect and operate the
appliance only according
to the type plate specifica-
tions.
Children younger than 8
years may not operate the
appliance.
These appliances may be
used by children aged 8
years and older and by per-
sons with reduced physical,
sensory or mental capabili-
ties or who lack experience
and / or knowledge if they
are supervised or have been
given instruction in the safe
use of the appliance and
have understood the dan-
gers involved. Children may
not play with the appliance.
Cleaning and user mainte-
nance may not be carried
out by children without
supervision.
Do not use if the power
cord or appliance show any
signs of damage.
Unplug after every use or if
defective.
To avoid potential hazards,
repairs such as replacing
a damaged cord, must only
be carried out by our customer
service personnel.
The power cord
● must not touch hot parts;
● must not be pulled over
sharp edges;
● must not be used as a
carrying handle.
The heating element will
become hot. Hold the
appliance only by its han-
dle. Only use on dry hair;
under no circumstances use
the appliance on artificial
hair.
Place the appliance on heat-
resistant surfaces only.
Avoid any skin contact.
Do not use near
water contained
in bath tubs,
sinks or other
containers.
Risk of fatal injury!
Never allow the appliance
to come into contact with
water.
Even an appliance that has
been switched off poses
a danger; therefore unplug
the appliance after every
use or when interrupted in
its use.
Installing a ground fault
circuit interrupter up to
30 mA in the house offers
additional protection. Please
consult an electrician.
Risk of suffocation!
Do not allow children to
play with packaging mate-
rial.
PARTS AND OPERATING
CONTROLS
1. ON/OFF switch
2. Temperature selector +/- (min 100°C
- max 200°C)
3. Display
4. Floating heating plates
5. Cord clip
6. Storage bag (heat-resistant)
OPERATION
Plug in the appliance and place on a
level, heat-resistant surface.
Turn on with switch 1. The preset
temperature (150°C) lights up on the
display 3.
The desired temperature can now be
set using the temperature selector 2
at intervals of 10 between 100°C and
200°C.
The appliance heats up, the preset
temperature flashes in the display.
The appliance is ready for use when
the preset temperature is illuminated
and no longer flashing.
Recommended temperatures for
especially gentle straightening and
shine:
Hair type Structure
Recommended
temperature
frizzy healthy 180°C
curly healthy 180°C
wavy healthy 160°C
frizzy damaged 160°C
curly damaged 160°C
wavy damaged 150°C
frizzy unhealthy 140°C
curly unhealthy 140°C
wavy unhealthy 140°C
This information was calculated under
labo ratory conditions: settings for your
own hair may vary.
Colour saving: Colour protection and
longer-lasting colour only at temperatu-
res < 180°C and at the recommended
temperatures stated above.
USE
Risk of burns!
Never allow appliance to come into
contact with skin (scalp or ears).
You can use the hair straightener to
straighten or curl your hair.
- Only use the appliance on dry hair.
Note: Fine hair responds particularly
quickly to the treatment with the hea-
ting plates. Please note the recommen-
ded temperature for your hair type, see
“OPERATION”.
The even heat emission of the heating
plates is especially gentle on the hair.
The result is smooth hair with an inten-
sive, silky shine.
Important: Never apply in one spot for
longer than 2 seconds.
Straightening your hair (Figure A)
The appliance is suitable for both long
and short hair.
• Comb the hair and section it into even
strands (about 5 cm wide).
• Starting from the roots, place a strand
of hair between the plates (Figure a).
• Press the plates together and pull
down gently and evenly toward the
ends of the hair (Figure b).
• Treat all strands in the same manner.
Allow hair to cool completely before
styling.
Tip: For shoulder-length hair, each
strand should take about 10 seconds.
Curling your hair (Figures B, C and D)
There are three methods for curling hair.
In all cases, the hair should be sectioned
into even strands about 2 cm wide.
The finer the strand, the tighter the curl.
Curling with volume in the entire hair
• Hold the hair straightener level, place
the strand of hair between the hea-
ting plates and close them.
• Turn the straightener 180° and wrap
the strand once around the upper
heating plate.
• Press the plates firmly together and
pull the straightener down to the
ends of the hair at a steady pace.
• Now open the plates.
Curling with volume in the length
• Hold the hair straightener level, place
the strand of hair between the heating
plates and close them.
• Turn the straightener 180° and wrap
the strand once around the lower
heating plate.
• Press the plates firmly together and
pull the straightener down to the
ends of the hair at a steady pace.
• Now open the plates.
Spiral curls for special hair styles
• Hold the hair straightener vertically,
place the strand of hair between
lower half of the heating plates and
close them.
• Turn the straightener 180° and wrap
the strand once around the free
heating plate.
• Press the plates firmly together and
pull the straightener down tilted to
the ends of the hair at a steady pace.
• Now open the plates.
N.B.: Make sure that the curl is not
pulled straight when removing the
straightener.
Tip for a longer lasting hair style:
Roll up the curl when it’s still hot and fix
with a hair clip until cool.
Warning: The best and most gentle
temperature setting depends primarily
on the speed at which the appliance
is pulled down the hair (the specified
values refer to approx. 2 cm/sec.):
• For short hair (approx. 10 cm in
length), the appliance should be
pulled evenly down the strand in
approximately 5 seconds.
• For shoulder-length hair (approx. 20
cm in length), the appliance should
be pulled evenly down the strand in
approximately 10 seconds.
• For long hair (40 cm in length), the
appliance should be pulled evenly
down the strand in approximately 20
seconds.
• If the appliance is pulled down the
hair faster, a higher temperature is
necessary (the same result is achieved,
but it is more damaging to the hair).
AUTOMATIC SHUT-OFF
For safety reasons this appliance is
equipped with an automatic shut-off
function.
• The appliance switches off automa-
tically 60 – 70 minutes after it was
switched on or after the temperature
selector 2 was adjusted for the last
time. The display will go dark.
Note: Use the ON/OFF switch 1 to
switch the appliance back on.
MAINTENANCE AND CLE-
ANING
Disconnect the mains plug before
cleaning and storing.
Once you have finished, switch off
the appliance, unplug it and let it cool
down.
Fix the cord with the clip 5.
Make sure that the plates are completely
cold before cleaning the appliance.
Wipe the outer casing down with a
dry cloth. The plates can be cleaned
with a slightly dampened cloth to
remove the remains of any hairdressing
products.
Never immerse the appliance into
water. Do not use a steam cleaner.
Do not store the appliance away if it is
still hot.
ADVICE ON DISPOSAL:
Our goods come in optimised
packaging. This basically consists
in using non-contaminating materials
which should be handed over to
the local waste disposal service as se-
condary raw materials.
Dispose of packaging in an
environmentally-friendly manner.
This appliance is labelled in
accordance with European
Directive 2012/19/EG concerning used
electrical and electronic appliances
(waste electrical and electronic
equipment – WEEE). The guideline
determines the framework for the return
and recycling of used appliances as
applicable throughout the EU. Please
ask your specialist retailer about current
disposal facilities.
FRANÇAIS
Consignes de sécurité
Lire attentivement ce mode
d’emploi, s’y conformer lors
de l’utilisation et le conser-
ver ! Veuillez joindre ce
mode d’emploi si vous pas-
sez l’appareil à quelqu’un
d’autre.
Cet équipement est destiné
à un usage domestique ou
de type domestique et non
pas à une utilisation profes-
sionnelle. Les utilisations de
type domestique englobent
par exemple le fonctionne-
ment de la machine dans
la salle de repos dédiée au
personnel des boutiques,
bureaux, entreprises agrico-
les ou artisanales, ainsi que
l’utilisation par les clients
des pensions, petits hôtels
et unités d’habitations simi-
laires.
Risque de chocs élec-
triques et d’incendie !
Ne brancher et n’utiliser
l’appareil que conformément
aux données indiquées sur
la plaque signalétique.
L’utilisation de l’appareil est
interdite aux enfants de moins
de 8 ans.
Ces appareils peuvent être
utilisés par des enfants à
partir de 8 ans et par des
personnes ayant des facultés
physiques, sensorielles ou
mentales réduites ou man-
quant d’expérience et / ou
de connaissances à condition
d’être surveillés ou d’avoir
été informés quant à la bon-
ne utilisation de l’appareil et
d’avoir compris les dangers
qui en découlent. Ne pas
laisser les enfants jouer avec
l’appareil.
Le nettoyage et l’entretien
incombant à l’utilisateur ne
doivent pas être effectués par
des enfants sans surveillance.
Ne l’utiliser que lorsque le
cordon et l’appareil ne pré-
sentent aucun dommage.
Retirer la fiche après chaque
utilisation ou en cas de dys-
fonctionnement.
Les réparations sur l’appareil
telles que le remplacement
d’un cordon endommagé
ne doivent être effectuées
que par notre SAV afin
d’éliminer tout danger.
Ne pas mettre le cordon
● en contact avec des
pièces brûlantes ;
● ne pas le faire glisser sur
une arête vive ;
● ne pas l’utiliser comme
poignée.
L’élément chauffant devient
brûlant. Ne saisir l’appareil
que par la poignée. N’utiliser
que sur des cheveux séchés,
et en aucun cas sur des che-
veux artificiels.
Ne poser l’appareil que sur
des surfaces non sensibles à
la chaleur.
Eviter tout contact avec la
peau.
Ne pas utiliser
baignoires, des
lavabos ou au-
tres récipients conte-
nant de l’eau.
Danger de mort !
Ne jamais mettre l’appareil
au contact de l’eau. Il y a
également risque lorsque
l’appareil est éteint. C’est la
raison pour laquelle après
utilisation ou lors d’une
interruption d’utilisation, il
faut retirer la fiche.
L’installation d’un interrupteur
de protection contre les
courants de court-circuit
jusqu’à 30 mA dans la
maison offre une protection
supplémentaire. Se faire
conseiller par un monteur
en dispositifs électriques.
Risque d’étouffement !
Ne pas laisser les enfants
jouer avec les emballages.
ELÉMENTS ET COMMANDES
1. Interrupteur d’allumage/d’extinction
2. Sélecteur de température +/–(mini
100°C - maxi 200°C)
3. Ecran
4. Plaques chauffantes, fixation mobile
5. Clip pour câble
6. Housse de rangement (résistante à la
chaleur)
FONCTIONNEMENT
Brancher l’appareil et le poser sur une
surface plane, non sensible à la cha-
leur.
Mettre en marche avec l’interrupteur
1. La température préréglée (150°C)
s’affiche à l’écran 3.
Vous pouvez maintenant, à l’aide des
touches 2, sélectionner la température
souhaitée par pas de 10°C, entre 100°C
et 200°C.
L’appareil chauffe, la température sélec-
tionnée sur l’afficheur clignote. Lorsque
l’affichage de la température devient
fixe, l’appareil est prêt à être utilisé.
Températures recommandées pour
un lissage et un brillant en douceur :
Type de
cheveu
Structure Température
recommandée
frisé sains 180°C
bouclé sains 180°C
ondulé sains 160°C
frisé fragilisés 160°C
bouclé fragilisés 160°C
ondulé fragilisés 150°C
frisé abîmés 140°C
bouclé abîmés 140°C
ondulé abîmés 140°C
Ces valeurs ont été déterminées en labo-
ratoire, les réglages peuvent différer indi-
viduellement en fonction des cheveux.
Préservation de la couleur : la
préservation de la couleur et sa tenue
dans le temps ne sont garanties que
pour des températures < 180°C et aux
températures recommandées figurant
ci-dessus.
UTILISATION
Risque de brûlure !
Eviter tout contact avec la peau (crâne
ou oreilles).
Le fer à lisser peut servir à lisser les
cheveux comme à former des boucles.
– N’utiliser l’appareil que sur des
cheveux secs.
Informations : Les cheveux fins réagis-
sent particulièrement vite au fer à lisser.
Respectez les recommandations formu-
lées pour votre type de cheveux, voir
« Mise en service ».
La diffusion régulière de chaleur des
plaques garantit un traitement en
douceur des cheveux.
Les cheveux sont bien lissés avec un
brillant intense et soyeux.
Important : Ne jamais s’arrêter plus
de 2 secondes à un endroit de la
chevelure.
Lisser les cheveux (Illustration A)
L’appareil convient pour les cheveux
longs comme les cheveux courts.
• Répartir les cheveux bien étirés en
mèches régulières (d’environ 5 cm)
• Placer la mèche entre les plaques du
fer, au plus près du crâne (illustration
a).
BSH Electrodomésticos España, S.A.
CIF A-28-893550
C/ Itaroa, n° 1, 31.620 HUARTE (Navarra)
España


Praat mee over dit product
Laat hier weten wat jij vindt van de Ufesa PP5139 Stijltang. Als je een vraag hebt, lees dan eerst zorgvuldig de handleiding door. Een handleiding aanvragen kan via ons contactformulier.