VEZETÉK NÉLKÜLI
AJTÓCSENGŐ
UT-WD136
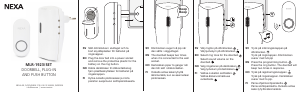
1. Az ebben a csomagban szállított adóegység(ek) párosítva vannak vevőegység(ek)kel, és be vannak
állítva a “Dingdong” alapértelmezett dallamra, AMENNYIBEN EZ NEM ÍGY VAN, kérjük, hogy tanulmá-
nyozza a „Gyors indítás” című fejezetet és annak segítségével párosítsa az adóegység(ek)et és
vevőegység(ek)et, majd állítsa be kedvenc dallamát/dallamait.
2. A fém, a falak, a mennyezet és az elektromos készülékek által kibocsátott egyéb rádiófrekvenciás jelek
befolyásolhatják a vezeték nélküli ajtócsengő rádió jelét. Általában a hatótáv elérheti a 180 métert
a nyílt, interferenciamentes térben, míg akadályokkal rendelkező környezetekben a hatótáv 18-90 m
lehet.
3. Nem tanácsos az adókészüléket fém felületre szerelni, mivel a fém blokkolhatja a rádiófrekvenciás
jeleket az adóegység és a vevőegység között. Azonban, amennyiben csak így lehet felszerelni az
adóegységet, akkor a csavarok helyett a készülékkel szállított kétoldalas ragasztószalag használatát
javasoljuk.
4. Az adóegységben használt elem típusa: 23A. Amennyiben gyenge állapotú elem van az adóegységben,
akkor a hatótáv csökkenni fog.
5. Nem tanácsos az adóegységet közvetlenül a külső ajtóra mindennemű védelem nélkül szerelni, mivel
az ily módon történő felszerelés következtében felgyorsulhat a műanyagok öregedése.
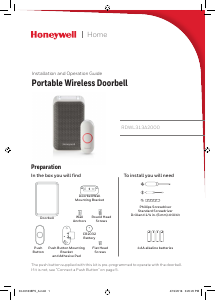
1. Kapcsolja be az adó- és a vevőegységet.
2. Dallambeállítás és az adó-, illetve vevőegység párosítása:
(1) Nyomja meg a vagy a gombot és válassza ki kedvenc dallamát a beprogramozandó vevőegységen.
(2) Tartsa lenyomva a gombot körülbelül 5 másodpercig, majd engedje fel, amikor megszólal egy
Ding-dong dallam és a LED jelzőlámpák elkezdenek villogni.
(3) Nyomja le az adóegység gombját annak érdekében, hogy elküldjön egy jelet a vevőegységhez
a működés ellenőrzése céljából. Amennyiben a dallam beállítása (a párosítás) sikeres, a
vevőegység automatikusan le fogja játszani a kiválasztott dallamot.
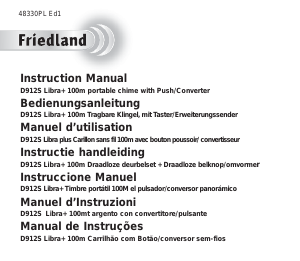
3. Hangerő szabályozás
Nyomja meg a gombot a vevőkészüléken. E kapcsoló a magas és alacsony hangerők között vált.
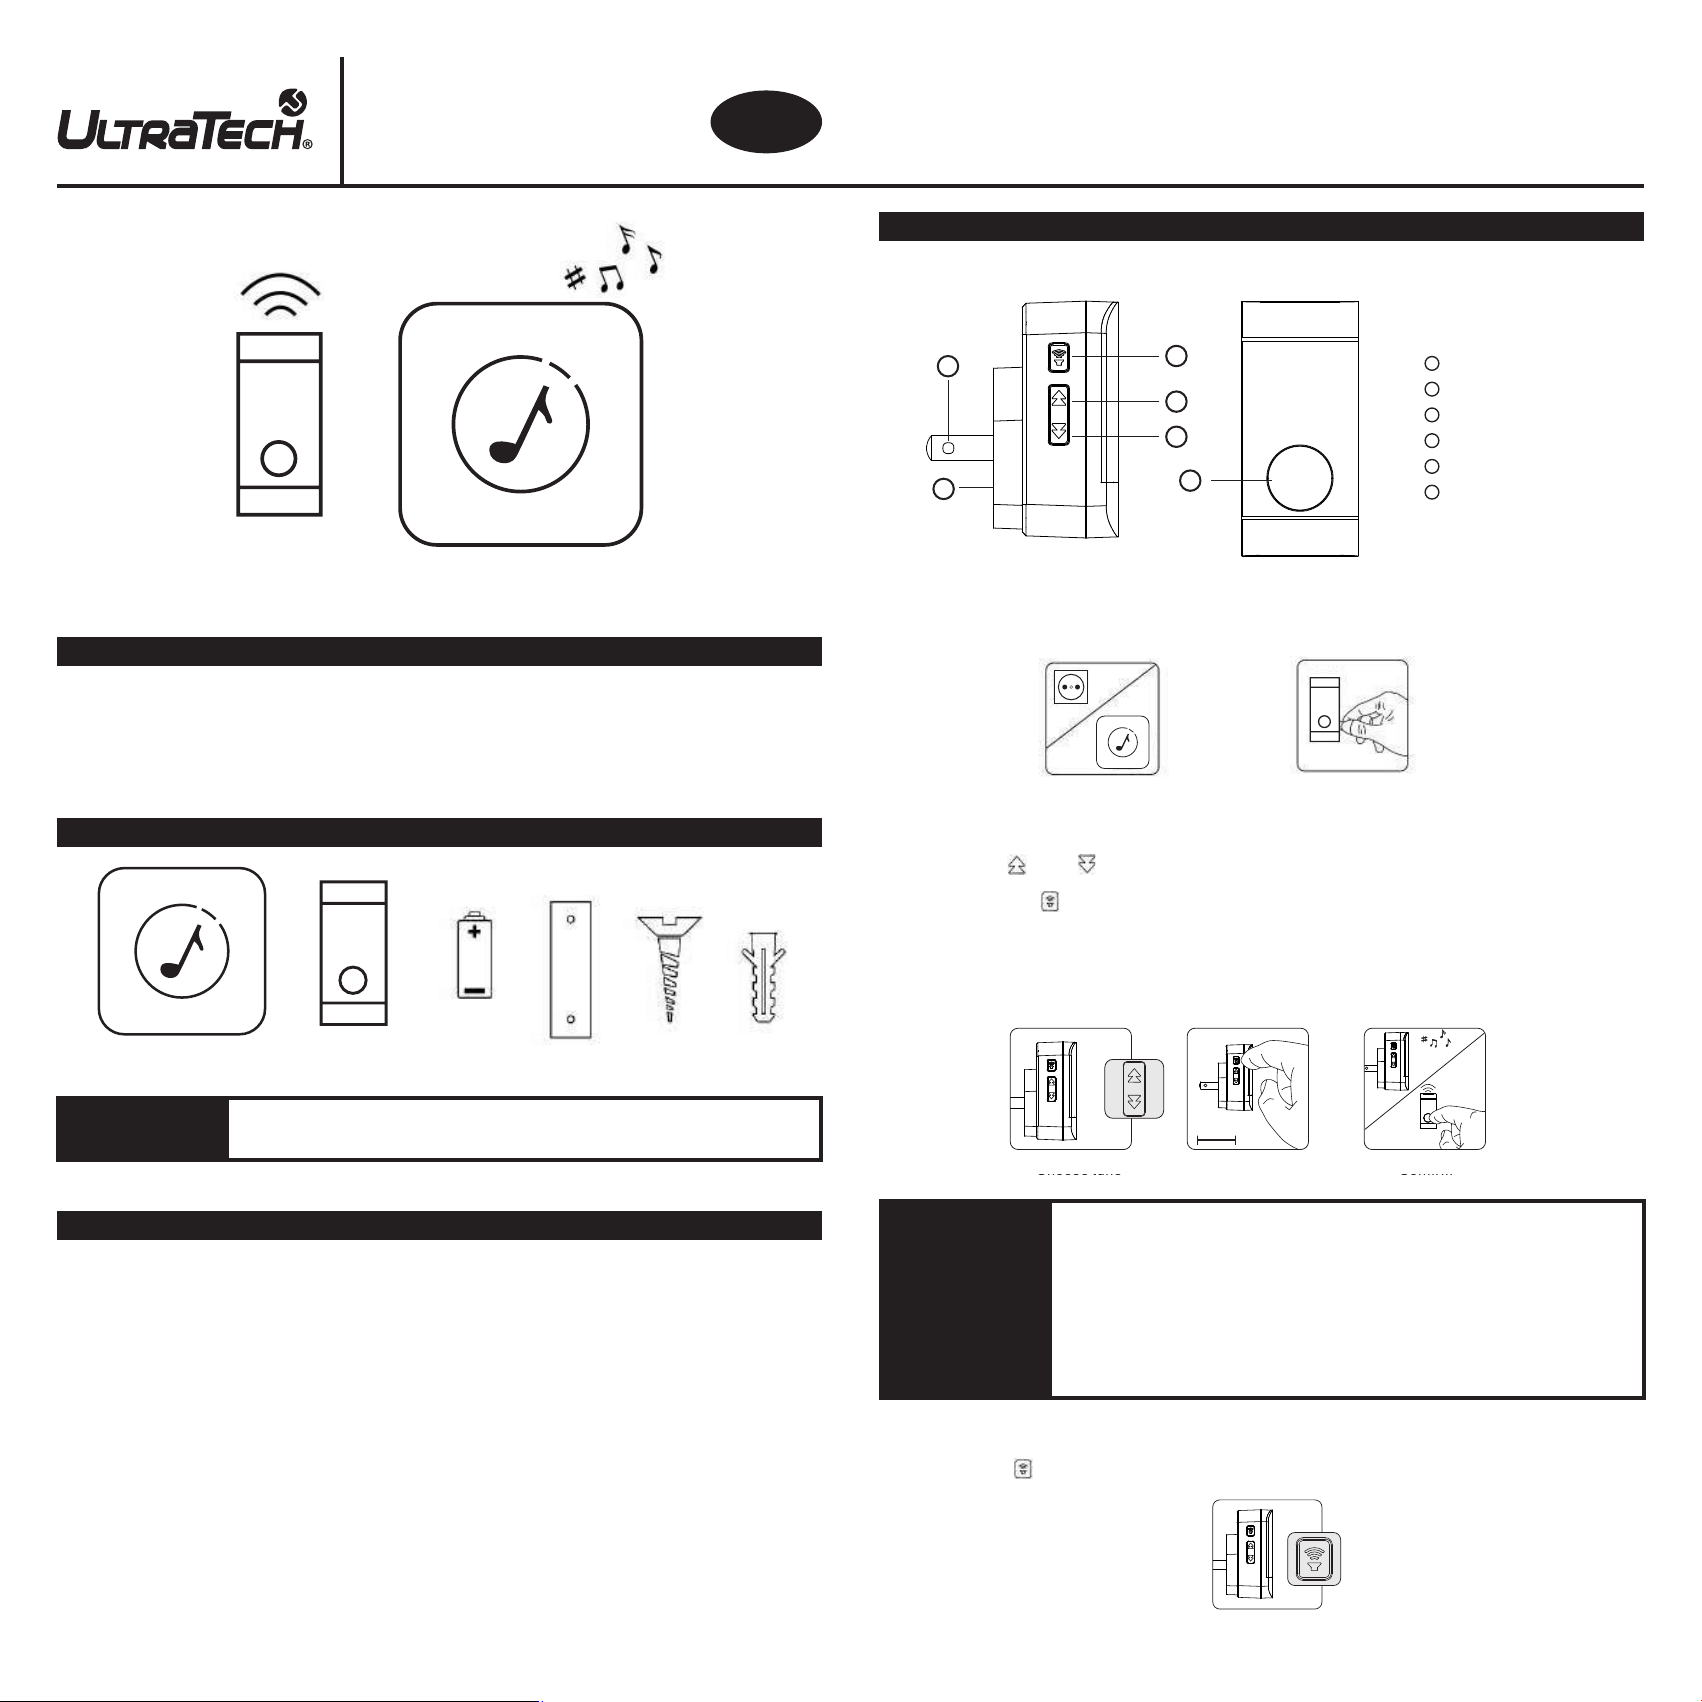
Köszönjük, hogy megvásárolta vezeték nélküli ajtócsengőnket. Ezen ajtócsengő telepítése kifejezetten
egyszerű, esetében nem kell bajlódni a vezetékekkel. Egyszerűen csak be kell dugni a vevőegységet a
konnektorba, az adót fel kell szerelni, és már kész is! Az ajtócsengő 52 dallammal, négy hangerő szinttel
szólaltatható meg abból a célból, hogy megfeleljen igényeinek és 180 méter távolságig használható nyílt,
interferenciamentes térben.
Kérjük, hogy használat és telepítés előtt körültekintően olvassa el a jelen felhasználói kézikönyvet.
RÖVID UTASÍTÁS
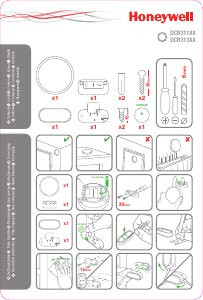
A CSOMAG TARTALMA
MIT KELL TENNIE TELEPÍTÉS ELŐTT?
GYORS INDÍTÁS
H
Kérjük, hogy óvatosan húzza ki a szigetelő csíkot az elem mellől az
adóegység használata érdekében.
(1) Egy új dallamra történő átállításának, illetve egy további adóegység
párosításának a lépései ugyanezek.
(2) A párosító üzemmód mindössze 5 másodpercig tart és automatikusan
leáll, amint a párosítás megtörtént.
(3) A párosító üzemmód egy időben csak egy adóegységhez használható.
Két vagy több adóegység párosításához adóegységenként meg kell
ismételni a fenti (1)-(3) lépéseket.
(4) Egy vevőegység maximum 50 adóegységhez párosítható, és a dallam
külön-külön eltérően állítható be adóegységenként.
FONTOS!
FONTOS!
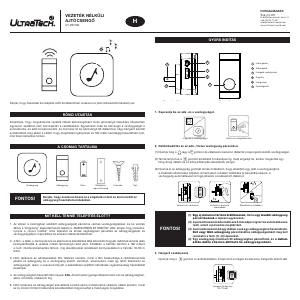
Vevőegység Adóegység Elem Kétoldalas Csavarok Tipli
ragasztószalag
FORGALMAZZA:
Sza-Co Kft.
H-6000 Kecskemét, Izzó u. 2.
+36-30-99-11-537
info@ultratech-world.com
www.ultratech-world.com
Hátra gomb
Előre gomb
Hangerő szabályozás
Dugvilla
Hangszóró
Nyomógomb
Dugja be a vevőegységet Húzza ki a szigetelőcsíkot
Wireless Doorbell
User Manual
EN
1.The transmitter(s) supplied with this kit is(are) paired with
receiver(s) and set to default tune “Dingdong”,IF NOT, please refer to
the “Getting Started” to pair the transmitter(s) with receiver(s) and set
your favorite tune(s).
2.Metal, walls, ceilings and other RF signals from electronic devices
can affect the radio signal of the wireless doorbell. Generally the
operating range can reach up to 600 feet in the open air and non-
interference environment, and 100~300 feet within obstructive
environments.
3.It is not advisable to mount the transmitte
r onto metal surfaces as
the material can block RF signals between the transmitter and the
receiver. However, if this is the only option then we recommend that
you use the sticky pad provided as opposed to using the provided
screws.
4.The battery using in transmitter is 23A,Operating range will
decrease if battery in transmitter is in low power status.
5.The push button is not advisable to mount the transmitter in the
outdoor directly without any shelter which could accelerate aging of
plastic materials.
What You Should Know Before Installation
Troubleshooting
1
2
3
4
5
6
1
2
3
4
5
6
Plug-in Chime Push Button
Back button
Forward button
Volume control
Plug(US/UK/EU/AU optional)
Speaker
Push button
5
2.Volume control: press button on the receiver, this switch
toggles between High and Low volume.
Volume range:25~110dB
1.Tune setting or pairing a (an additional)transmitter to receiver :
(1)Press button or Button to choose your favorite tune, the
receiver playing is the tune selected.
(2) Hold the button for about 5s and release until a Ding-dong is
heard and the LED indicator starts flashing.
(3) Press the transmitter button to send a signal to receiver to confirm,
when the tune setting (pairing) is successful, the receiver will play the
selected tune automatically.
Choose tune
Activate pairing mode
Confirm
5s
Important:
(1)The steps of changing a new tune or pairing an additional
transmitter are the same.
(2)Pairing mode will last for 5s only and quit automatically after
pairing is completed.
(3)The pairing mode is only available for a transmitter each time. For
two or more transmitters, please follow the steps (1)-(3) above
once again to get transmitters paired one by one.
(4)Maximally one receiver can pair with up to 50 transmitters, and the
tune can be set different for each transmitter
3.Mounting the doorbell transmitter
Mount using either the double-sided adhesive pad, or the screws
provided.
Mounting with double-sided adhesive tap:
(1).To ensure proper adhesion, please clean the surface of the
intended location prior to the installation.
(2).Remove one side of the double-sided adhesive tap and stick it to
the underside of the transmitter, tear off the other side and put
transmitter onto wall, then press for 10s.
Important: test the operating range before final installation to
make sure the position where you want to mount the doorbell
t
ransmitter is within the range of receiver.
Note: please note that the double-sided adhesive tap will have poor
adhesion ,if put on dirty or uneven surface. sunlight or rain will affect
the adhesion and may cause the transmitter to come off.
1.The receiver doesn’t sound
Check the doorbell button battery, replace it if necessary.
The plug of receiver is loose.
The receiver could be out of range of the doorbell button.
The receiver may not have paired with the doorbell button.
Check that the volume control is not at the minimum setting.
2.Operating range is reduced
Metal structures, including uPVC door frames can reduce the
range of the doorbell. Avoid mounting the transmitter or receiver
on or near metal structures.
Other equipment can cause radio interference that affects your
doorbell.
Walls and ceilings will reduce the range.
Weak batteries will reduce range. Replace every 12–18 months.
Mounting with screw/anchors:
Please prepare an electric drill, a Phillips-head screwdriver and a
small flat-bladed screwdriver before installation.
(1).Insert a flat-bladed screwdriver into the slot A, carefully lever the
cover and base apart.
(2).Attach the back cover to wall and make two marks at the location of
the two mounting holes.
(3).Drill two holes on the marked locations, insert 2 expansion bolts
provided in the package if necessary. Fina
lly, screw up back cover and
put back the front case.
4. Reset: Press button for 5s to reset the receivers, the reset is
successful when you hear the default doorbell sound with flashing
LED.
5.Transmitter battery replacement: Remove the front of the case by
pushing in the tab on the transmitter button with a small screwdriver,
take our the battery and replace with a new one,finally put back in
place.(Battery Model:23A)
Working voltage of plug-in receiver: AC 110V (US)/ AC 220V (EU,UK,AU)
Battery in transmitter: 12V 23A alkaline battery
Power consumption of transmitter < 10mW
Wireless range: 600 feet( in the open air)
Audible range 300 feet
Selectable tunes: 52
Volume range: 25~110 dB, 4 levels
Expandable (Yes or No): Yes
Working frequenc
y: 315MHz/433.92 MHz±280KHz
Working temperature: -30℃~70℃
5s
Modern and stylish design
52 different selectable tunes
4-level adjustable volume
600 feet operation range (in the open air)
Easy to install and use
Easy to add additional transmitters or receivers
Low power consumption
Features
Specifications
Getting Started
Made In China
Wireless Doorbell
User Manual
Made In China
Wireless Doorbell
User Manual
EN
1.The transmitter(s) supplied with this kit is(are) paired with
receiver(s) and set to default tune “Dingdong”,IF NOT, please refer to
the “Getting Started” to pair the transmitter(s) with receiver(s) and set
your favorite tune(s).
2.Metal, walls, ceilings and other RF signals from electronic devices
can affect the radio signal of the wireless doorbell. Generally the
operating range can reach up to 600 feet in the open air and non-
interference environment, and 100~300 feet within obstructive
environments.
3.It is not advisable to mount the transmitte
r onto metal surfaces as
the material can block RF signals between the transmitter and the
receiver. However, if this is the only option then we recommend that
you use the sticky pad provided as opposed to using the provided
screws.
4.The battery using in transmitter is 23A,Operating range will
decrease if battery in transmitter is in low power status.
5.The push button is not advisable to mount the transmitter in the
outdoor directly without any shelter which could accelerate aging of
plastic materials.
What You Should Know Before Installation
Troubleshooting
1
2
3
4
5
6
1
2
3
4
5
6
Plug-in Chime Push Button
Back button
Forward button
Volume control
Plug(US/UK/EU/AU optional)
Speaker
Push button
5
2.Volume control: press button on the receiver, this switch
toggles between High and Low volume.
Volume range:25~110dB
1.Tune setting or pairing a (an additional)transmitter to receiver :
(1)Press button or Button to choose your favorite tune, the
receiver playing is the tune selected.
(2) Hold the button for about 5s and release until a Ding-dong is
heard and the LED indicator starts flashing.
(3) Press the transmitter button to send a signal to receiver to confirm,
when the tune setting (pairing) is successful, the receiver will play the
selected tune automatically.
Choose tune
Activate pairing mode
Confirm
5s
Important:
(1)The steps of changing a new tune or pairing an additional
transmitter are the same.
(2)Pairing mode will last for 5s only and quit automatically after
pairing is completed.
(3)The pairing mode is only available for a transmitter each time. For
two or more transmitters, please follow the steps (1)-(3) above
once again to get transmitters paired one by one.
(4)Maximally one receiver can pair with up to 50 transmitters, and the
tune can be set different for each transmitter
3.Mounting the doorbell transmitter
Mount using either the double-sided adhesive pad, or the screws
provided.
Mounting with double-sided adhesive tap:
(1).To ensure proper adhesion, please clean the surface of the
intended location prior to the installation.
(2).Remove one side of the double-sided adhesive tap and stick it to
the underside of the transmitter, tear off the other side and put
transmitter onto wall, then press for 10s.
Important: test the operating range before final installation to
make sure the position where you want to mount the doorbell
t
ransmitter is within the range of receiver.
Note: please note that the double-sided adhesive tap will have poor
adhesion ,if put on dirty or uneven surface. sunlight or rain will affect
the adhesion and may cause the transmitter to come off.
1.The receiver doesn’t sound
Check the doorbell button battery, replace it if necessary.
The plug of receiver is loose.
The receiver could be out of range of the doorbell button.
The receiver may not have paired with the doorbell button.
Check that the volume control is not at the minimum setting.
2.Operating range is reduced
Metal structures, including uPVC door frames can reduce the
range of the doorbell. Avoid mounting the transmitter or receiver
on or near metal structures.
Other equipment can cause radio interference that affects your
doorbell.
Walls and ceilings will reduce the range.
Weak batteries will reduce range. Replace every 12–18 months.
Mounting with screw/anchors:
Please prepare an electric drill, a Phillips-head screwdriver and a
small flat-bladed screwdriver before installation.
(1).Insert a flat-bladed screwdriver into the slot A, carefully lever the
cover and base apart.
(2).Attach the back cover to wall and make two marks at the location of
the two mounting holes.
(3).Drill two holes on the marked locations, insert 2 expansion bolts
provided in the package if necessary. Fina
lly, screw up back cover and
put back the front case.
4. Reset: Press button for 5s to reset the receivers, the reset is
successful when you hear the default doorbell sound with flashing
LED.
5.Transmitter battery replacement: Remove the front of the case by
pushing in the tab on the transmitter button with a small screwdriver,
take our the battery and replace with a new one,finally put back in
place.(Battery Model:23A)
Working voltage of plug-in receiver: AC 110V (US)/ AC 220V (EU,UK,AU)
Battery in transmitter: 12V 23A alkaline battery
Power consumption of transmitter < 10mW
Wireless range: 600 feet( in the open air)
Audible range 300 feet
Selectable tunes: 52
Volume range: 25~110 dB, 4 levels
Expandable (Yes or No): Yes
Working frequenc
y: 315MHz/433.92 MHz±280KHz
Working temperature: -30℃~70℃
5s
Modern and stylish design
52 different selectable tunes
4-level adjustable volume
600 feet operation range (in the open air)
Easy to install and use
Easy to add additional transmitters or receivers
Low power consumption
Features
Specifications
Getting Started
Made In China
Wireless Doorbell
User Manual
Made In China
Válassza ki a dallamot Ellenőrizze a működéstAktiválja a párosító
üzemmódot
Hangerő tartomány:
25~110 dB


Praat mee over dit product
Laat hier weten wat jij vindt van de UltraTech UT-WD136 Deurbel. Als je een vraag hebt, lees dan eerst zorgvuldig de handleiding door. Een handleiding aanvragen kan via ons contactformulier.