
Vetta’s RT200 series are the upgraded version of all RT series cycle computers. It is recommended that these
products are to be installed by a qualified bicycle retailer. Failure to read the instructions and/ or improper installation
of the device may void the warranty. If you have any doubts about the installation or the operations, contact your local
bicycle retailer for clarification.
WARNINGS & CAUTIONS
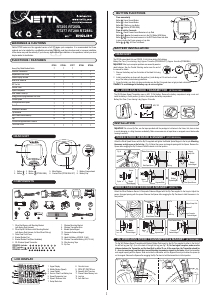
HEAD UNIT
COMPONENTS
RT255 RT255L
RT277 RT288 RT288L
1. Button
2. Button
3. Button
4. Button (RT255L/288L)
5. Main Display
6. Contact Pins (RT255/255L/277)
7. Battery Compartment
8. Battery Cap
Heavy Duty Metal Braided Cable
Wireless Transmission
Replaceable Front Cover
Screen Display Window
NiteLite w/ SmartLite
EZ Tire Set
Service Timer
Speed Comparator
Auto Awake & Start-up
Energy Efficient programmable Auto Start
Current Speed
Average/Maximum Speed
Ride Time
Cumulative Odometer
Trip Distance
Multi Freeze Frame Memory
Lap
Current/Average/Maximum Cadence
12/24 Hour Clock
FUNCTIONS / FEATURES
RT255/255L includes: 1 3 4 5 9 11 12 14 15
RT277 includes: 2 3 4 5 9 10 11 12 14 15
RT288/288L includes: 3 4 5 6 7 8 9 11 12 13
1. Wired Spd Sensor with Mounting Bracket
(with Heavy Duty Harness)
2. Wired Spd & Cad Sensor with Mounting Bracket
(with Heavy Duty Harness, for Rear Wheel Pick-up)
3. Extra Clear Front Cover
4. Bracket Rubber Pad
5. Bracket Rubber Pad (Riser Handlebar)
6. WL Wireless Speed Transmitter
7. Wireless Mounting Bracket
8. Wireless Transmitter Shim
9. Bladed Spoke Magnet
10. Composite Cadence Magnet
11. Spacer
12. Head Unit Battery (CR2032, 3-Volt)
13. Wireless Transmitter Battery (A23, 12-Volt)
14. Wire Securing Tape
15. Zip-Ties
1
2
3
4
RT255 RT255L RT277 RT288 RT288L
• •
••
••
•
•
•
•
••
••
• ••
••
• ••
••
••
• ••
••
• ••
••
• ••
••
• ••
••
• ••
••
• •
•
•
••
• ••
• ••
11 16 11 11 16
10 15 10 10 15
3 3 3 3 3
1.0
4
5
1
3
2
6
7
8
1
7 8 9
10
11 12 13 1514
2
4
3
5 6
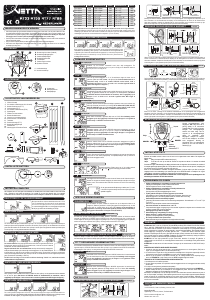
LCD DISPLAY
1. Upper Display
2. Middle Display (Speed)
3. Lower Display
4. Service Timer/ Low Battery Icon
5. Speed Comparator Icon
6. Speed / Distance Units
7. Setup Mode Icon
8. Function Icons
9. RPM / RT/ PM/ TM Icon
10. Speed & Split Time Icon
11. Freeze Frame Memory Icon
12. Lap Icon
13. Auto Start Icon
1
2
5
6
7
8
9
10
11
13
12
4
3
Important: Do not use Zip-Ties, use the tapes provided with the package to hold wires to the frame, fork, bars or stem
to avoid damaging or cutting the wires accidentally. Make sure excess wire is taped down or wrapped around brake cable
housing to secure it.
BATTERY INSTALLATION
INSTALLATION
WIRED CADENCE SENSOR & MAGNET (
RT277)
Attach the Wired Cadence Sensor & Composite Cadence Magnet with the Zip-Ties supplied to the bicycle. Adjust the
sensor & magnet spacing with the spacer. Remove the Spacer after snugging the Zip-Ties down to hold the sensor in its
final position.
4
1
3
2
BUTTON FUNCTIONS
WIRED SPEED SENSOR & MAGNET (
RT255/255L)
Press momentarily
Button : Upper Screen Modes
Button : Lower Screen Modes
Button : F-Button or Lap Button
Button : NiteLite (RT255L/288L)
Press & hold for 2 seconds
Button : Recall Freeze Frame Memories or Lap Data
Button & when the lowest screen is in the CLK Mode: NOM Setup
Button & when the lowest screen is in the DST Mode: Reset ride data
to zero including the Frozen screens or Lap data
Button , & : All Clear Total Reset
Wired Cadence Sensor
Crank
Arm
Chain Stay
Spacer
Spacer
Tip
Alignment Mark
Crank Arm
Composite Cadence
Magnet
Wired Cadence Sensor
Zip-Tie
Composite
Cadence Magnet
Composite
Cadence Magnet
Composite
Cadence Magnet
Wired Speed Sensor
Wired Speed Sensor
Fork Leg
Bladed
Spoke Magnet
Bladed
Spoke Magnet
Bladed
Spoke Magnet
Bladed Spoke Magnet
Spoke
Magnet
Sweep Path
Zip-Tie
Spacer
Spoke
Spacer
Tip
Alignment Mark
Fig. A
1
2
3
4
3
1
1
1 2
2
3
2
Magnet Sweep Path
The RT200 series Head Unit use CR2032, 3-Volt Lithium button Cell batteries.
Battery Run Time (1 hour training / day): Approx.12 months (RT255/255L/277); Approx. 8 months (RT288/288L)
Important: Most cycle computer problems are caused by weak or
dead batteries. See the Trouble Shooting section near the end of
the manual for details.
1. Remove the battery cap from the bottom of the Head Unit using
a coin.
2. Install a new battery as shown with the positive (+) side facing out. Do not touch or bend
any of the battery contacts during installation.
3. Screw the battery cap firmly into place and make sure that the O-ring seal does not get pinched or distorted.
Caution: To avoid damage to the battery cap, do not over tighten.
HEAD UNIT
The WL Wireless Speed Transmitter uses an A23, 12-Volt battery. Remove the battery compartment using a coin and
install the battery in it with positive (+) side in, then replace the battery compartment.
Battery Run Time (1 hour training / day): Approx.10 months
WL WIRELESS SPEED TRANSMITTER (
RT288/288L)
A23, 12V
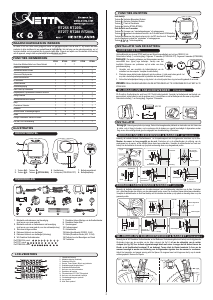
Attach the Wired Speed Sensor with the Zip-Tie supplied and tighten the Bladed Spoke Magnet to the bicycle. Mounting
the sensor as high up as on the fork leg. (Fig. A) Adjust the sensor and magnet spacing with the Spacer. Remove the
Spacer after snugging the Zip-Tie down to hold the sensor in its final position.
WL WIRELESS SPEED TRANSMITTER & MAGNET (
RT288/288L)
Tie the WL Wireless Speed Transmitter with Bracket Rubber Pad loosely by the Zip-Ties supplied to either in the front of
the left fork leg (see Fig.1 A) or at the back of the right fork leg (see Fig.1 B). For best signal reception, make sure the
distance between the Transmitter and the Head Unit is within 70 cm. At the same time, the Transmitter should be
2 ~ 4 cm (or more) away from the brake, to avoid blocking transmission signals by the brake. Adjust the transmitter
and magnet spacing with the Spacer. Slide and rotate the transmitter until the alignment mark just touches the spacer tip
on the magnet. Remove the Spacer after snugging the Zip-Tie down to hold the transmitter in its final position.
Within 70 cmWithin 70 cmWithin 70 cm
2~4 cm2~4 cm
2~4 cm
Fig.1 B
Fig.1 A
1


Praat mee over dit product
Laat hier weten wat jij vindt van de Vetta RT277 Fietscomputer. Als je een vraag hebt, lees dan eerst zorgvuldig de handleiding door. Een handleiding aanvragen kan via ons contactformulier.