Turn Headset On: Hold down the MFB for 2-3 seconds
until you hear 2 rising tones. The red light will fl ash
once every second.
Standby Mode: After the headset is turned on, it will
attempt to connect to the last device that it was paired
with, putting itself into standby mode. The headset can
also be put into standby mode with a quick press and
release of the MFB. The blue light will fl ash indicating
an active Bluetooth link.
Turn Headset Off (conserves battery power): Hold
down the MFB for 2-3 seconds until you hear 2 falling
tones. A red light will fl ash 4 times and the headset will
turn off.
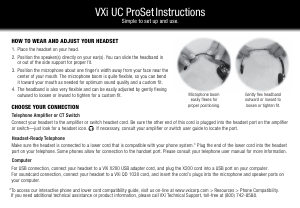
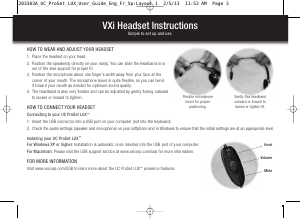
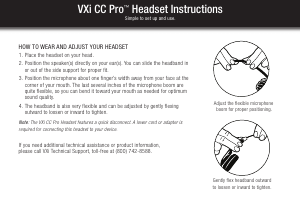
Position microphone near corner of your mouth.
Correct positioning ensures that the noise
cancellation technology works properly. Slight
adjustment of the microphone may help to achieve
optimum performance.
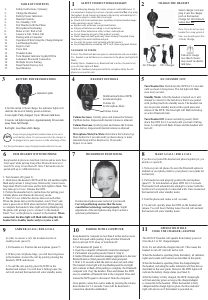
HEADSET CONTROLS
4
Volume Increase: Quickly press and release the Volume
Up/Mute button. Repeat until desired volume is attained.
Volume Decrease: Quickly press and release the Volume
Down button. Repeat until desired volume is attained.
Microphone Mute/Un-Mute: Hold down the Volume Up/
Mute button for 2 seconds until you hear a beep. A mute
reminder beep will be heard every 10 seconds.
Repeat to un-mute.
Multifunction Button (MFB)
& Indicator Lights
Volume Up
& Microphone Mute
Volume Down
After the initial 12 hour charge, the indicator lights will
indicate the level of battery power as follows.
Green light: Fully charged. Up to 16 hours talk time.
Green & red lights together: Approximately 60 seconds
away from full charge.
Red light: Less than a full charge.
TIPS
BATTERY POWER INDICATORS
3
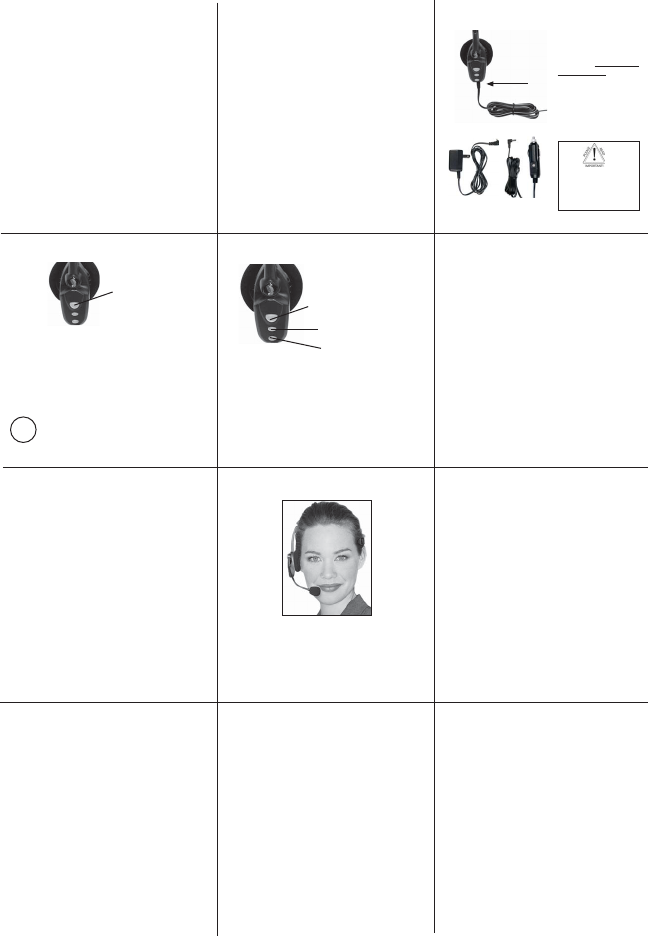
Select charger cord and
plug it into the charger
port on the headset.
Charge for 12 full hours
before fi rst use.
Note: If you do not use your
headset for a long period of
time, you should repeat this
12
hour charge.
AC Charger
DC Charger
TABLE OF CONTENTS
1 - Safety Instructions / Glossary
2 - Charge the Headset
3 - Battery Power Indicators
4 - Headset Controls
5 - On / Standby / Off
6 - Pair Headset with the Phone
7 - Microphone Positioning
8 - Make a Call / End a Call
9 - Answer a Call / End a Call
10 - Pairing with a Computer
11 - Operation While Using the Charger/Adapter
12 - Last Number Redial
12- Reject a Call
13 - Voice Dial
13 - Transfer Audio
14- Turn Headset Indicator Lights Off/On
14- Automatic Bluetooth Connection
15- Multiple Device Pairing
16- Reset Paired Devices List
17- Specifi cations
Keep charger plugged into headset when not in use to
avoid battery drain. It’s not necessary for the charger to
be plugged into a power source to take advantage of this.
Avoid hearing damage. Set volume at lowest comfortable level. If
you experience ringing in your ears or people sound muffl ed, stop using
the headset. Avoid turning up volume to block noisy surroundings (it’s
possible to adapt to volume that is too high).
Check with local and state laws regarding cell phone handset usage
while operating a motor vehicle.
Replace only with same or equivalent battery.
Dispose of batteries according to local regulations.
Do not throw batteries in a fi re, as they could explode.
Do not immerse any part of this product in water.
Plastic bags and small parts may cause choking if ingested. Keep
them away from small children and pets.
Use only the power cords included with this product.
Avoid temperatures exceeding 140°F (will cause equipment failure).
GLOSSARY OF TERMS
Paired- Two Bluetooth devices agree to communicate with one another.
On - Headset is on but there is no connection to the phone (red light will
fl ash).
Standby Mode - Headset is on, Bluetooth link is active, the user is not
on a call (blue light will fl ash).
Talk Mode- Headset is being used with the cell phone while the cell
phone is on an active call.
PAIR HEADSET WITH THE PHONE
6
PAIRING WITH A COMPUTER
10
MAKE A CALL / END A CALL
8
OPERATION WHILE
USING THE CHARGER / ADAPTER
11
SAFETY INSTRUCTIONS/GLOSSARY
1
5
ON / STANDBY / OFF
1. Turn headset off (panel 5).
2. Hold down the headset’s MFB until the red and blue lights
fl ash and you hear 2 rising tones, followed by 4 more tones.
Important: Wait for all tones and for both lights to fl ash. This
may take up to 15 sec. Release the MFB.
3. Follow the manufacturer’s instructions for putting your
cellular phone into Bluetooth discovery mode.
4. Wait 5-15 sec. while the devices discover each other.
When the phone discovers the headset, select “Pair” and
enter a passcode of 0000 when instructed. When pairing
is complete the headset’s blue light will stop fl ashing and
the phone will prompt you to ‘connect’ to the headset.
Enter “Yes” on the phone to connect to the headset. When
connected, the blue light will fl ash indicating that the
headset is in standby mode ready to receive a call.
Keep headset & phone no less than 3 inches and no more than
3 feet apart while pairing. Keep other Bluetooth devices at
least 50 ft. away or turn them off. Note: The headset can be
paired with up to 3 different devices.
If you have not paired the headset and phone together yet, you
must do so (panel 6).
1. Turn on your cell phone. Be sure the Bluetooth option is
enabled on your phone (refer to your phone’s user guide for
instruction).
2. Put headset on and properly position the microphone
(panel 7). To turn headset on press MFB for 2-3 seconds.
The headset will automatically attempt to connect with the
last device it was paired or connected with. Once connected,
the headset will enter standby mode.
3. Dial the phone and make a call as usual.
4. To end call, quickly press the MFB on the headset and
release. You will hear 2 falling tones; the call will end and
the headset will enter standby mode.
In order to answer a call, the headset must be in
standby mode (panel 5).
1. Put headset on. Position the microphone (panel 7).
2. When your cell phone rings, you will hear ring tones
in the headset. Answer the call by quickly pressing the
headset’s MFB and release.
3. To end the call, quickly press the MFB on the
headset and release. You will hear 2 falling tones; the
call will end and the headset will enter standby mode.
MICROPHONE POSITIONING
7
ANSWER A CALL / END A CALL
9
Indicator Lights
CHARGE THE HEADSET
2
Keep headset & computer no less than 3 inches and no more
than 3 feet apart while pairing. Keep all other Bluetooth
devices at least 50 ft. away or turn them off.
1. Turn headset off (panel 5).
2. Open the computer’s Bluetooth connection manager.
3. Put headset into pairing mode (Panel 6- Step 2).
4. Instruct Bluetooth connection manager application to discover
Bluetooth device. Enter passcode 0000 when prompted.
5. Wait 5-15 seconds while the devices discover each other.
The headset’s blue light will stop fl ashing and the red light
will continue to fl ash. After pairing is complete, the Bluetooth
computer will ‘ring’ the headset. Press and release the MFB
once to establish a Bluetooth link to the computer. Press and
release the MFB again to disconnect from the computer.
Once paired, connection can be made by pressing the volume
down button for 1-2 seconds. Tones will be heard and a
connection should be established.
The B250-XT headset will operate from battery power or
from the AC or DC charger/adapter.
Note: Do not attach the charger mid-call. This causes the
headset to turn off (call will not be lost).
When the headset is operating from the battery, all indicator
lights and sounds will function as described in this guide.
When the headset is operating from the charger/adapter,
the headset, including the audio indicators will function as
described in this user guide. However the MFB lights will
indicate the battery charge status (see Panel 3).
After the battery is fully charged, the MFB charge light
will turn and stay green as long as the charger/adapter
is connected to the headset. While the headset is fully
charged and the charge light is green, the blue indicator
light will also be on if the headset is powered on.
For best performance, keep charging headset when not in use.
Failure to charge
less than 12 hours
may result in shorter
talk time.

Praat mee over dit product
Laat hier weten wat jij vindt van de VXi B250-XT Headset. Als je een vraag hebt, lees dan eerst zorgvuldig de handleiding door. Een handleiding aanvragen kan via ons contactformulier.