• 5-Year
Limited Warranty
WGNBPW210A
WIC 787918
Doc# L-03424, Rev.1
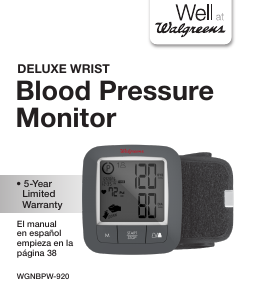
DELUXE WRIST
Blood Pressure
Monitor
ABOUT BLOOD PRESSURE
What is Blood Pressure?
Blood pressure is the pressure exerted on the artery walls while blood
flows through the arteries. The pressure measured when the heart
contracts and sends blood out of the heart is systolic (highest) blood
pressure. The pressure measured when the heart dilates with blood
flowing back into the heart is called diastolic (lowest) blood pressure.
Why Measure Your Blood Pressure?
Among today’s various health problems, those associated with high
blood pressure are very common. High blood pressure dangerously
correlates with cardiovascular diseases. Therefore, blood pressure
monitoring is important for identifying those at risk.
Why Do My Readings Vary?
Blood pressure is a body parameter that is subject to normal variations
throughout the day. A single reading that is different from yours or your
doctor’s readings are not necessarily inaccurate. The average of several
readings, taken under similar conditions, using the same arm is preferred
for accurate blood pressure readings.
Why Are My Readings Different Than Those Taken at My
Doctor’s Office?
Many experience a phenomenon called “White Coat Hypertension” when
measured by a doctor. White Coat Hypertension refers to blood pressure
that rises above its usual level when measured in a clinical setting, such
as a doctor’s office.
BLOOD PRESSURE STANDARD
This table contains defined levels for hypertension that are publicly
available from the American Heart Association
®
(AHA 2017). Users
can compare their own blood pressure readings against these defined
levels to determine if they may potentially be at an increased risk.
This table is applicable to most adults aged 18 and older.
Blood pressure tends to go up and down, even in people who
normally don’t have high readings. If your numbers stay above the
normal range most of the time, you may be at increased risk and
should consult your physician.
Although one can easily find where their own blood pressure readings
fall on this table, this monitor comes equipped with a Risk Category
Index that automatically compares each reading to the defined levels
and provides a helpful cue if your reading falls into one of the stages
that could potentially indicate increased risk. See Risk Category Index
section for more information on this feature.
Please note that cues provided by this monitor are only intended to
assist you in using the table on the previous page. The table and
cues are only provided for convenience to help you understand your
Blood Pressure Category
Systolic
mmHg (upper
number)
Diastolic
mmHg (lower
number)
LED
Indicator
Color
Normal <120 and <80 Green
Elevated 120–129 and <80 Yellow
High Blood Pressure
(hypertension) Stage 1
130–139 or 80–89
Red
High Blood Pressure
(hypertension) Stage 2
≥
140 or
≥
90
Hypertensive Crisis
(consult your doctor immediately)
>180 and/or >120
*Source: AHA 2017
HOW THIS BLOOD PRESSURE
MONITOR WORKS
This monitor uses innovative GentleInflate
®
technology to detect your
blood pressure. With one touch of a button, the monitor automatically
takes the reading during inflation, then deflates, delivering a quick,
comfortable and quiet measurement every time.
To help guide your wrist into the ideal position, this blood pressure
monitor comes equipped with an optional wrist positioning guide to
help you take an accurate blood pressure reading. Please see Wrist
Positioning Guide section for more information on this feature.
Please note that any muscle movement during inflation will cause a
measurement error. When measurement is complete, the monitor will
display your systolic pressure, diastolic pressure, and pulse readings.
The monitor automatically finds where your measurement results fall on
the American Heart Association (AHA 2017) table and provides a cue if
your reading falls into one of the stages that could potentially indicate
increased risk. See Risk Category Index section for more information
on this feature.
The appearance of the
icon indicates that a pulse irregularity
consistent with an irregular heartbeat was detected during measurement
Refer to Irregular Heartbeat Detector section for more information on the
Irregular Heartbeat Detector.
Accessories for unit:
2 “AAA” 1.5V alkaline
batteries and a carrying case
are included with the unit.
NAME/FUNCTION OF EACH PART
Memory Recall/
Date & Time Select
Wrist Cuff
Battery Cover
(located on
side of unit)
User-Select
START/STOP
LCD Display
Date & Time Set
DISPLAY EXPLANATIONS
Systolic
Pressure
Diastolic
Pressure
Date/Time
Indicator
Heart Rate
Wrist
Positioning
Guide
Irregular Heartbeat
Detector
Display Symbols:
User 1: Appears when the monitor is operated by User 1.
User 2: Appears when the monitor is operated by User 2.
Low Battery Symbol: Appears when batteries should be
replaced, or +/- polarities have been positioned incorrectly.
Pulse Symbol: Shows heart rate in beats per minute.
Wrist Positioning Guide: See Wrist Positioning Guide
section for more information.
Irregular Heartbeat Detector: Irregular heartbeat detected
during measurement. See Irregular Heartbeat Detector
section for more information.
Risk Category Index: Indicates the blood pressure level.
See Risk Category Index section for more information.
Memory Average: Displays average of last 3 readings.
AM Averaging: Indicates the reading being displayed is an
average from the last 3 mornings measurements.
PM Averaging: Indicates the reading being displayed is an
average from the last 3 evening measurements.
INSTALLING BATTERIES
1. Slide off the battery cover to
open the battery compartment.
2. Install or replace the 2 “AAA”
alkaline batteries according to
the indications inside the
battery compartment.
NOTE:
When removing batteries, pull black ribbon forward.
3. Replace the battery cover.
Replace the batteries if:
• The low battery symbol appears on the display.
• When any button is pressed and nothing is displayed on the screen.
NOTE:
• Date and time will need to be reset if batteries are removed or replaced.
• Replace all batteries at one time (as simultaneous set). Do not mix
old and new batteries.
• Use only 1.5V “AAA” alkaline batteries. Do not mix alkaline, standard
(carbon-zinc) or rechargeable (Ni-Cad, Ni-MH, etc.) batteries.
• When installing batteries, observe proper +/- polarities. Incorrect
installation of batteries may cause damage to the unit.
• Remove batteries when unit is not in use for extended periods of time.
• When the batteries are removed, the measurement values stored in
memory are retained. However, the date and time must be reset.
• Clean contacts on battery and in battery compartment with a soft dry
cloth each time you install batteries.
• Keep batteries away from children as they could pose a
choking hazard.
• Recycle or dispose of properly in accordance with all local, state,
province, and country regulations.
• Batteries are hazardous waste. DO NOT dispose of them
together with the household garbage.
• DO NOT dispose of batteries in fire. Batteries may explode or leak.
DATE & TIME SET PROCEDURE
It is important to set the Date & Time before using your blood
pressure monitor, so that a time stamp can be assigned to each
record that is stored in the memory.
1. To set the date and time, press the
“Date & Time Set”
button.
2. The display will show a blinking number
representing the MONTH. Change the MONTH by pressing the
“MEM” button. Each press will increase the number by one in a
cycling manner. Press the
button again to confirm the entry.
The screen will then show a blinking number representing the DAY.
3. Change the DAY, YEAR, HOUR, & MINUTE as described in step
2 above, using the “MEM” to change the numbers and the
button to confirm the entries.
Repeat process to set DAY, YEAR, HOUR and MINUTE.
IMPORTANT: IF YOU ARE USING THIS BLOOD PRESSURE MONITOR FOR THE FIRST
TIME, PLEASE REMOVE THE PROTECTIVE FILM FROM THE DISPLAY SCREEN.
Press the button
“MEM”
Blinking Month
Increase Month
Confirm Entry
APPLYING THE CUFF
1. Remove all watches, wrist jewelry, etc. prior
to attaching the wrist monitor. Clothing sleeves
should be rolled up and the cuff should
be wrapped around bare skin for correct
measurements.
2. Apply cuff to left wrist with palm facing up as
shown in Fig. A.
SYS
DIA
mmHg
mmHg
SYS
DIA
mmHg
mmHg
SYS
DIA
mmHg
mmHg
Fig. A
3. Make sure the edge of the cuff is about 1/4"–1/2"
(1cm–1.5cm) from the palm as shown in Fig. B.
4. In order to ensure accurate measurements,
fasten the hook and loop strap securely around
your wrist so there is no extra space between
the cuff and the wrist. If the cuff is not wrapped
tight enough, the measurement values will not
be accurate.
5. If your physician has diagnosed you with
poor circulation in your left arm, place the cuff
around your right wrist as shown in Fig. C.
NOTE:
• This device should not be used when your
wrist is wounded or injured.
• If it is not possible to use the cuff on your left
wrist, it can also be used on your right wrist.
However, all measurements should be made using the same wrist.
SYS
DIA
mmHg
mmHg
Fig. B
SYS
DIA
mmHg
mmHg
SYS
DIA
mmHg
mmHg
SYS
DIA
mmHg
mmHg
Fig. C
CORRECT MEASUREMENT POSTURE
1. Place your elbow on a table so that the cuff is at
the same level as your heart as shown in Fig. A.
Relax your entire body, especially between your
elbow and fingers.
NOTE:
Your heart is located slightly below your armpit.
2. If the cuff is not at the same level as your heart
or if you cannot keep your arm completely still
throughout the reading, use a soft object, such
as a folded towel, to support your wrist as shown
in Fig. B.
3. Turn your palm upwards.
4. Sit upright in a chair with feet flat on the floor and
take 5-6 deep breaths. Do not cross your legs.
Keep your back against the backrest of the chair.
Avoid leaning back while the measurement is
being taken as shown in Fig. C.
Fig. A
Fig. B
Fig. C
(X)
WRIST POSITIONING GUIDE
• When using wrist blood pressure monitors, it is important to take the
measurement while relaxing your wrist at heart level. This will help
ensure an accurate reading will be taken. Because it is difficult to
find the ideal location for a wrist measurement, we have included an
optional Wrist Positioning Sensor that will assist in directing your wrist
to the ideal location for a blood pressure measurement.
• After you press “START/STOP” button, the display will illuminate
with different icons that are designed to help you move your wrist.
Once the ideal location is found, the wrist symbol
will flash twice
and measurement will begin. Keep your arm still until measurement
is completed.
SYMBOL ACTION
Move your wrist up.
Move your wrist down.
Rotate your wrist to your left.
Rotate your wrist to your right.
Wrist is in ideal position, do not move.
Wrist was NOT in ideal position, this symbol will be
saved in the measurement memory if this occurs.
• Even if the monitor is not in the ideal position after 10 seconds, the
measurement will still begin. If this occurs, the wrist symbol will
appear and be stored in the memory with the measurement.
NOTE:
• Due to differences in individual sizes and physique, this feature may
not be helpful in all cases and you may wish to turn this feature OFF.
If you feel the suggested wrist position does not match your heart
level, please turn this feature OFF and follow your judgment. To
turn The Wrist Positioning Guide OFF, press and hold the “START/
STOP” button for 3 seconds.
IMPORTANT PRODUCT NOTICES
AND SAFETY INSTRUCTIONS
When using your blood pressure monitor, basic precautions should always
be followed. Please read and follow all instructions and warnings before
using this product. Save these instructions for future reference.
• This device is intended for indoor, home use.
• This device is not intended for public use.
• This device is portable, but it is not intended for use during patient transport.
• This device is not suitable for continuous monitoring during medical
emergencies or operations.
• This device is intended for non-invasive measuring and monitoring of
arterial blood pressure. It is not intended for use on extremities other
than the wrist, or for any purpose other than obtaining a blood pressure
measurement.
• This device is for adults. Do not use this device on neonates or infants.
Do not use it on children unless otherwise instructed by a medical
professional.
• Not for use on pregnant women, especially those in preeclampsia.
• The device is not suitable for use on patients with implanted, electrical
devices, such as cardiac pacemakers, defibrillators.
• The effectiveness of this device has not been established for use:
–on users with common arrhythmias such as atrial or ventricular
premature beats or atrial fibrillation,
–on users with peripheral arterial disease,
–on users undergoing intravascular therapy, or with arteriovenous (AV) shunt.
Consult a medical professional before use.
• DO NOT use this device for diagnosis or treatment of any health
problem or disease. Contact your physician if you have or suspect any
medical problem. Do not change your medications without the advice of
your physician or health care professional.
• If you are taking medication, consult your physician to determine the
proper time to measure your blood pressure.
• This device may be used only for the intended use described in this
manual, the manufacturer shall have no liability for any incidental,
consequential, or special damages caused by misuse or abuse.
• Report any unexpected operation or events to the manufacturer.
• DO NOT apply the cuff on a wrist that has an intravenous drip or a blood
transfusion attached.
• WARNING: Taking blood pressure measurements too frequently could
disrupt blood circulation and cause injuries.
• WARNING: Do not apply cuff to areas on patient where skin is delicate
or damaged. Check cuff site frequently for irritation.
• WARNING: Do not place the cuff on the wrist of a person whose arteries
or veins are undergoing medical treatment, i.e. intra-vascular access
or intra-vascular therapy or an arteriovenous (A-V) shunt, which could
disrupt blood circulation and cause injuries.
• DO NOT place the cuff on the wrist on the same side of a mastectomy
(especially when lymph nodes have been removed). It is recommended
to take measurements on the unaffected side.
• DO NOT wrap the cuff on the same wrist to which another monitoring
device is applied. One or both devices could temporarily stop
functioning if you try to use them at the same time.
• Please check that the operation of the device do not result in prolonged
impairment of patient blood circulation.
• WARNING: On the rare occasion of a fault causing the cuff to remain
fully inflated during measurement, loosen and remove the cuff
immediately. Prolonged high pressure applied to the wrist (cuff pressure
>300 mmHg or constant pressure >15 mmHg for more than 3 minutes)
might lead to bruising and discolored skin.
• WARNING: Do not use this device with high-frequency (HF) surgical
equipment at the same time.
• WARNING: This device is not AP/APG equipment. Do not use the device
where flammable anesthetic are present, or in environments with a
mixture of air with oxygen or nitrous oxide.
• The device contains sensitive electronic components. To avoid
measurement errors, avoid taking blood pressure measurements near a
strong electromagnetic field radiated interference signal or electrical fast
transient/burst signal.
• Wireless communication equipment, such as wireless home network
devices, mobile phones, cordless telephones and their base stations,
walkie-talkies may cause interference that may affect the accuracy of
measurements. A minimum distance of 1 foot (30 cm) should be kept
from such devices during a measurement.
• You can use this device to take your own measurement, no third-party
operator is required.
• Please use the device under the environment which is provided in the
user manual. Otherwise, the performance and lifetime of the device
will be impacted and reduced.
• The device may require up to 30 minutes to warm up / cool down
from the minimum / maximum storage temperature before it is ready
for use.
• WARNING: Do not touch output of the batteries and the user
simultaneously.
• WARNING: The power cord is considered the disconnect device
for isolating this equipment from supply mains. Do not position the
equipment so that it is difficult to reach or disconnect.
• The blood pressure monitor and the cuff are suitable for use within the
patient environment.
• WARNING: Do not use this device if you are allergic to polyester,
nylon, or plastic.
• WARNING: Only use accessories approved by manufacturer. Using
unapproved accessories might cause damage to the unit and
injure users.
• WARNING: If you experience discomfort during a measurement,
such as pain in the wrist or other complaints, press the Power button
immediately to release the air from the cuff.
• No calibration is required within two years of reliable service.
• DO NOT attempt to repair the unit yourself if it malfunctions. In the
event that the device needs to be checked for calibration or replaced,
contact the distributor.
• Store your device, cuff in a clean and dry place, protect it against
extreme moisture, heat, lint, dust and direct sunlight. Never place any
heavy objects on it.
• WARNING: Keep the device, cuff, and batteries away from children as
they may pose a risk of choking or strangulation if used improperly.
• Clean both device and cuff with a soft, dry cloth. If necessary use a
dampened cloth and natural detergent. Do not use alcohol, benzene,
or other harsh chemicals.
• DO NOT wash the cuff in a washing machine or dishwasher!
• The service life of the cuff may vary by the frequency of washing, skin
condition, and storage state. The typical service life is 10000 times.
• Dispose of accessories, detachable parts, and the device according to
the local guidelines.
• Use only 1.5V “AAA” alkaline batteries for power supply.
Blood pressure measurements determined with this device are
equivalent to those obtained by a trained observer using the cuff/
stethoscope auscultatory method, within the accuracy limits prescribed
by the American National Standard, manual, electronic, or automated
sphygmomanometers. The sphygmomanometer was clinically
investigated according to the requirement of ISO 81060-2:2013.
noninvasive blood pressure reading as it relates to the American
Heart Association
®
information. They are not a substitute for a medical
examination by your physician. It is important for you to consult with
your physician regularly. Your physician will tell you your normal
blood pressure range as well as the point at which you may actually
be considered to be at risk.
Incorrect cuff placement: Correct and measure again.
Error Determining Measurement Data: Relax, do not
move, and measure again.
Pulse signal not detected: Measure again.
Error Determining Measurement Data: Relax for 3
minutes, measure again.
XX
System Error: Turn off monitor and measure again. If
EExx error still appears on the display, call a Consumer
Relations representative.
OUT
Pressure Measurement Out of Range: Switch the unit
off to clear, then measure again.
If and any of the following letters and numbers appear in the area that
systolic pressure should be displayed or the wrist icon appears, an error has
occurred with your reading. See Troubleshooting section of this manual for
more information.
Excessive Body Motion Detector: Appears when
excessive body movement, especially of the wrist the cuff is
worn, is detected during the measurement. See Excessive
Body Motion Detector section for more information.
NOTE: The measured blood pressure reading may not be
accurate if the icon is displayed.
WRIST POSITIONING GUIDE SETTINGS
1. To turn the Wrist Positioning Guide OFF or ON, press and hold the
“START/STOP” button for 3 seconds.
NOTE:
• By default, the Wrist Positioning Guide is ON.
• When the Wrist Positioning Guide is OFF, the instruction will not
appear at the start of the measurement.
Wrist Positioning
Guide is ON
Wrist Positioning
Guide is OFF
Display Symbols, cont.:


Praat mee over dit product
Laat hier weten wat jij vindt van de Walgreens WMTBPA-240BT Bloeddrukmeter. Als je een vraag hebt, lees dan eerst zorgvuldig de handleiding door. Een handleiding aanvragen kan via ons contactformulier.