Handleiding Whirlpool W7F HS41 X Vaatwasser

Handleiding voor je Whirlpool W7F HS41 X Vaatwasser nodig? Hieronder kun je de handleiding gratis bekijken en downloaden als PDF in het Nederlands en/of Engels. Dit product heeft 12 veelgestelde vragen, 4 comments en heeft 0 stemmen. Is dit niet de handleiding die je zoekt, neem dan contact met ons op.

Is je product kapot en biedt de handleiding geen oplossing meer? Dan kun je voor reparatie gratis terecht bij Repair Café.

Handleiding

Loading…

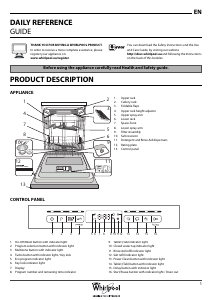
ENDaily Reference Guide
1
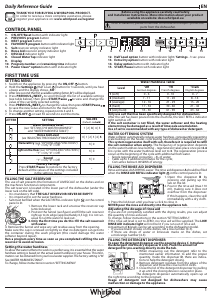
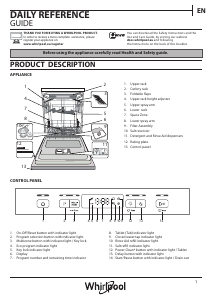
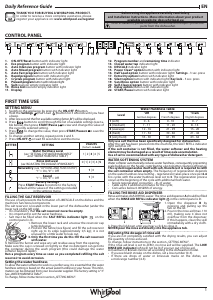
CONTROL PANEL
1
2 3 4
5
6
7
8
9
10
11 12 13
14
15 16 17 18 19 20 21 22
1. ON-OFF/Reset button with indicator light
2. Eco program button with indicator light
3. Auto Intensive program button with indicator light
4. Auto Mixed program button with indicator light
5. Auto Fast program button with indicator light
6. Rapid program button with indicator light
7. Crystals program button with indicator light
8. Prewash program button with indicator light
9. Salt reservoir empty indicator light
10. Rinse Aid reservoir empty indicator light
11. Display
12. Program number and remaining time indicator
13. Closed water tap indicator light
14. DESCALE indicator light
15. Power Clean® option button with indicator light
16. Half Load option button with indicator light/ Settings - 3 sec. press
17. Extra Dry option button with indicator light
18. Silent option button with indicator light/ Key lock - 3 sec. press
19. Sani Rinse option button with indicator light
20. Self-Clean program button with indicator light
21. Delay option button with indicator light
22. START/Pause button with indicator light
THANK YOU FOR BUYING A WHIRLPOOL PRODUCT.
In order to receive a more complete assistance, please
register your appliance on: www.whirlpool.eu/register
Before using the appliance carefully read Safety
and Installation Instructions. More information about your product
available on website: docs.whirlpool.eu
After installation, please remember to remove all transport protection
parts from the dishwasher.
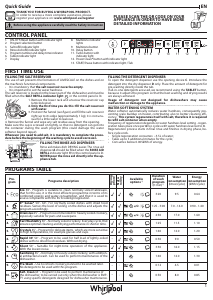
SETTING MENU
1. Switch on the appliance by pressing the ON-OFF button.
2. Hold the Settings (Half Load ) button for 3 seconds until you hear
a beep.
3. After one second the rst available setting (letter h”) will be displayed.
4. Press button to scroll through the list of available settings (see ta-
ble below), then press START/Pause to view and change the value of
the currently selected setting.
5. Press to change the value, then press START/Pause to save the
new value.
6. To change another setting, repeat points 2 and 5.
7. Press ON-OFF or wait 30 seconds to exit the menu.
FILLING THE SALT RESERVOIR
The use of salt prevents the formation of LIMESCALE on the dishes and the
machine’s functional components.
The salt reservoir is located in the lower part of the dishwasher (under the
lower rack on the left side).
It is mandatory that the salt reservoir never be empty.
It is important to set the water hardness.
Salt must be lled when the SALT REFILL indicator light on the
control panel is lit.
1. Remove the lower rack and unscrew the reservoir cap
(anticlockwise).
2. Position the funnel (see gure) and ll the salt reservoir
right up to its edge (approximately 0,5 kg); it is not
unusual for a little water to leak out.
3. Only the rst time you do this: ll the salt reservoir
with water.
4. Remove the funnel and wipe any salt residue away from the opening.
Make sure the cap is screwed on tightly so that no detergent can get into
the container during the wash program (this could damage the water
softener beyond repair).
Run a program every time as soon as you completed relling the salt
reservoir to avoid corrosion.
Setting the water hardness
To allow the water softener to work in a perfect way, it is essential that the water
hardness setting is based on the actual water hardness in your house. This infor-
mation can be obtained from your local water supplier. The factory setting is “3”.
See WATER HARDNESS TABLE”.
To change, follow instructions in section „SETTING MENU”.
LETTER SETTING
VALUES
(Default - in bold)
Water Hardness Level
(see “SETTING THE WATER HARDNESS
and “WATER HARDNESS TABLE”)
1 | 2 | 3 | 4 | 5
Rinse Aid Level
(see “ADJUSTING THE DOSAGE OF RINSE AID”)
0 | 1 | 2 | 3 | 4 | 5
NaturalDry (see “OPTIONS AND FUNCTIONS”)
“1” = On, “0” = O
1 | 0
Sound
“1” = On, “0” = O
1 | 0
Factory Settings
Press START/Pause to restore to the factory
default all the values of the settings included
in the settings menu.
-
Only use salt that has been specically designed for dishwashers.
After the salt has been poured into the machine, the SALT REFILL indicator
light switches o.
If the salt container is not lled, the water softener and the heating
element may be damaged as a result of limescale accumulation.
Use of salt is recommended with any type of dishwasher detergent.
WATER SOFTENING SYSTEM
Water softener automatically reduces water hardness, consequently preventing
scale buildup on the heater, contributing also to better cleaning eciency.
This system regenerates itself with salt, therefore it is required to rell
the salt container when empty. The frequency of regeneration depends
on the water hardness level setting - regeneration takes place once per 4-6
Eco cycles with the water hardness level set to 3. The regeneration process
occurs at the beginning of the cycle with additional fresh water.
Single regeneration consumes: ~3L of water;
Takes up to 5 additional minutes for the cycle;
Consumes below 0.005kWh of energy.
FILLING THE RINSE AID DISPENSER
Rinse aid makes dish DRYING easier. The rinse aid dispenser A should be lled
when the RINSE AID REFILL indicator light in the control panel is lit.
1. Open the dispenser B by
pressing and pulling up the
tab on the lid.
2. Pour in the rinse aid (max. 110
ml), making sure it does not
overow from the dispenser.
If this happens, clean the spill
immediately with a dry cloth.
3. Press the lid down until you hear a click to close it.
NEVER pour the rinse aid directly into the appliance tub.
Adjusting the dosage of rinse aid
If you are not completely satised with the drying results, you can adjust
the quantity of rinse aid used.
To change, follow instructions in the section „SETTING MENU”.
If the rinse aid level is set to ZERO, no rinse aid will be supplied. The LOW
RINSE AID indicator light will not be lit if you run out of rinse aid.
A maximum of 6 levels can be set according to the dishwasher model.
If you see bluish streaks on the dishes, set a low number (0-3).
If there are drops of water or limescale marks on the dishes, set
a mid-range number (4-5).
A
B
FIRST TIME USE
Water Hardness Table
Level
°dH
German degrees
°fH
French degrees
°Clark
English degrees
1 (soft) 0 - 6 0 - 10 0 - 7
2 (medium) 7 - 11 11 - 20 8 - 14
3 (average) 12 - 16 21 - 29 15 - 20
4 (hard) 17 - 34 30 - 60 21 - 42
5 (very hard) 35 - 50 61 - 90 43 - 62
Download de handleiding in het Nederlands en/of Engels (PDF, 9.11 MB)
(Denk aan het milieu en print deze handleiding alleen als dat echt noodzakelijk is)

Loading…

Meer over deze handleiding

We begrijpen dat het prettig is om een papieren handleiding te hebben voor je Whirlpool W7F HS41 X Vaatwasser. Je kunt de handleiding bij ons altijd downloaden en daarna zelf printen. Indien je graag een originele handleiding wilt hebben, raden we je aan contact op te nemen met Whirlpool. Zij kunnen wellicht nog voorzien in een originele handleiding. Zoek je de handleiding van Whirlpool W7F HS41 X Vaatwasser in een andere taal? Kies op de homepage je taal naar keuze en zoek daarna op het modelnummer om te zien of we deze beschikbaar hebben.

Specificaties

Merk Whirlpool
Model W7F HS41 X
Categorie Vaatwassers
Bestandstype PDF
Bestandsgrootte 9.11 MB

Alle handleidingen voor Whirlpool Vaatwassers
Meer handleidingen voor Vaatwassers

Beoordeling

Laat ons weten wat je van de Whirlpool W7F HS41 X Vaatwasser vindt door een beoordeling achter te laten. Wil je je ervaringen met dit product delen of een vraag stellen? Laat dan een bericht achter onderaan de pagina.
Bent u tevreden over de Whirlpool W7F HS41 X Vaatwasser?
Ja Nee
Beoordeel dit product als eerste
0 stemmen

Praat mee over dit product

Laat hier weten wat jij vindt van de Whirlpool W7F HS41 X Vaatwasser. Als je een vraag hebt, lees dan eerst zorgvuldig de handleiding door. Een handleiding aanvragen kan via ons contactformulier.

Ján Hollý 25-09-2024
hoe u de deur van de whirlpool W7F HS51 X-spoelbak opent

beantwoord | Ik vind dit nuttig (0) (Vertaald door Google)
van Rijswijk 24-10-2024
Goede dag, I.v.m. Vocht overlast van mijn W7F HS41X in mijn keuken na het automatisch openen is mijn vraag kan ik deze functie uitschakelen zonder problemen en zo ja hoe kan dat. M.V.G. Frits van Rijswijk

beantwoord | Ik vind dit nuttig (0)
Hein Jonker 18-11-2024
Hij geeft waterafvoer verstopt aan maar hij is net nieuw

beantwoord | Ik vind dit nuttig (0)
Hein Jonker 18-11-2024
Hij geeft Waterafvoer verstopt Aan .ik heb hem net aangesloten. En nu geeft die f7 en e3 wat moet ik nu doen

beantwoord | Ik vind dit nuttig (0)

Veelgestelde vragen over Whirlpool W7F HS41 X Vaatwasser

Ons supportteam zoekt dagelijks naar nuttige productinformatie en antwoorden op veelgestelde vragen. Als er onverhoopt toch een onjuistheid tussen onze veelgestelde vragen staat, laat het ons dan weten via het contactformulier.

Na afloop van het programma blijkt vaak dat het vakje in de vaatwasser met daarin de vaatwastablet niet is geopend, hoe kan dit? Geverifieerd

Vaak komt dit doordat er vaat in de vaatwasser staat die het vakje voor de tablet blokkeert. Let hier goed op bij het inruimen van de vaatwasser.

Ik vind dit nuttig (8072) Lees meer

De vaatwasser verwarmt het water niet meer, hoe komt dit? Geverifieerd

Hoogstwaarschijnlijk is het verwarmingselement defect. Zorg dat deze vervangen wordt. Neem bij twijfel contact op met de fabrikant.

Ik vind dit nuttig (7648) Lees meer

Kan ik keukenzout gebruiken in mijn vaatwasser? Geverifieerd

Nee, in keukenzout kunnen stoffen zitten die schadelijk zijn voor de vaatwasser.

Ik vind dit nuttig (3248) Lees meer

Moet ik de vaat eerst afspoelen voordat ik deze in de vaatwasser doe? Geverifieerd

Afspoelen is niet nodig maar grove, harde en vette etensresten dienen wel verwijderd te worden. Deze kunnen de afvoer op termijn verstoppen.

Ik vind dit nuttig (1326) Lees meer

Kan ik de vaatwasser openen terwijl deze bezig is? Geverifieerd

De meeste vaatwassers zijn uitgerust met een waterstop waardoor het programma direct stopt als de deur geopend wordt en er dus geen water uit komt. Bij sommige modellen kunnen hier op termijn problemen door ontstaan. Bij inbouwvaatwassers is het mogelijk dat wanneer de vaatwasser veel geopend wordt tijdens een programma er vochtschade ontstaat aan de omringende keukenkasten door de stoom die vrijkomt.

Ik vind dit nuttig (1081) Lees meer

Moet ik na afloop van het programma de vaatwasser open zetten of dicht laten om de vaat snel te laten drogen? Geverifieerd

Dit hangt af van het soort vaatwasser en de plaatsing van de vaatwasser. Sommige vaatwassers zijn uitgerust met een functie die de vaat na afloop van het programma droogt. In dat geval heeft het openzetten van de vaatwasser geen toegevoegde waarde. Bij inbouwvaatwassers is het mogelijk dat wanneer de vaatwasser veel geopend wordt tijdens een programma er vochtschade ontstaat aan de omringende keukenkasten door de stoom die vrijkomt.

Ik vind dit nuttig (859) Lees meer

Wat houdt '6th Sense' in? Geverifieerd

Apparaten van Whirlpool die zijn uitgerust met de 6th Sense technologie beschikken over sensoren die zorgen voor een optimale werking van het apparaat. Bij wasdrogers wordt bijvoorbeeld het vochtgehalte in de was gemeten en stopt de machine pas wanneer de was helemaal droog is.

Ik vind dit nuttig (806) Lees meer

Na afloop van het programma is het plastic vaak nog nat, maar de rest van de vaat niet. Hoe komt dit? Geverifieerd

Plastic geleid warmte slecht, waardoor de producten snel afkoelen. Het vocht dat erop achterblijft verdampt daarom minder goed dan bij bijvoorbeeld keramiek of metaal.

Ik vind dit nuttig (780) Lees meer

Kan ik een vaatwasser aansluiten op een verlengsnoer? Geverifieerd

Apparaten die veel stroom gebruiken, zoals een vaatwasser, kunnen niet zomaar op elk verlengsnoer worden aangesloten. Bekijk wat het vermogen is van de vaatwasser, aangegeven in Watt, en of het verlengsnoer dit aankan. Er zijn verlengsnoeren met dikkere kabels die gemaakt zijn om grotere apparaten op aan te sluiten.

Ik vind dit nuttig (706) Lees meer

Kan ik houten objecten zoals spatels en snijplanken in de vaatwasser doen? Geverifieerd

Nee. Houten objecten kunnen beschadigd raken en krom trekken in de vaatwasser. Daarnaast kunnen de houtvezels die loskomen de vaatwasser beschadigen. Houten snijplanken zijn vaak gemaakt met lijmverbindingen die los kunnen laten na enkele keren in de vaatwasser te zijn geweest.

Ik vind dit nuttig (705) Lees meer

Kan ik pannen met Teflon in de vaatwasser doen? Geverifieerd

Ja, dat kan. De pan zal wel sneller slijten dan wanneer hij met de hand wordt schoongemaakt. Als een pan met Telfon met de hand wordt schoongemaakt, gebruik dan geen schuurspons maar een zachte spons of doek.

Ik vind dit nuttig (705) Lees meer

Is het een probleem als er krassen op het metaal aan de binnenkant van de vaatwasser zitten? Geverifieerd

De binnenkant van de meeste vaatwassers is van roestvrij staal en kan dus tegen krassen.

Ik vind dit nuttig (704) Lees meer
Handleiding Whirlpool W7F HS41 X Vaatwasser

Gerelateerde producten

Gerelateerde categorieën