IMPORTANT INFORMATION
Important: For warranty verification, please do not remove line cord
sticker.
Read before using the rice cooker for the first time.
• Read all instructions.
•Wash inner pot, lid, measuring cup and serving scoop in warm, soapy
water. Rinse and dry thoroughly.
• Never immerse outer pot in water.
• Never place liquid in the outer pot; place it only in the inner pot.
•Never try to force cook lever to stay in the COOK position after it has
shifted automatically to the WARM position.
• Always place inner pot inside outer pot before plugging in the rice
cooker.
• When plugging in the cooker, always be sure inner pot contains liquid,
or be ready to add oil, butter or margarine immediately to the inner pot.
• Save these instructions and refer to them often.
NOTE: Always wipe down the outer surface of the inner pot before placing
it inside the cooker. Any moisture remaining on inner pot surface may
cause a crackling noise while the unit is heating up. Except for actual
cooking area, keep all surfaces dry to prevent damage to the inner
workings of the appliance while it is in operation.
How to Use
This appliance is for household use only. It may be plugged into a standard
electrical outlet.
The measuring cup provided is based on 160g.
1. Before placing the inner pot into the cooker, be sure the heating plate
and outside surface of the inner pot are clean and dry. Do not allow
loose rice or food particles to fall into the cooker. The inner pot must
fit snugly onto the heating plate to ensure proper contact for cooking.
Place desired amount of rice into the inner pot. Add cold water up to
the exact level indicated inside of the inner pot. Add oil, butter
or margarine to prevent rice from sticking, add salt if desired.
For example: For "4" measuring cups of uncooked rice, fill water
to the "4" level mark. By adding too much water you may cause
the unit to boil over.
2. Taste/hardness will vary depending on the quality/type of rice and
length of time it is cooked. For a softer, fluffier rice add a little more
water; for firmer, crunchier rice add a little less water. You may need
to experiment to suit your taste. Note that brown rice takes longer to
cook than white rice and requires more water.
3. Place the lid on the rice cooker. Plug it into a standard electrical outlet.
The WARM indicator light will come on. Push the "ON" switch down
and the COOK indicator light will come on. As the rice expands and
cooks, steam will come out of the vent in the lid. Do not place the
cooker directly under your cabinets. Slight spattering is normal.
NOTE: Cooking will begin only when the "ON" switch is pushed down and
the inner pot is in position in the unit.
4. When cooking is done, the cooker will automatically switch to WARM
(the warm indicator light will come on) and will continue until the unit
is unplugged. Rice can be kept warm for several hours. For best results,
let the cooked rice sit for 15 minutes before stirring or removing. This
allows the steam to finish the cooking process.
NOTE: Do not try to prevent the cooker from switching to the WARM
cycle. Do not immediately depress the switch again after it has begun the
WARM cycle.
5. Fluff rice with a plastic or wood utensil and mix in ingredients such
as minced vegetables, if desired.
6. When done, unplug the unit. Always clean the cooker thoroughly
as soon as possible after each use.
POINTS TO REMEMBER
•
Do not operate the rice cooker without water.
•
Avoid placing unit under any wall cabinets when operating, as much
steam is generated. Avoid reaching over the unit when it is operating.
•
Use clean water to fill water reservoir before each use. Do not use wine,
broth or other liquids. Do not add anything to the water.
•
Cooking times are estimates and depend on the quantity, size, desired
degree of doneness and temperature of food.
•
Cooking times may lengthen/shorten according to personal taste.
•
Use hot pads or oven mitts when removing the lid from the rice cooker.
Open the lid carefully to allow steam to escape safely.
•
A bit of water may remain in water reservoir after the rice cooker is
turned off. This is normal.
•
Do not use any parts in microwave or on any cooking/heated surface.
•
Unplug after cooking.
•
Allow the unit to cool before cleaning.
Care and Cleaning
This product contains no user serviceable parts. Refer service to qualified
service personnel.
1. Always unplug and allow to cool completely before cleaning.
2. Never place the outer pot of the cooker in water or other liquid.
3. Clean the outer pot by wiping the inside and outside surfaces with
a damp, soapy cloth and drying thoroughly.
4. If water accidentally gets into the switch area or onto the heating plate,
allow to dry thoroughly before using the cooker.
5. The cooking bowl, lid, measuring cup and serving scoop may be
washed in warm soapy water or the top rack of the dishwasher. If crusty
rice sticks to the bottom of the bowl, soak the bowl to loosen rice. Do
not use abrasive cleaners or metal scouring pads—they may scratch or
dent surfaces and could result in poor contact with the heating plate.
6. Rinse and dry all parts thoroughly.
IMPORTANT:
•
When cooking a small quantity of rice, be sure to add the correct
amount of water to avoid boiling over. Do not keep small amounts of
rice warm in the cooker for extended periods.
•
As rice cooks, a thin crust may develop on the bottom of the cooking
bowl. This crust is chewy and many people enjoy eating it. With
parboiled and brown rice the crust may be browned on the bottom. The
crust can easily be peeled off and discarded, if preferred.
•
Use the serving scoop (or a wooden spoon or paddle) to stir and remove
rice—don’t use metal utensils that can scratch or dent the cooking bowl.
To store
1. Unplug unit.
2. Store in its box in a clean, dry place.
3. Never store it while it is hot or still plugged in.
4. Make sure to clean before storing.
5. Never wrap cord tightly around the appliance.
6. Do not put any stress on the cord where it enters the unit, as it could
cause the cord to fray and break
INFORMACIÓN IMPORTANTE
Importante: Para verificación de la garantía, por favor no retire la etiqueta
del cable eléctrico.
Lea antes de usar la olla arrocera por primera vez.
• Lea todas las instrucciones.
• Lave la olla interior, la tapa, la tasa de medir y la cuchara de servir en
agua tibia jabonada. Enjuague y seque bien.
• Nunca sumerja la olla exterior en agua.
• Nunca vierta líquido en la olla exterior sino que en la olla interior.
• Nunca trate de forzar la palanca de cocinar de manera que permanezca
en la posición
COCINAR
una vez que ésta ha pasado automáticamente
a la posición de calentamiento (
CALENTAR
).
• Siempre coloque el recipiente interior adentro de la olla exterior antes
de enchufar el aparato a fin de cocinar el arroz.
• Cuando enchufe la olla arrocera, asegúrese de que la olla interior
contenga líquido o esté lista para añadirle inmediatamente el aceite,
la margarina o la mantequilla.
• Conserve estas instrucciones y consúltelas a menudo.
NOTA: Siempre limpie la superficie del inferior de la olla interior antes
de colocarla adentro de la olla arrocera. Cualquier residuo de humedad
en la superficie de la olla interior puede producir un crujido mientras
el aparato se calienta. Con excepción de la superficie de cocina,
mantenga todas las demás superficies secas para prevenir daño al
funcionamiento interior del aparato.
Como usar
Este producto es para uso doméstico solamente y puede ser enchufado
a una toma de corriente normal.
La tasa de medir provista es de 160 gramos.
1. Antes de colocar la olla interior en su lugar, asegúrese de que tanto el
exterior de la olla como la placa calefactora estén limpias y secas. No
permita que caiga arroz suelto ni partículas adentro de esta superficie.
La olla interior debe de quedar bien ajustada para asegurar que haga el
contacto apropiado con la placa calefactora. Agregue la cantidad de
arroz deseada adentro de la olla. Vierta agua fría hasta el nivel exacto
indicado en el costado de la olla. Añada aceite, mantequilla o
margarina para evitar que el arroz se pegue. Agregue sal al gusto. Por
ejemplo, para 4 medidas de arroz crudo, llene la olla con agua hasta el
"4" nivel. El exceso de agua puede hacer que la unidad rebalse.
2. El sabor y la textura varía según la calidad o el tipo del arroz y según el
tiempo de cocción. Para un arroz suave y suelto, agregue un poco más
de agua; y para un arroz firme y crujiente, disminuya la cantidad de
agua. Uno debe ensayar hasta lograr el resultado que satisfaga el gusto.
Tome en cuenta que el arroz silvestre requiere más agua y mayor
tiempo de cocción.
3. Coloque la tapa sobre la olla arrocera. Enchúfela a una toma de
corriente normal. La luz indicadora CALENTAR se iluminará. Oprima
para abajo el interruptor de encendido y se ilumina la luz indicadora
de cocción COCINAR. A medida que el arroz se expande y se cocina,
el escape de la tapa emite vapor. No coloque la olla arrocera
directamente debajo de los gabinetes. Es normal que haya cierta
salpicadura.
NOTA: El ciclo de cocción inicia únicamente cuando uno coloca la olla
interior sobre la placa calefactora y oprime para abajo el interruptor de
encendido.
4. Una vez cocido el arroz, la olla pasa al ciclo de calentamiento
automáticamente (se ilumina la luz indicadora) y permanece así hasta
que uno desconecta el aparato. El arroz se puede mantener caliente
por varias horas. Para mejores resultados, deje reposar el arroz ya
cocido durante 15 minutos antes de revolver o de retirarlo. Esto permite
que el vapor termine el proceso de cocción.
NOTA: NO trate de impedir que la olla pase al ciclo de calentamiento.
NO OPRIMA DE INMEDIATO el interruptor una vez que inicia el ciclo
calentamiento.
5. Revuelva el arroz con un utensilio plástico o de madera y si desea,
agregue ingredientes tales como verduras picadas.
6. Cuando termine de cocinar, desconecte el aparato. Siempre procure
limpiar cuidadosamente y lo antes posible la olla arrocera después de
cada uso.
PUNTOS A RECORDAR:
•
No utilice la olla arrocera sin antes agregar agua.
•
Debido a la alta emisión de vapor, no coloque el aparato debajo de los
gabinetes de cocina cuando la olla esté en funcionamiento. No coloque
nada sobre la olla cuando esté en funcionamiento.
•
Vierta agua limpia para llenar el depósito antes de cada uso. No use
vino, caldo u otros líquidos. No añada nada al agua.
•
El tiempo de cocción es estimado y depende de la cantidad, el tamaño,
el punto de cocción deseado y la temperatura de los alimentos.
•
El tiempo de cocción puede ser menor o mayor según el gusto de las
personas.
•
Use agarraderas o guantes de cocina cuando retire la tapa de la olla.
Abra la tapa cuidadosamente para que el vapor escape sin peligro.
•
Cierta cantidad de agua podría permanecer en el depósito al finalizar el
ciclo de cocción. Esto es normal.
•
No introduzca ninguna de las piezas del aparato en el horno microondas
ni coloque sobre ninguna superficie caliente.
•
Desenchufe el aparato después de cocinar.
•
Permita que el aparato se enfríe antes de limpiarlo.
Cuidado y limpieza
El aparato no contiene piezas reparables al consumidor. Para servicio,
acuda a personal de asistencia calificado.
1. Siempre desconecte el aparato y permita que se enfríe bien antes de
limpiarlo.
2. NUNCA sumerja la olla exterior del aparato en agua ni en ningún otro
líquido.
3. Limpie la olla exterior del aparato, limpiando las superficies interiores
y exteriores con un paño humedecido con agua y jabón y seque bien.
4. Si cae agua accidentalmente adentro del interruptor, permita que éste se
seque bien antes de utilizar la olla arrocera.
5. Uno puede lavar el recipiente de cocinar, la tapa, la tasa de medir y la
cuchara de servir con agua tibia jabonada o en la bandeja superior de la
máquina lavaplatos. Si se llegara a pegar el arroz en el fondo de
la olla, déjela en remojo hasta que el arroz se desprenda. No utilice
limpiadores abrasivos ni almohadillas de fibras metálicas que puedan
rayar o abollar las superficies, perjudicando el contacto de la olla con
la placa calefactora.
6. Enjuague y seque bien todas las piezas.
IMPORTANTE
•
Cuando prepare una cantidad poca de arroz, asegúrese de agregar
la cantidad de agua apropiada para que ésta no se desborde. Procure
no mantener poco arroz calentándose por mucho tiempo.
•
A medida que el arroz se cocina, podría formarse una fina capa de
corteza en el fondo de la olla que es del gusto de ciertas personas.
El arroz precocido y el arroz silvestre, dejan a veces una capa color café
en el fondo de la olla que uno puede desprender y desechar fácilmente.
•
Utilice la cuchara de servir (o una cuchara o paleta de madera) para
revolver el arroz. No utilice utensilios metálicos que puedan rayar o
abollar la olla de cocinar.
Almacenamiento
1. Desenchufe el aparato.
2. Almacene en la caja original o en un lugar limpio y seco.
3. Nunca almacene el aparato estando aun caliente o enchufado.
4. Asegúrese de limpiarlo antes de guardarlo.
5. Nunca enrolle el cable ajustadamente alrededor del aparato.
6. No aplique presión a la unión del cable con el aparato a fin de evitar
que éste se debilite o se rompa.
Product may vary slightly from what is illustrated./ Este producto puede variar ligeramente del que aparece ilustrado.
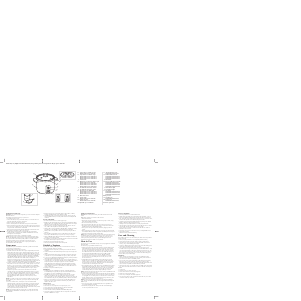
†1.Tapa de vidrio con salida de vapor,
Modelo R100 (Pieza no. R100-01)
†2.Tapa métalica con salida de vapor
Modelo R200 (Pieza no. R200-3061)
Modelo R300 (Pieza no. R300-3061)
Modelo R600 (Pieza no. R600-3061)
3. Asas laterales
†4. Olla interior con marcas de nivel de agua
Modelo R100 (Pieza no. R100-02)
Modelo R200 (Pieza no. R200-3060)
Modelo R300 (Pieza no. R300-3120)
Modelo R600 (Pieza no. R600-3130)
5. Luz indicadora del ciclo de calentar
6. Luz indicadora del ciclo de cocinar
†7. Interruptor de encendido (ON)
Modelo R200 (Pieza no. R200-3062)
Modelo R300 (Pieza no. R300-3123)
Modelo R600 (Pieza no. R600-3133)
8. Olla exterior (base)
†9.Tasa de medir
Modelo R100 (Pieza no. R100-03)
†10. Cuchara de servir
Modelo R100 (Pieza no. R100-04)
† Reemplazable por el consumidor
†1. Glass lid with steam vent,
Model R100 (Part# R100-01)
†2. Metal lid with steam vent
Model R200 (Part# R200-3061)
Model R300 (Part# R300-3061)
Model R600 (Part# R600-3061)
3. Side handles
†4. Inner pot with water level marks
Model R100 (Part# R100-02)
Model R200 (Part# R200-3060)
Model R300 (Part# R300-3120)
Model R600 (Part# R600-3130)
5. Warm indicator light
6. Cook indicator light
†7. "On" switch
Model R200 (Part# R200-3062)
Model R300 (Part# R300-3123)
Model R600 (Part# R600-3133)
8.Outer pot (Base)
†9. Measuring cup
Model R100 (Part# R100-03)
†10. Serving scoop
Model R100 (Part# R100-04 )
† Consumer replaceable


Praat mee over dit product
Laat hier weten wat jij vindt van de Windmere R600 Rijstkoker. Als je een vraag hebt, lees dan eerst zorgvuldig de handleiding door. Een handleiding aanvragen kan via ons contactformulier.