
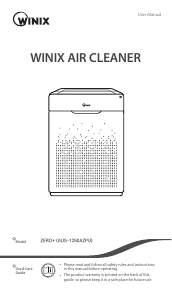
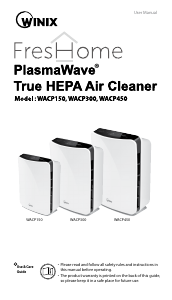
User Manual
• ThisproductismanufacturedforuseonlyintheUSAandCanada.
• Thisproductissuitablefor120Vonly.
D480 / D360Model
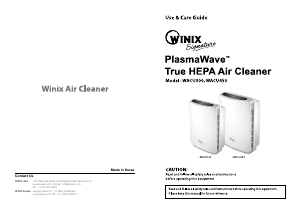
Use & Care
Guide
•
Dedicated Call Center :
☎
(877) 699-4649
•
Website : www.winixamerica.com
Contact Winix for
product related inquiries
and customer service
AIR PURIFIER
2610-0236-00 Rev.00
Toexpediteservice,pleasespecifythemodelnameandnumber,thenatureoftheproblem,yourcontact
information,andyouraddress.
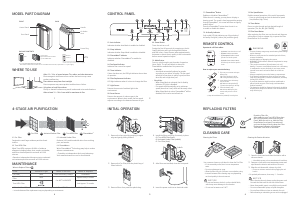
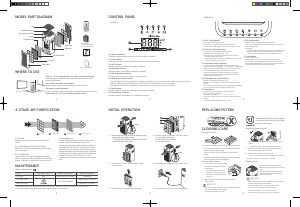
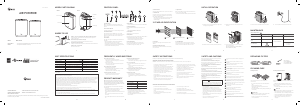
FRONT
Control Panel
Front Panel
Air Outlet
Vent
BACK
Handle
Power plug
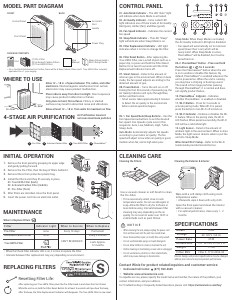
WHERE TO USE
MODEL PART DIAGRAM
12~18 in
4 in
Allow 12 ~ 18 in. of space between TVs, radios, and other electronics
Electromagnetic interference from certain electronics may cause
product malfunction.
Place indoors away from direct sun light
Direct exposure may cause product malfunction or failure.
Only place on hard, flat surfaces
Flimsy or slanted surfaces may result in abnormal noise and vibrations.
Allow at least 4 in. from walls
For maximum air flow.
3
True HEPA Filter
2
Activated Carbon Filter SheetPre-Filter
1
3-STAGE AIR PURIFICATION
1109
02 04 100706
03
01 05 08 12
10. Power Indicator
LED light indicates when the air-purifier is turned on.
11. Power Button
Turns the unit on or off. During the first 30 seconds
of power, the Air Quality Indicator will cycle through
Blue, Amber and Red colors.
•
Smart Sensor takes approximately 4 minutes to gauge
the air quality in the environment before normal
operation begins.
12. Light Sensor
When in Auto Mode, the light sensor detects when to
put the unit into sleep mode.
•
Detects the amount of ambient light in the environment.
01. Smart Sensor
When in Auto Mode, the Smart Sensor detects the
amount of impurities in the environment to adjust fan
speeds.
02. Check Filter Indicator
LED light indicates when it is time to change the filter.
03. Filter Reset Button
After replacing the True HEPA Filter, use a small
object such as a paper clip, to press and hold the reset
button for at least 5 seconds until the Check Filter
light turns off.
04. Auto Mode
The LED "Auto" light will indicate when Auto mode is
activated.
•
When in Auto Mode the Fan Speed is automatically
adjusted according to the indoor air quality.
As the indoor air quality improves, the fan speed will
automatically decrease. If the indoor air quality worsens,
the fan speed will automatically increase.
05. Auto Button
•
Use the Auto Button to set the Air Purifier to Auto Mode.
06. Air Quality Indicator
Color-coded LED indicates one of three levels of air
quality.
•
BLUE (good), AMBER (fair), RED (poor).
07. Fan Speeds
Indicates the current fan speed.
08. Sleep Mode
The LED "Sleep" light will indicate when Sleep mode is
activated. When Sleep mode is activated:
•
The Air Quality Indicator LED light is disabled.
•
The fan speed is automatically set to quiet.
09. Fan Speed Button
Use the Fan Speed Button to set the desired
Fan Speed. Fan Speeds cycle in this sequence :
Low, Medium, High, Turbo, Sleep, Low.
CONTROL PANEL
01. Pre-Filter
Designed to catch larger airborne particles found
indoors.
02. Activated Carbon Filter Sheet
Reduces VOCs and household odors from cooking,
pets, and smoke.
03. True HEPA Filter
Captures 99.97%* of airborne allergens including;
pollen, Mold spores, dust, pet dander, microbes, and
smoke. *particles as small as 0.3 microns in size.
ITEM: 1712-0101-00
ITEM: 1712-0100-00
After replacing
the True HEPA Filter,
press the RESET button
for at least 5 seconds.
REPLACING FILTERS
INITIAL OPERATION
CLEANING CARE
Latch
1.
Remove the front panel by grasping its upper edge
and gently pulling forward.
2.
Remove the Pre-Filter, then the bag of filters
behind it.
Cleaning the Filters
Use a vacuum cleaner or soft brush to clean
the Pre-Filter.
•
If it is excessively soiled, rinse in room temperature
water.
•
Do not use detergent or soap.
•
Allow the filter to completely dry for 24 hours or
m
ore before using.
•
Intervals between filter cleaning may vary depending on
the air quality.
NOTICE
•
Do not use benzene, alcohol, or other volatile fluids,
which may cause damage or discoloration.
•
Do not use hot water over 104
o
F or volatile fluids
such as paint thinner.
Cleaning the Exterior & Interior
Wipe with a soft damp cloth using room temperature
water.
•
Afterwards, wipe it down with a clean dry cloth.
Open the front panel and clean the interior with a
vacuum c
le
aner.
•
For optimal performance, clean every 1 - 2 months.
NOTICE
•
When cleaning the unit, always unplug the power cord
first and then wait until the unit has cooled down.
•
Never disassemble, repair, or modify this unit yourself.
•
Do not use flammable sprays or liquid detergents.
•
Do not allow children to clean or maintain the unit.
•
Before cleaning or maintaining, ensure unit is
unplugged.
When to Replace Filters
Filter Indicator Light When to service When to replace
Pre-Filter
none Clean once every 14 days Permanent
Activated Carbon Filter
Sheet
none
Can NOT be WASHED
Replace every 3 months
True HEPA Filter
Lasts Approx.
12 months
•
When the Check Filter indicator LED is on, it is time to replace the True HEPA Filter.
•
Intervals between filter replacement may vary depending on environment.
MAINTENANCE
3.
Remove the filters from the protective plastic bag.
03
02
01
4.
Install the filters until they fit securely in place.
01. Pre-Filter (front)
02. Activated Carbon Filter Sheet (middle)
03. True HEPA Filter (back)
Latch
5.
After filters are installed close the front panel.
6.
Insert the power cord into an electrical outlet.
Before operating this equipment, carefully read and
follow these safety cautions
Ensure filters are inserted before running unit
Running the unit without filters can shorten the unit's
life and cause electric shock or injury.
Be sure foreign objects are NOT inserted into the
vents on the unit
Objects can include pins, rods, and coins.
Do not touch any part of the interior of the unit with
wet hands
The high voltage may cause electric shock.
Ensure unit intake and outlet vents do not become blocked
Blockage may lead to increased internal temperatures
causing product failure and derformation.
Do not use the unit as a step stool or place heavy
objects on it
Personal injury may occur or product failure and
deformation.
WARNING
Follow these instructions to reduce the risk of serious
injury or death and to reduce risk of damaging the unit.
•
If the supply cord is damaged, it must be replaced by a
special cord or assembly available from the manufacturer
or its service agent.
•
This appliance is not intended for use by a person
(including children) with reduced physical sensory or
mental capabilities, or lack of experience and knowledge,
unless they have been given supervision or instruction
concerning use of the appliance by a person responsible
for their safety.
•
Children should be supervised to ensure that they do not
play with the appliance.
•
This unit is not intended to be used to preserve
documents or in art conservation.
Do not pull on the power cord when unplugging the
unit.
Do not tie or knot the power cord when unit is in
operation.
If the unit becomes submerged in water, unplug it
and contact customer service.
Do not unplug or move the unit while in operation.
Do not plug additional appliances into the same outlet
or power supply.
Do not touch the plug with wet hands.
Unplug the unit when not in operation for extended
periods of time.
Do not place around heating elements.
Do not use around mist or fumes from industrial oil
or around large quantities of metallic dust.
The cord can become damaged by forcefully bending,
pulling, twisting, bundling, pinching or placing heavy
objects on it.
Do not install in any sort of motor or transport vehicle
(trucks, boats, ships, etc.).
Do not place in an area with excessive amounts of
noxious gases.
Do not place near any flammable materials
(aerosols, fuel, gases etc.).
Do not have the unit facing into wind or draft.
Do not place below any electrical outlet.
Do not place in excessively humid areas where the
unit may become wet.
To reduce the risk of fire or electric shock, do not use
this fan with any solid-state speed control device.
SAFETY AND CAUTIONSSAFETY INSTRUCTIONS
Thank you for purchasing a Winix air purifier. This product is for household use only.
•
Do not repair or modify the unit. All other repairs should
be completed by a qualified technician.
•
The plug for this unit is polarized with one blade wider than
the other. Do not force the plug into an electrical outlet.
Do not alter the plug in any way. If the unit does not fit into
the outlet, reverse the plug. If it still does not fit, contact a
qualified technician to install a proper outlet.
•
Do not use if the power cord or plug is damaged or the
connection to the wall outlet is loose.
•
Use AC 120V only.
•
Do not damage, break, forcefully bend, pull, twist,
bundle, coat, pinch, or place heavy objects on the power
cord.
•
Periodically remove dust from the power plug. This will
reduce the risk of shock due to humidity build up.
•
Remove the power plug from the outlet before cleaning
the unit. When removing the power plug, grasp by holding
the plug itself, never hold by the cord.
•
If the power plug is damaged, it must be replaced by
the manufacturer or a qualified technician.
•
Do not operate the unit when using indoor smoke-
generating insecticides.
•
Do not clean unit with benzene or paint thinner.
Do not spray insecticides on the unit.
•
Do not insert fingers or foreign objects into air intake or
outlet.
•
Unit will not remove carbon monoxide emitted from
heating appliances or other sources.
IMPORTANT CAUTIONS FOR USING YOUR AIR PURIFIER
WARNING : Follow the instructions in this manual to reduce the risk of electric shock, short circuit, and/or fire.
IMPORTANT PRECAUTIONS FOR USING YOUR AIR PURIFIER
•
Do not block the intake or outlet vents.
•
Do not use near hot objects, such as a stove.
•
Do not use where the unit may come into contact with
steam.
•
Do not use the unit on its side.
•
Keep away from products that generate oily residue,
such as a deep fryer.
•
Do not use detergent to clean the unit.
•
Do not operate without a filter.
•
Do not wash and reuse the True HEPA Filter.
•
Hold the handle on the back of the unit to transport.
•
Do not hold by the front panel.
•
Do not stick any small objects in the air outlet vents or fan.
PRODUCT WARRANTY
Winix warrants the parts of the machine to be free of
defects and provides service and support for two (2)
years from the date of purchase. If any part is found to
be defective during the warranty period, Winix will repair
or replace the defective part or unit.
The Limited Warranty will be honored under the following
circumstances:
•
If purchased through an authorized dealer or retailer.
•
Purchase date is within the warranty period.
•
The unit has been confirmed defective after
troubleshooting with the Winix America Customer Service
Team.
•
The unit has been operated based on the user manual
instructions.
•
Genuine Winix Replacement Filters have been used in the
unit.
Model Name
D480 / D360
Purchase Date
Warranty period
Two (2) years
Place of purchase
•
Additional costs for spare parts and/or shipping costs
may apply during warranty inspections.
•
This warranty does not apply in cases of abuse,
mishandling, failure to comply with product usage
standards, or unauthorized repair.
•
The Limited Warranty does not include or cover the air
cleaner's filters.
The unit does not turn on at all.
•
Is the plug securely attached to the outlet?
-
Make sure the outlet has power going to it, and ensure
the plug is secured.
•
Is there a power outage?
-
Check to see if other lights and electrical equipment
are working and try again.
The unit doesn’t work in Auto Mode.
•
Has Auto Mode been selected?
-
Press the Mode button until Auto Mode is selected.
•
Is the sensor blocked or clogged?
-
Wipe Smart Sensor with wet cloth, then dry.
It vibrates and makes a lot of noise.
•
Is it running on a slanted or uneven surface?
-
Move the unit to a hard, flat, even area.
The power plug and outlet feel hot.
•
Is the plug securely plugged in?
-
Make sure the plug is properly plugged into the outlet.
There is a strange smell.
•
Is it being used in a place with a lot of smoke, dust, or
odors?
-
Clean the air intakes on either side and clean
the Pre-Filter.
-
Replace the Carbon and True HEPA filter.
The fan strength is weak. The unit is not purifying the air.
•
Is the Check Filter indicator light on?
-
Change the filters as required.
The display panel is dim.
•
Is the Light Sensor blocked by debris?
-
When Auto Mode is on, Sleep Mode is automatically
activated when the Light Sensor detects that the room is
dark.
FREQUENTLY ASKED QUESTIONS
Model Name
D480 D360
Power Voltage
AC120V/60Hz
Power Rate
90 W 65 W
Verified Room Size
480 sq.ft. 360 sq.ft.
Product Dimensions
16.77 in(W) x 11.81 in(D) x 22.83 in(H) 14.96 in(W) x 10.33 in(D) x 21.06 in(H)
Product Weight
17.6 lbs 16.6 lbs
Replacement Filter
Filter D4 / SKU : 1712-0100-00 Filter D3 / SKU : 1712-0101-00
The exterior, design, and product specifications may be changed without prior notice to improve product
performance.
Warning : Change or modifications to this unit not expressly approved by the party responsible for compliance could void
the user's authority to operate the equipment.
Note : This equipment has been tested and found to comply with the limits for a Class B digital device, pursuant to Part 15
of the FCC Rules. These limits are designed to provide reasonable protection against harmful interference in a residential
installation. This equipment generates, uses and can radiate radio frequency energy and, if not installed and used in
accordance with the instructions, it may cause harmful interference to radio communications. However, there is no
guarantee that interference will not occur in a particular installation. If this equipment does cause harmful interference
to radio or television reception, which can be determined by turning the equipment off and on, the user is encouraged to
try to correct the interference by one or more of the following measures.
•
Reorient or relocate the receiving antenna.
•
Increase the separation between the equipment and receiver.
•
Connect the equipment into an outlet on a circuit different from that to which the receiver is connected.
•
Consult the dealer or on experienced radio/TV technician for help.
This device contains license-exempt transmitter(s)/receiver(s) that comply with Innovation, Science and Economic
Development Canada's license-exempt RSS(s). Operation is subject to the following two conditions:
•
This device may not cause interference.
•
This device must accept any interference, including interference that may cause undesired operation of the device.
UNIT SPECIFICATIONS


Praat mee over dit product
Laat hier weten wat jij vindt van de Winix D480 Luchtreiniger. Als je een vraag hebt, lees dan eerst zorgvuldig de handleiding door. Een handleiding aanvragen kan via ons contactformulier.
beantwoord | Ik vind dit nuttig (1) (Vertaald door Google)