Delta HR
Wireless Cycle
Computer with
Heart Rate
INTRODUCTION
Thank you for your purchase of an Ascent computer! The
Ascent Delta hr combines all the features of an advanced cycle
computer with ECG accurate heart rate technology to create
the ultimate training tool. The added convenience of wireless
transmission makes installation simple.
COMPUTER FUNCTIONS
Current Speed
Displays current speed up to 62mph (99.9kmh). Accurate to
0.1mph or kmh. Current speed is always displayed in the top
right corner of the screen.
Current Heart Rate
Provided the chest transmitter is being used, current heart
rate is displayed in the top left corner of all display screens.
Modes
Press the MODE button to scroll through the Delta hr display
screens in the following order:
Clock (CLOCK)
Displays time of day in a 12 hour or 24 hour format.
Auto Ride Timer (AUTOTIME)
Auto start/stop timer is activated by front wheel movement
and records ride time up to 9:59:59.
Maximum Speed (MAXSPEED)
Displays maximum speed attained during a ride, up to 62mph
(99.9kmh).
Average Speed (AVGSPEED)
Displays average speed up to 62mph (99.9kmh). Calculated
using ride time and trip distance. Note, if either ride time or
trip distance reach their maximum value (9:59:59, or 600 mi.)
average speed can no longer be calculated correctly. “Err”
will appear in the display screen until the ride time and trip
distance values have been reset.
Trip Distance (TRIP)
Displays distance traveled during current ride, up to 600 mi.
(999.99 km).
Total Odometer (TOTALODO)
Displays cumulative ride distance, up to 6200 mi. (9,999.9
km).
Maximum Heart Rate (MAXPULSE)
Displays maximum heart rate attained since last reset. From
30bpm—240bpm.
Average Heart Rate (AVGPULSE)
Displays average heart rate attained since last reset. From
30bpm—240bpm.
Calorie Counter (KCAL)
Displays calories burned since last reset, up to 9999 Kcal.
Scan
Allows hands free viewing of display screens. When activated,
the scan feature scrolls through all nine display screens on a
continuous loop, displaying the screens for five seconds each.
Additional Features:
Dual Wheel Settings
Two wheel size settings allow you to switch the computer
between two bikes with different wheel sizes (e.g. your road
bike and mountain bike), and keep track of your combined ride
time and distance on both bikes. To select the desired wheel
setting (“I” or “II”), press the blue button on the underside of
the computer head.
Programmable Heart Rate Target Zone
Allows you to program upper and lower heart rate target zone
limits to ensure the most efficient workout based on your
specific fitness goals.
Out of Zone Alarm
Visual and selectable audible alarm indicates when your heart
rate rises above your target zone upper limit or falls below
your target zone lower limit.
Low Battery Indicator
Indicates when batteries should be replaced.
PROGRAMMING THE COMPUTER
SETTING THE CALORIE COUNTER
The Delta hr uses weight and gender to calculate calories
burned. In order for the calorie counter to provide an accurate
measurement, you must enter your weight and gender.
STEP 1: Press the MODE button to advance to the Calorie
(KCAL) display screen. Press and hold the SET button for 2
seconds to enter the personal settings screen.
STEP 2: Press the SET button to select gender, then press the
MODE button to advance to the weight scale selection screen.
STEP 3: Press the SET button to select the desired weight
scale (Kg or Lb). Then press the MODE button to advance to
the weight input screen.
STEP 4: Press the SET button (or press and hold) to adjust the
weight value. Press and hold the MODE button to set the value
and exit the set-up mode.
SETTING THE CLOCK
The Delta hr is equipped with a digital clock that displays time
of day in a 12 hour or 24 hour format.
STEP 1: Press the MODE button to advance to the Clock
(CLOCK) display screen. Press and hold the SET button for 2
seconds to enter the clock setting screen.
STEP 2: “12H” or “24H” will flash in the upper row of the
display. Press the SET button to select 12 hour or 24 hour
mode. Press the MODE button to set your choice and advance
to the hours setting.
STEP 3: The hours will flash. Press the SET button (or press
and hold) to advance the hours. Press the MODE button to set
the value and advance to the minutes setting.
STEP 4: Press the SET button (or press and hold) to advance
the minutes. Press the MODE button to set the value and
advance to the seconds setting.
STEP 5: Press the SET button to reset the seconds to “00”.
STEP 6: Press and hold the MODE button to exit the clock set-
up screen and return to the Clock display screen.
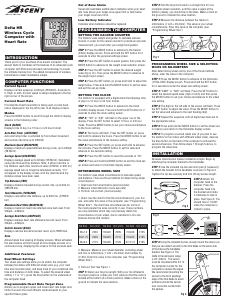
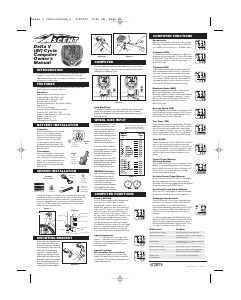
DETERMINING WHEEL SIZE
The Delta hr uses wheel circumference to calculate speed
and distance. There are three methods for determining wheel
circumference:
1. Select size from chart below (least accurate)
2. Measure wheel diameter (more accurate)
3. Perform roll-out test (most accurate)
1. Chart: Use the chart to find the circumference for your tire
size, and enter this value in the computer (see “Programming
Wheel Size”). The chart lists circumferences for some of
the most popular tire sizes currently in use. These numbers
are only estimates which may not precisely match the
circumference of your wheel, due to variations in tire size
between brands and models.
2. Measure: Measure your wheel diameter (including wheel
and tire) in millimeters (1 inch = 25.4mm) and multiply by
3.1416. Enter this value in the computer (see “Programming
Wheel Size”).
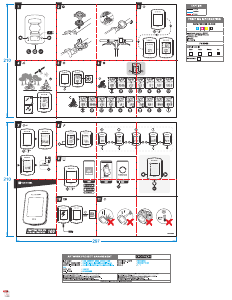
3. Roll-out Test: See Figure 1.
STEP 1: Stand your bicycle upright. With your tire inflated to
its proper pressure, rotate your front wheel so that the valve is
located at the bottom (6 o’clock position). Make a mark on the
ground to indicate the valve location.
STEP 2: Roll the bicycle forward in a straight line for one
complete wheel revolution, until the valve is again at the
bottom (ideally, you should be on the bike). Make a mark on
the ground to indicate the valve location.
STEP 3: Measure the distance between the marks in
millimeters (1 inch = 25.4mm). This value is your wheel
circumference. Enter this value in the computer (see
“Programming Wheel Size”)
PROGRAMMING WHEEL SIZE & SELECTING
MILES OR KILOMETERS
After determining wheel size by one of the three methods
above, enter the value in the computer.
STEP 1: Press the MODE button to advance to the Odometer
(TOTALODO) display screen. Press and hold the SET button
for 2 seconds to enter the wheel size setting screen.
STEP 2: “KM/H” or “M/H” will flash. Press the SET button to
select the desired speed scale (mph or kmh) and then press
the MODE button to set your choice and advance to the wheel
size setting.
STEP 3: The digit on the left side of the screen will flash. Press
the SET button to adjust the value. Press the MODE button to
set the value and advance to the next flashing digit.
STEP 4: Repeat this sequence until all digits have been set to
the appropriate value.
STEP 5: Press and hold the MODE button to set the wheel size
in memory and return to the Odometer display screen.
STEP 6: To program a second wheel size (if you plan to use
the Delta hr on two bikes with different wheel sizes), depress
the blue button on the back of the computer to activate the
second wheel size. Then follow steps 1 through 5 above, to
program the wheel size.
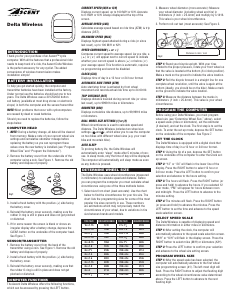
INSTALLATION
Wireless transmission makes installation simple. Begin by
attaching the computer bracket to the handlebar.
STEP 1: Use the included zip-ties and shim pad (if necessary)
to attach the bracket to the handlebar as shown in Figure 2.
Tighten the zip-ties securely and trim off any excess length.
STEP 2: Attach the
computer head to the
bracket. Press the
computer head into
the bracket and rotate
it clockwise to lock in
place. See Figure 3. You
should hear a “CLICK”
when the computer is
locked in place.
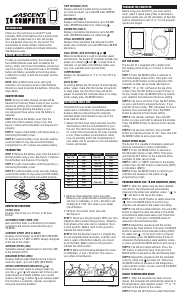
STEP 3: Using the included zip-ties, loosely mount the sensor (so
that you can slide it around) to the fork blade on the same side
of the bike as the handlebar
bracket. See Figure 4. The
Delta hr transmission range
is 24” (60cm). The sensor
must be mounted within 24” of
the computer in order for the
computer to receive the signal.
We recommend mounting the
sensor to the front (leading)
edge of the fork blade to avoid
problems should the sensor
ever come into contact with
the spokes.
1x
Tire Size Circ.(mm) Tire Size Circ.(mm) Tire Size Circ.(mm)
26x1.5 2030 700x20 2095 700x28 2135
26x1.75 2045 700x23 2110 700x32 2155
26x2.0 2115 700x25 2125 27x11/4 2155
KM/H
TOTALODO
Fig 2
KM/H
SCANATMPM
KM/H
SCAN
ATMPM
Fig 3
Max 24"
Computer
Fig 4
Fig 1
06AscentDeltahr_INS.indd 1 8/22/06 3:24:02 PM

Praat mee over dit product
Laat hier weten wat jij vindt van de Ascent Delta HR Fietscomputer. Als je een vraag hebt, lees dan eerst zorgvuldig de handleiding door. Een handleiding aanvragen kan via ons contactformulier.