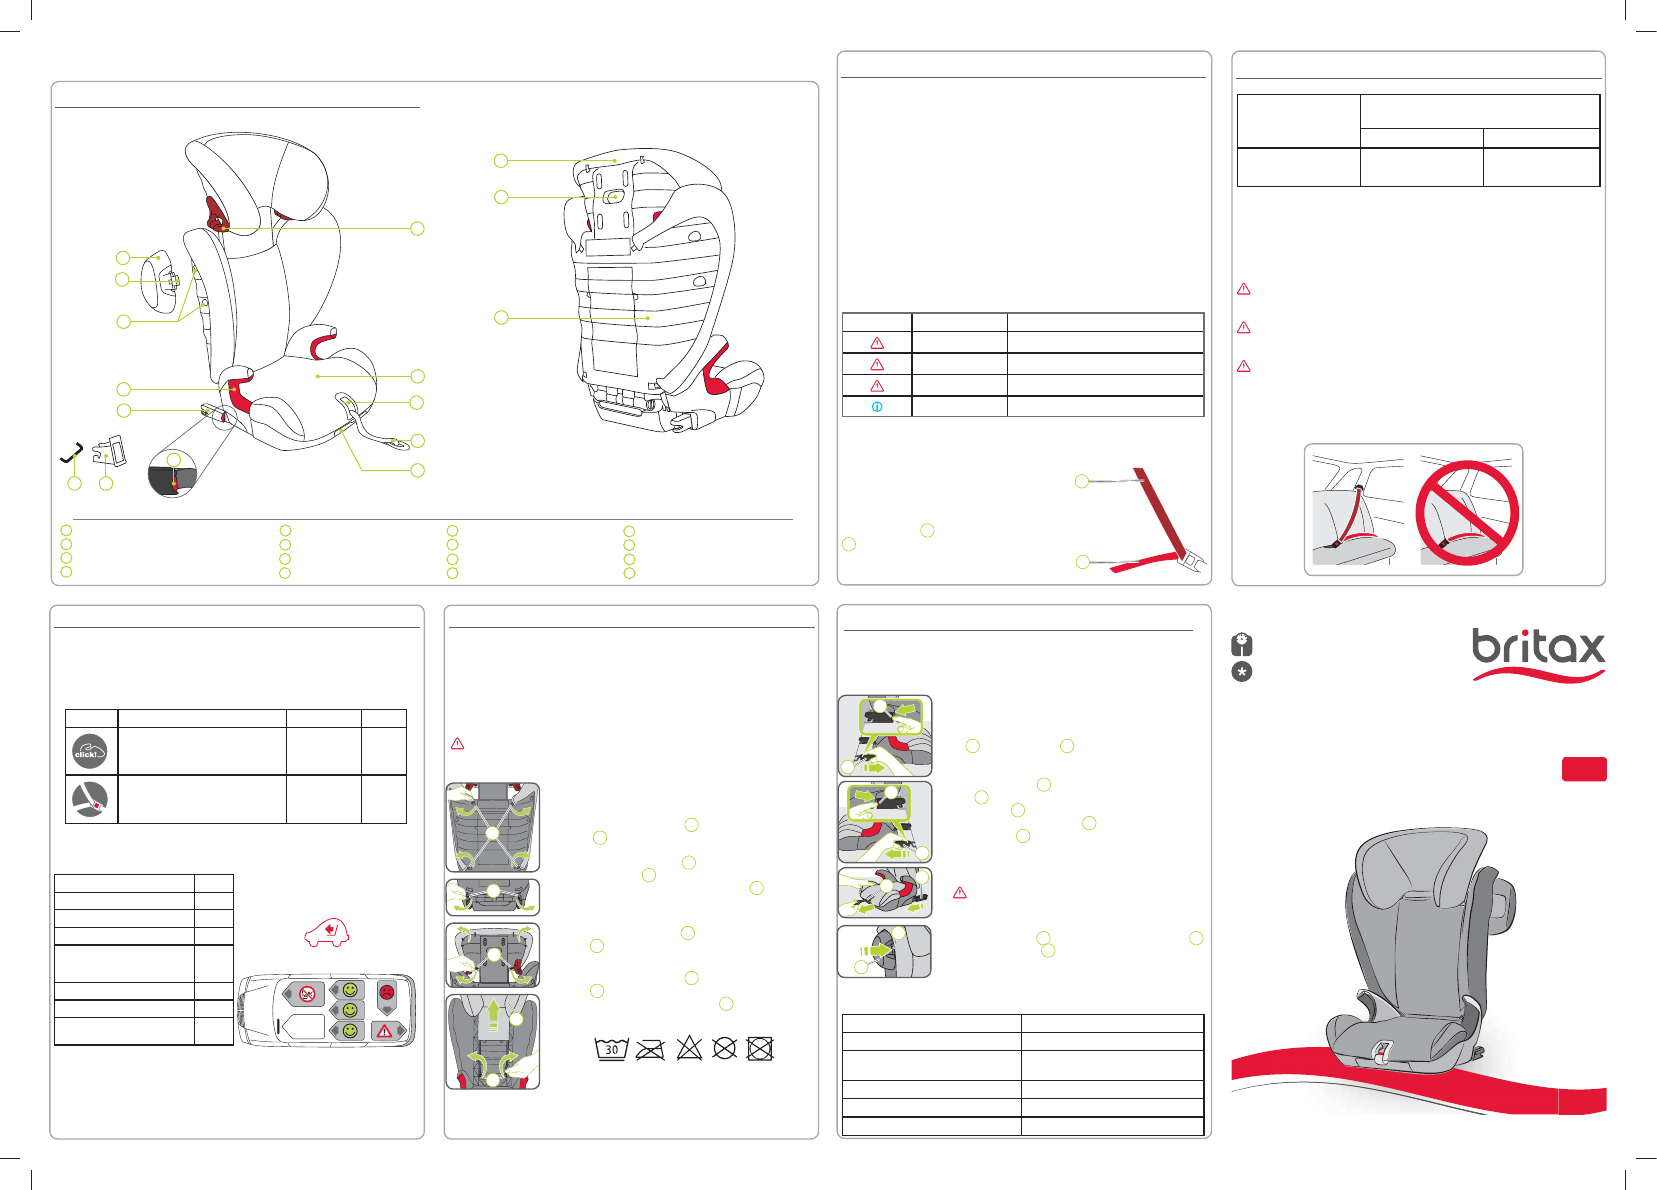
Handleiding Britax Kidfix SL Autostoeltje
Handleiding voor je Britax Kidfix SL Autostoeltje nodig? Hieronder kun je de handleiding gratis bekijken en downloaden als PDF in het Nederlands en/of Engels. Dit product heeft 6 veelgestelde vragen, 0 comments en heeft 0 stemmen. Is dit niet de handleiding die je zoekt, neem dan contact met ons op.
Is je product kapot en biedt de handleiding geen oplossing meer? Dan kun je voor reparatie gratis terecht bij Repair Café.
Handleiding
Loading…

Loading…
Meer over deze handleiding
We begrijpen dat het prettig is om een papieren handleiding te hebben voor je Britax Kidfix SL Autostoeltje. Je kunt de handleiding bij ons altijd downloaden en daarna zelf printen. Indien je graag een originele handleiding wilt hebben, raden we je aan contact op te nemen met Britax. Zij kunnen wellicht nog voorzien in een originele handleiding. Zoek je de handleiding van Britax Kidfix SL Autostoeltje in een andere taal? Kies op de homepage je taal naar keuze en zoek daarna op het modelnummer om te zien of we deze beschikbaar hebben.
Specificaties
| Merk | Britax |
| Model | Kidfix SL |
| Categorie | Autostoeltjes |
| Bestandstype | |
| Bestandsgrootte | 0.46 MB |
Alle handleidingen voor Britax Autostoeltjes
Meer handleidingen voor Autostoeltjes
Veelgestelde vragen over Britax Kidfix SL Autostoeltje
Ons supportteam zoekt dagelijks naar nuttige productinformatie en antwoorden op veelgestelde vragen. Als er onverhoopt toch een onjuistheid tussen onze veelgestelde vragen staat, laat het ons dan weten via het contactformulier.
Kunnen Isofix autostoeltjes in auto’s zonder Isofix geplaatst worden? Geverifieerd
De meeste op de markt verkrijgbare Isofix autostoeltjes hebben naast een voertuigspecifieke goedkeuring ook een universele goedkeuring voor bevestiging met autogordels. Hiermee is het mogelijk het zitje met gordels te bevestigen in de auto. Raadpleeg hiervoor de handleiding van het autostoeltje. Er zijn echter ook autostoeltjes met Isofix die niet met de autogordels vastgezet kunnen of mogen worden.
Ik vind dit nuttig (809) Lees meerWat is de veiligste plek om het autostoeltje te plaatsen? Geverifieerd
Dit hangt voor een deel af van de auto, maar over het algemeen is het midden van de achterbank de veiligste plek om een autostoeltje te plaatsen. Zo is het kind zo ver mogelijk van alle kanten af en dus het best beschermd in het geval van een ongeluk. Dit geldt echter als er een volledige 3-punts gordel beschikbaar is. Als er midden achter alleen een oudere 2-punts gordel is dan is het veiliger om de plaatsen aan het raam te gebruiken.
Ik vind dit nuttig (693) Lees meerKan ik het autostoeltje ook in het vliegtuig gebruiken? Geverifieerd
Er zijn geen internationale regels met betrekking tot het gebruik van autostoeltjes in het vliegtuig. Afhankelijk van het model kan een autostoeltje hier wel geschikt voor zijn. Of het is toegestaan hangt af van de luchtvaartmaatschappij. Neem altijd van tevoren contact op met de luchtvaartmaatschappij om dit te verifiëren.
Ik vind dit nuttig (254) Lees meerKunnen Isofix autostoeltjes in alle auto’s met Isofix geplaatst worden? Geverifieerd
Nee, er zijn universele Isofix autostoeltjes en niet-universele Isofix aurostoeltjes. Een niet-universeel Isofix-zitje mag alleen gebruikt worden in de daarvoor bestemde auto's. Bij het zitje is een typelijst meegeleverd waarop de typen auto's staan vermeld waarin het zitje gebruikt kan worden. Een universeel stoeltje mag alleen gebruikt worden in een auto die voorzien is van Isofix en een Top Tether bevestigingspunt.
Ik vind dit nuttig (229) Lees meerHoe lang mag mijn kind in een autostoeltje zitten? Geverifieerd
Laat je kindje maximaal 1,5 tot 2 uur per dag in het autostoeltje zitten. Op veel moderne kinderwagens is het mogelijk het autostoeltje te plaatsen, zodat je je kindje snel en makkelijk kunt vervoeren. Houd ook in dat geval maximaal 1,5 tot 2 uur in totaal per dag aan.
Ik vind dit nuttig (201) Lees meerWat is Isofix? Geverifieerd
Isofix is een internationaal gestandaardiseerd systeem voor de bevestiging van autostoeltjes in auto's. In de auto bevinden zich de Isofix bevestigingsbeugels. De beugels bevinden zich tussen de rugleuning en het zitvlak van de achterbank en zijn verbonden met de carrosserie van de auto. Het Isofix-zitje zelf is voorzien van grijphaken die eenvoudig vastgeklikt worden in de Isofix bevestigingsbeugels.
Ik vind dit nuttig (201) Lees meerBeoordeling
Laat ons weten wat je van de Britax Kidfix SL Autostoeltje vindt door een beoordeling achter te laten. Wil je je ervaringen met dit product delen of een vraag stellen? Laat dan een bericht achter onderaan de pagina.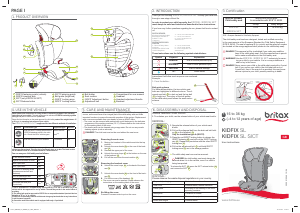

Praat mee over dit product
Laat hier weten wat jij vindt van de Britax Kidfix SL Autostoeltje. Als je een vraag hebt, lees dan eerst zorgvuldig de handleiding door. Een handleiding aanvragen kan via ons contactformulier.