Handleiding Cat Mate 359W Timer Control Kattenluik

Handleiding voor je Cat Mate 359W Timer Control Kattenluik nodig? Hieronder kun je de handleiding gratis bekijken en downloaden als PDF in het Nederlands en/of Engels. Dit product heeft 1 veelgestelde vraag, 2 comments en heeft 1 stem met een gemiddelde score van 0/100. Is dit niet de handleiding die je zoekt, neem dan contact met ons op.

Is je product kapot en biedt de handleiding geen oplossing meer? Dan kun je voor reparatie gratis terecht bij Repair Café.

Handleiding

Loading…

4 5
1. Introduction
Thank you for choosing the Cat Mate Timer Control Cat Flap.
WE RECOMMEND THAT YOU CAREFULLY READ THESE INSTRUCTIONS TO
BECOME FAMILIAR WITH THE CAT FLAP BEFORE YOU INSTALL IT.
The Cat Mate Timer Control Cat Flap allows you to choose the times you do not
wish your cat(s) to go out through the flap to avoid high risk periods, e.g. high traffic,
night time, etc. A secure rotary 5 way lock allows you complete control of your cat’s
movement through the flap.
2. Fitting Instructions
Wood / Plastic / Metal Door Panels
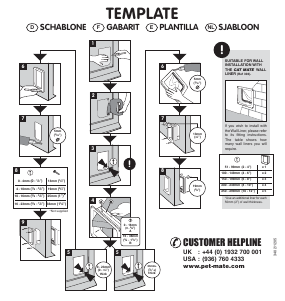
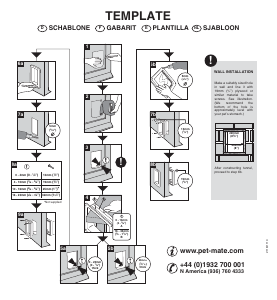
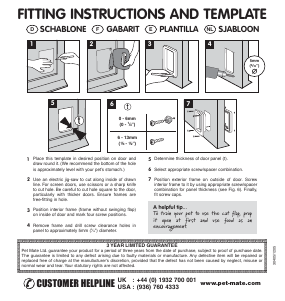
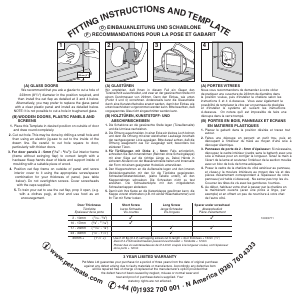
2.1 Place the exterior frame in desired position on panel and draw round the
outside of the tunnel section as shown in Fig. 3. We recommend the bottom of
the hole is approximately level with your pet's stomach.
2.2 Use an electric jigsaw to cut 2mm (
1
/
16
”) outside of drawn line. Be careful to
cut hole square to the door, particularly with thicker doors. Ensure frames are
free-fitting in hole.
2.3 Determine thickness of door panel.
2.4 For door panels 0 - 20mm (
3
/
4
”) thick:
2.4.1 Position exterior frame on outside of door and mark four hole positions
(Fig. 4).
2.4.2 Remove frame and carefully drill screw clearance holes square to panel
at 6mm (
1
/
4
”) diameter (Fig. 5).
2.4.3 For panels less than 18mm (
3
/
4
”) thick, cut excess tunnel from exterior
frame as shown in Fig. 6 with a hacksaw or plastic cutting disc.
2.4.4 Fit seal to exterior frame. Position exterior frame on outside of door.
Screw interior frame to it by using 32mm (1
1
/
4
”) screws for panels from
6 - 20mm (
1
/
4
” -
3
/
4
”) thick. For panels less than 6mm (
1
/
4
”) thick use 19mm
(
3
/
4
”) screws. Finally, fit screw caps (Fig. 7).
2.5 For door panels 20mm (
3
/
4
”) + thick:
2.5.1 Carefully drill out four holes in interior frame to allow close clearance on
screws (recommended drill 5mm (
3
/
16
”) diameter) as shown in Fig. 8.
2.5.2 Fit seal to exterior frame. Screw exterior frame on outside of door using
13mm (
1
/
2
”) screws.
2.5.3 Screw interior frame to inside of door using 19mm (
3
/
4
”) screws. Finally, fit
screw caps.
Walls / Glass Panels
You will require an adapter kit available from your cat flap supplier or direct from
Pet Mate (Product Ref. 361) to enable easy installation.
3. Fitting the batteries
3.1 Remove the battery cover by pushing up the retaining clip and pulling out
(Fig. 9).
3.2 Insert 2 x AA batteries using the orientation symbols marked on the inside of the
battery compartment. Replace the battery cover.
3.3 The cat flap will self test for approximately 10 seconds after which the clock will
show 0:00.
Good quality alkaline batteries should normally last approximately 24 months
(dependent on use). You may use all popular batteries including 1.5v lithium
batteries but the low battery indicator will only work correctly with standard
alkaline batteries.
4. Setting the clock
4.1 Press and hold the SET and ADJ buttons for 5 seconds until the hour figure on
the clock starts to flash.
NOTE: Hours are always displayed in a 24 hour clock format.
4.2 Press the ADJ button to adjust clock to the correct hour. Hold down the ADJ
button for longer than 3 seconds to scroll through.
4.3 Press the SET button and the minute figure will flash. Adjust the minutes using
the ADJ button, then press SET to save the setting. Do not press any buttons
for 30 seconds, the display will then show current time.
5. Setting the Timer Control
NOTE: Setting procedure will time out if no button is pressed for 30 seconds.
5.1 Set 5 way lock to position E , Fig. 2.
5.2 Press and hold the SET and ADJ buttons for 5 seconds until the hour figure on
the clock starts to flash.
5.3 Press the SET button three times. Segment 3 , Fig. 1 will flash.
5.4 To select a time period for the timed lock to be operative (e.g. 8am - 10am, as
Fig. 1) repeatedly press the ADJ button until the flashing segment ( 3 , Fig.1)
reaches the start of the desired period(s). (In this example indicated by flashing
of segment of 8 - 9.)
5.5 Press SET so that the OUT arrow ( 5 , Fig. 1) disappears.
5.6 Press ADJ and the next segment will then flash. (In this example you would
again press SET.) In this manner you may program multiple time periods if
required.
5.7 To DESELECT a time segment in which the timed lock is operative, press the
ADJ button repeatedly until the flashing segment is positioned at the relevant
segment. Then press SET.
When you have programmed all the time segments you require, do not press any
buttons for 30 seconds.
NOTE: When the timer lock is operative the current time segment will flash.
Download de handleiding in het Nederlands en/of Engels (PDF, 0.41 MB)
(Denk aan het milieu en print deze handleiding alleen als dat echt noodzakelijk is)

Loading…

Beoordeling

Laat ons weten wat je van de Cat Mate 359W Timer Control Kattenluik vindt door een beoordeling achter te laten. Wil je je ervaringen met dit product delen of een vraag stellen? Laat dan een bericht achter onderaan de pagina.
Bent u tevreden over de Cat Mate 359W Timer Control Kattenluik?
Ja Nee
0%
100%
1 stem

Praat mee over dit product

Laat hier weten wat jij vindt van de Cat Mate 359W Timer Control Kattenluik. Als je een vraag hebt, lees dan eerst zorgvuldig de handleiding door. Een handleiding aanvragen kan via ons contactformulier.

Rebecca Kretschmer 20-09-2019
Is het mogelijk om het kattenluik zo te verstellen dat de dieren er maar een bepaalde tijd in en uit kunnen? Ik wil de klep aan mijn konijnenverblijf bevestigen zodat de konijnen overdag vrij in de tuin kunnen bewegen - als ik 's ochtends ga, kan ik ze niet naar buiten laten omdat het nog donker is en er op dat moment nog marters zijn. 's Avonds kan ik haar zelf opsluiten. Maar niemand mag 's ochtends gebeuren.

beantwoord | Ik vind dit nuttig (0) (Vertaald door Google)
Deodat Lawson 10-11-2019
Hoe verander ik de tijd erop? het is een uur snel.

beantwoord | Ik vind dit nuttig (0) (Vertaald door Google)

Meer over deze handleiding

We begrijpen dat het prettig is om een papieren handleiding te hebben voor je Cat Mate 359W Timer Control Kattenluik. Je kunt de handleiding bij ons altijd downloaden en daarna zelf printen. Indien je graag een originele handleiding wilt hebben, raden we je aan contact op te nemen met Cat Mate. Zij kunnen wellicht nog voorzien in een originele handleiding. Zoek je de handleiding van Cat Mate 359W Timer Control Kattenluik in een andere taal? Kies op de homepage je taal naar keuze en zoek daarna op het modelnummer om te zien of we deze beschikbaar hebben.

Specificaties

Merk Cat Mate
Model 359W Timer Control
Categorie Kattenluiken
Bestandstype PDF
Bestandsgrootte 0.41 MB

Alle handleidingen voor Cat Mate Kattenluiken
Meer handleidingen voor Kattenluiken

Veelgestelde vragen over Cat Mate 359W Timer Control Kattenluik

Ons supportteam zoekt dagelijks naar nuttige productinformatie en antwoorden op veelgestelde vragen. Als er onverhoopt toch een onjuistheid tussen onze veelgestelde vragen staat, laat het ons dan weten via het contactformulier.

Er is een batterij in mijn apparaat gaan oxideren, kan ik het nog veilig gebruiken? Geverifieerd

Ja, het apparaat kan nog veilig gebruikt worden. Verwijder eerst de geoxideerde batterij. Doet dit niet met blote handen. Reinig daarna het batterijcompartiment met een wattenstaafje gedipt in azijn of citroensap. Laat het drogen en doe nieuwe batterijen in het apparaat.

Ik vind dit nuttig (155) Lees meer
Handleiding Cat Mate 359W Timer Control Kattenluik

Gerelateerde producten

Gerelateerde categorieën