
For Information Call (800) 333-2124 or Visit Our Website at http://www.chef-master.com
Fig. 5
Important Directions:
HELPFUL HINTS
1. To get the best results, cool the dispenser by
running cold water on the unit or refrigerate.
2. Only use soluble ingredients. For sweetening, it is
best to use sugar syrup or liquid sweeteners.
Granulated sugar or salt should first be dissolved
in cool water or cream. Use powdered or liquid
spices only. Insoluble substances such as seeds,
pulp, etc. prevent the closure of the dispensing
piston or might impair the proper function of the
dispenser. If you use blended mixtures, use a fine
strainer to remove seeds or pulp.
3. The Chef·Master Whipped Cream Dispenser is
well suited for the preparation of cold mousse,
sauces or Espuma (foam). The operating
temperature range must be from 3°C/37°F to
50°C/122°F. Do not exceed these temperatures.
4. Excessive shaking may stiffen pure cream to a
degree that it loses its soft texture, Do not over-
shake. Do not shake every time before dispens-
ing. For recipes consisting of mixtures of cream
and other liquids, the dispenser needs to be
shaken more times and more frequently.
5. When dispensing, always hold the unit upside
down with the decorator nozzle pointing vertically
downward otherwise gas may escape and the
complete emptying of all ingredients from the
dispenser may not be possible.
6. For best results, serve immediately upon
dispensing.
7. The dispenser is fabricated to make cleaning easy.
Do not use any sharp objects or abrasive material
on the unit
8. Do not expose your Chef·Master Whipped Cream
Dispenser to heat or direct sunlight.
9. With the exception of the charger holder, decora-
tor nozzle and head gasket do not dismantle any
other parts of the head for normal cleaning
10. For spare parts, please contact Chef·Master
directly. For repairs, always return the entire unit,
(head plus dispenser).
11. Attach only Chef·Master dispenser heads to
Chef·Master Whipped Cream Dispenser. Never
combine third party components with Chef·Master
components
TROUBLESHOOTING:
Q. After installation, the charger is not pierced.
A. An unsuitable charger has been used or charger
was inserted incorrectly. Use only disposable
Chef·Master cream chargers and place in the
charger holder as shown in Fig. 1
Q. You have not pressed the lever, but nevertheless,
cream flows thru the nozzle and can’t be stopped:
A. Additives such as powdered sugar, cream
stiffener, etc. have not been completely dissolved,
blocking the piston. Use only ingredients that
dissolve completely. Stir well before pouring into
the dispenser. Turn the dispenser into upright
position (nozzle up). Cover nozzle well with heavy
towel and carefully press lever to release the gas
until hissing sound stops. Unscrew head and
clean the dispensing piston, strain contents and
refill the unit.
OR
The dispenser piston is damaged. Contact the
Chef·Master Service center.
Q. When the charger is being screwed in, gas
escapes between the bottle and the head:
A. Head gasket is missing. Insert head gasket in the
head.
OR
The head gasket is damaged. Insert a new gasket.
OR
Head is not screwed on firmly enough. Screw
head onto unit firmly in accordance with the
operation instructions.
OR
The upper edge of the bottle is damaged. Contact
the Chef·Master service center.
Q. The cream is still liquid after preparations:
A. The dispenser was not shaken firmly or often
enough. Shake again firmly.
OR
The dispenser was not turned upside down when
pressing the dispensing button. Always turn the
unit upside down before pressing the dispensing
lever ,(decorator nozzle pointing vertically
downward).
Q. The cream is too firm and “spits” sideways from
the nozzle
A. The dispenser has been shaken too much. Do not
over shake and do not shake before each dispens-
ing.
Do not attempt to modify the units. If you cannot
solve a problem with the help of these instructions,
please contact the Chef·Master Service center.
CLEANING:
Your Chef·Master Whipped Cream Dispenser
consists of few components that are easy to clean.
Before opening the unit, empty it completely by
pressing the lever until no cream or gas is discharged
through the nozzle. An insignificant amount of cream
may remain in the bottle.
Follow these steps to clean your Chef·Master Whipped
Cream Dispenser after confirming no gas remains in
the unit.
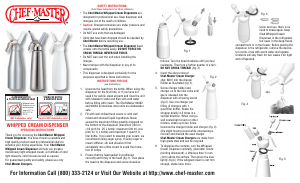
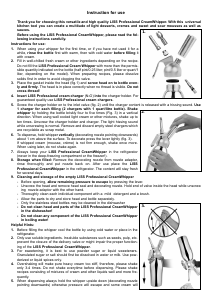
1. Unscrew the head then remove the head gasket
and the decorating nozzle. Hold end of the piston
inside the head while unscrewing the nozzle
adapter with the other hand.
2. Thoroughly clean each individual component with
a mild detergent and a soft brush.
3. Allow the parts to dry before reassembling.
4. When cleaning, only remove parts as shown in
fig. 5.
5. Do not use any sharp objects or abrasive materi-
als when cleaning the dispenser.
6. Only stainless steel parts of the dispenser are
dishwasher safe. All plastic parts must be washed
and dried by hand.
WARRANTY:
The Chef·Master stainless steel Whipped Cream
Dispensers, Model numbers 90062 and 90063, have a
lifetime limited warranty to be free from defects in
material and workmanship. All other Chef-Master
whipped cream dispensers come with a two year
warranty from date of purchase. This warranty does
not cover tips, adapter, washers, charger holder or any
consequential damage or any malfunction caused by
improper use or normal wear and tear. This limited
warranty is only valid when using original Chef·Master
components and chargers. We will not satisfy any
express warranty or liability claims for malfunction,
damage and consequential damage resulting from any
failure of complying with this manual and the safety
instructions contained within.
No returns will be accepted by ChefMaster without a
Return Authorization Number (RA#). To obtain RA #,
contact Chef·Master customer service at 1-800-333-
2124. Ext. 112.
For further information or any questions, contact
Chef·Master at www.Chef-Master.com or Chef·Master
ph. 1-800-333-2124 ext. 112
Chef-Master. A division of ©Mr. Bar-B-Q, Inc.
445 Winding Rd, Old Bethpage, NY 11804-1311
All rights reserved.

Praat mee over dit product
Laat hier weten wat jij vindt van de Chef-Master Slagroomspuit. Als je een vraag hebt, lees dan eerst zorgvuldig de handleiding door. Een handleiding aanvragen kan via ons contactformulier.