
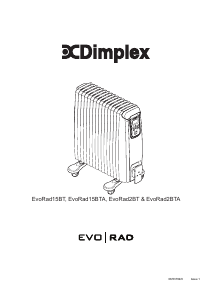
Dimplex Model: EvoRad15BT(A), EvoRad2BT(A),
Model Description Watts
EvoRad15BT(A), 1.5kW Oil free radiator with Electronic Thermostat 1500
EvoRad2BT(A), 2.0kW Oil free radiator with Electronic Thermostat 2000
IMPORTANT SAFETY ADVICE
WARNING: This appliance must not be used in
a bathroom.
WARNING: Do not use this heater in the
immediate surroundings of a bath, a shower or
a swimming pool.
WARNING: This heater must not be located
immediately below a xed socket outlet.
The heater carries a warning symbol to alert
the user to the risk of re that exists if the
heater is accidentally covered.
This appliance can be used by children aged from
8 years and above and persons with reduced
physical, sensory or mental capabilities or lack of
experience or knowledge if they have been given
supervision or instruction concerning the use of
the appliance in a safe way and understand the
hazards involved. Children shall not play with the
appliance. Cleaning and user maintenance shall
not be made by children without supervision.
Children of less than 3 years should be kept
away unless continuously supervised. Children
aged from 3 years and less than 8 years shall
only switch on/off the appliance provided that
it has been placed or installed in its intended
normal operating position and they have been
given supervision or instruction concerning
the use of the appliance in a safe way and
understand the hazards involved. Children aged
from 3 years and less than 8 years shall not plug
in, regulate and clean the appliance or perform
user maintenance.
CAUTION: Some parts of this product can
become very hot and cause burns. Particular
attention has to be given where children and
vulnerable people are present.
WARNING: Do not use the heater in small rooms
when they are occupied by persons who are not
capable of leaving the room on their own, unless
constant supervision is provided.
WARNING: To reduce the risk of fire, keep
textiles, curtains or any other ammable material
a minimum distance of 1m from the air outlet.
Do not use the heater if it has been dropped.
Do not use the heater if there are any visible
signs of damage.
If the mains lead is damaged, it must be replaced
by the manufacturer or its service agent or a
similarly qualied person in order to avoid a
hazard.
The heater should only be used on a horizontal
and stable surface with the feet securely tted
Electrical
WARNING – THIS APPLIANCE MUST BE EARTHED
If the socket outlets in your home are not of the 13 amp BS1363 type
they will not accept the plug connected to this heater, therefore cut off the
plug. When cut off this plug can constitute a shock hazard if inserted into
a socket outlet. It must therefore be disposed of safely.
Before wiring the appropriate plug please note that the wires in this mains
lead are coloured in accordance with the following code:
GREEN/YELLOW: EARTH
BLUE: NEUTRAL
BROWN: LIVE
Connect the Green/Yellow wire to the terminal marked E or the earth
symbol or coloured Green or Green/Yellow.
Connect the Brown wire to the terminal marked L or coloured Red.
Connect the Blue wire to the terminal marked N or coloured Black. DO
NOT connect the Brown (Live) or the Blue (Neutral) wires to the Earth
terminal of your 13 amp plug. If the terminals of the plug are unmarked
or you are in any doubt, consult a qualied electrician.
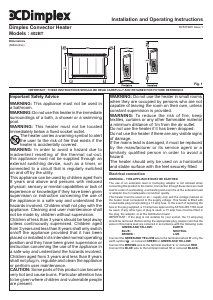
Positioning the Heater
Select the position for the heater ensuring there is clearance from any
furniture and ttings of at least 300mm above the heater and 150mm
each side. The heater should only be operated on a at stable surface.
Operational modes
The electronic control has four control modes: AUTO, MANUAL, BOOST
and STANDBY mode (see Fig. 3)
In both MANUAL and AUTO mode there are three heat settings options
(see Fig. 4):
‘Intelligent’ Eco Mode - The product will automatically regulate the room
temperature accordingly. In this mode the product operates at full power,
however the output of the product is automatically reduced and regulated as
the room temperature approaches the desired level. This mode optimises
energy use by calculating the most efcient and effective way to achieve
the desired temperature setting. The desired room temperature can be
adjusted at any time during operation by pressing the appropriate key.
Low Heat - In this option, the appliance will operate at a low heat setting,
the appliance will automatically cycle at this setting to maintain the room
temperature setting.
High Heat - In this option, the appliance will operate at a high heat setting,
the appliance will automatically cycle at this setting to maintain the room
temperature setting.
Press the Mode key,‘ ’, to toggle through the modes and the ENTER
key to conrm the mode selection. Note: when selecting the mode if the
ENTER key is not pressed, after 5 seconds the heater will activate the
mode shown on the LCD display.
Initial Operation
When the heater is initially connected to the mains the heater will power
up in MANUAL mode with a set temperature of 30˚C. The Mains and
Heat indication neon will be lit and the LCD display will be as per Fig.5.
For subsequent operations the unit will power up in its previous state, i.e.
if it was in the boost mode when the unit was plugged out when power is
reinstated it will resume in boost mode.
Setting the Time
To set the time press and hold ‘ ’ for two seconds, the time digits will begin
ashing (see Fig. 6). Press the ‘ ’ or ‘ ’ buttons to set the time and press
ENTER to conrm. The heater will revert to the previous operational mode.
Standby Mode
With the heater ON, if the button is pressed, the heater will go into
standby mode; the heater switches off, the LCD will display the current
set time, only the mains neon remains illuminated. On pressing the
button again the heater will come on in Manual mode and with a set point
setting of 25 ˚C.
Manual Operation
Repeatedly press the ‘ ’ button until the manual mode is visible on the
LCD and conrm the mode selection by pressing ENTER. Use the arrow
keys to select the desired heat setting (see Operational modes for heat
setting details) and conrm the selection by pressing the ENTER key. The
desired temperature can be adjusted at any point during the Manual mode
operation, see Setting the Desired temperature.
THESE INSTRUCTIONS SHOULD BE READ CAREFULLY AND RETAINED FOR FUTURE REFERENCE


Praat mee over dit product
Laat hier weten wat jij vindt van de Dimplex EVORAD2BTA Kachel. Als je een vraag hebt, lees dan eerst zorgvuldig de handleiding door. Een handleiding aanvragen kan via ons contactformulier.