• For competition among RC BEYBLADE tops, the other RC BEYBLADE tops (sold separately) must have frequencies other than 49 Mhz
• Before assembly and playing, please read instructions. Please keep these instructions for future reference.
• Discard plastic bags immediately.
BEYBLADE tops/BEYSTADIUM are intended to be used on the floor. Do not lean over the stadium
when BEYBLADE tops are in play. BEYBLADE tops may bounce up and hit eye or face.
WARNING: Do not use BEYBLADE tops or BEYSTADIUM
on tables or other elevated surfaces.
™
AGE 8+
82671/82731 Asst.
HIGH PERFORMANCE TOPS
Les toupies et les arènes BEYBLADE doivent être utilisées sur le sol. Ne te penche pas au-dessus de l’arène pendant que
les toupies y tournoient, car celles-ci peuvent rebondir hors de l’arène et causer des blessures aux yeux ou au visage.
MISE EN GARDE: Ne te sers pas des toupies ou des arènes
BEYBLADE sur une table ou toute autre surface surélevée.
™
ÂGE 8+
82671/82731 Asst.
TOUPIES À HAUTE PERFORMANCE
Los trompos y los estadios BEYBLADE deben usarse en el suelo. No te inclines sobre el estadio
mientras los trompos están girando, ya que pueden rebotar y causar lesiones a los ojos y la cara.
CUIDADO:
No uses los trompos o los estadios BEYBLADE
sobre una mesa o sobre cualquier otra superficie elevada.
™
EDAD 8+
82671/82731 Asst.
TROMPOS DE ALTO NIVEL
BEYSTADIUM sold separately.
Requires 4 x 1.5V “AA” or R6 size batteries (not included). Alkaline batteries recommended.
Phillips/cross head screwdriver (not included) needed to insert batteries. See instructions.
Includes radio control launcher, radio control BEYBLADE top, ripcord, Bit Chip, and label sheet.
Requiert 4 piles AA ou R6 de 1,5 V, non comprises, à installer à l’aide d’un tournevis cruciforme (non
inclus). Piles alcalines de préférence. Comprend un propulseur à radiocommande, une toupie BEYBLADE
radiocommandée, une tige cannelée, un capuchon et un feuillet d’autocollants.
Requiere 4 pilas AA o R6 de 1,5 V, no incluidas. Se recomiendan pilas alcalinas. Se necesita un destornillador
en cruz (no incluido) para colocar las pilas. Tensión: 1,5 V x 4. Consumo: 0,33 A. Incluye un propulsor a
control remoto, un trompo BEYBLADE radiodirigido, una varilla dentada, una tapita e una hoja de etiquetas.
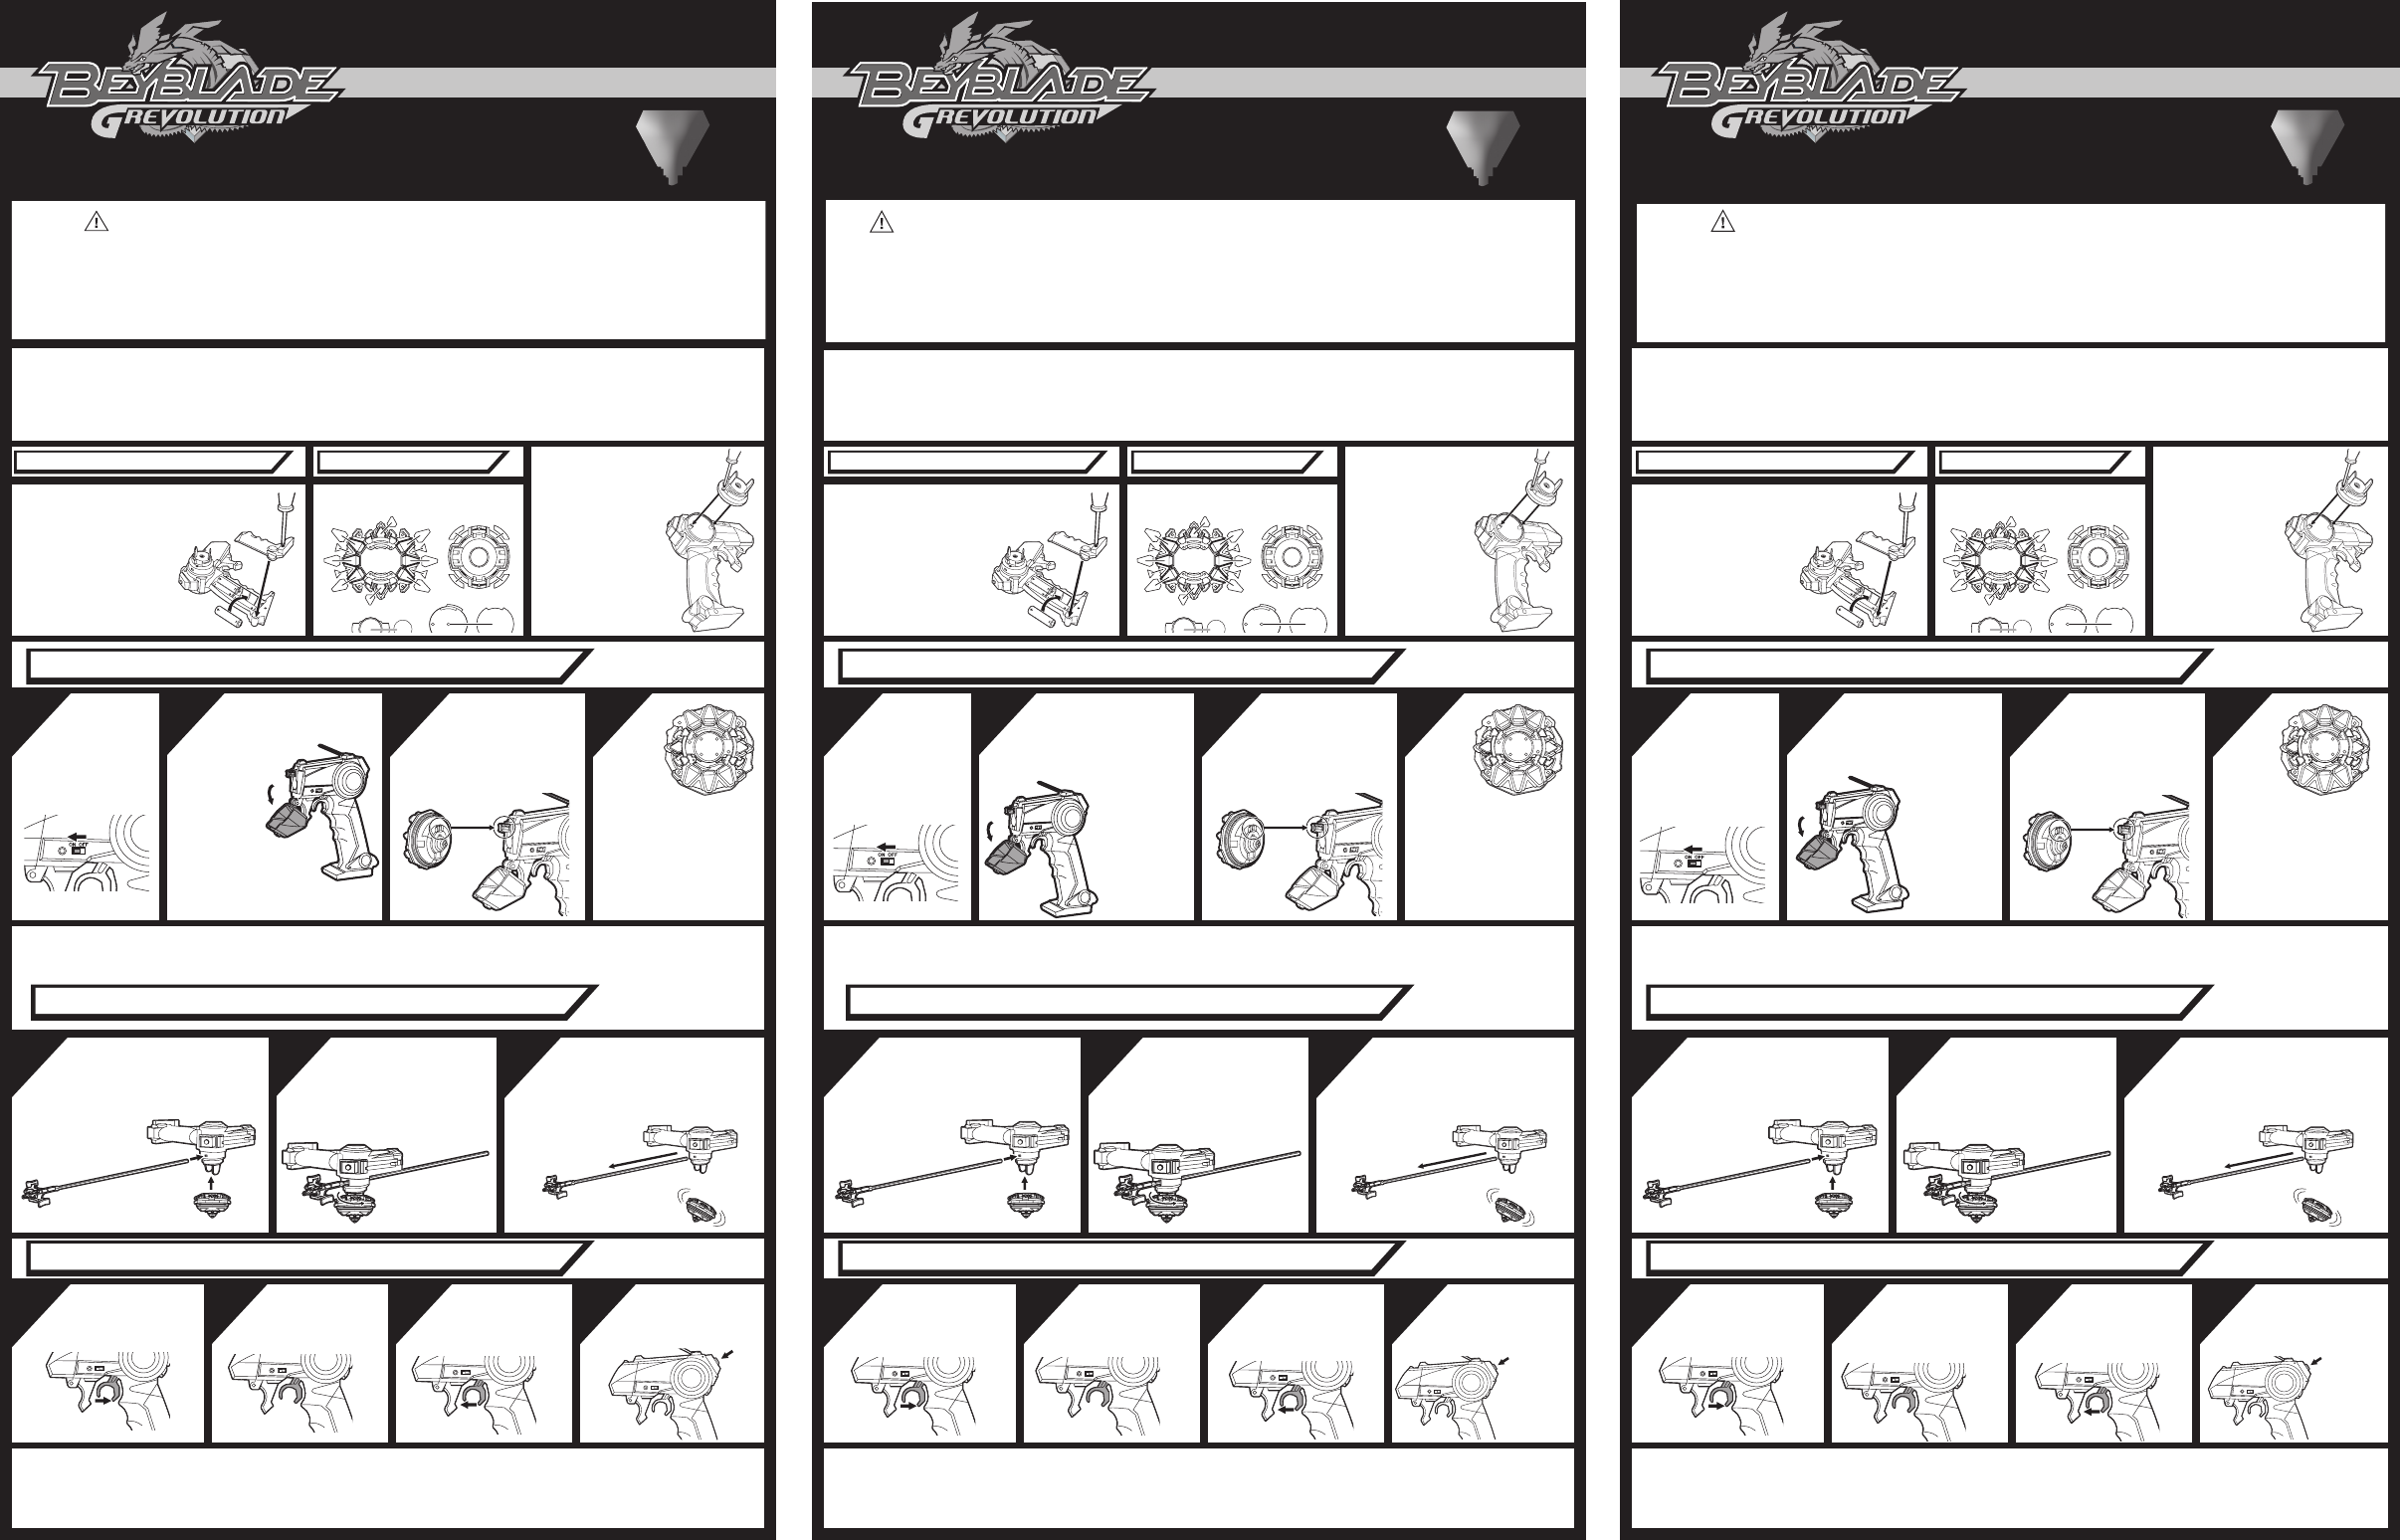
Slide the ripcord through
the launcher and attach the
radio control top.
™
™
™
Draciel G
TM
®
*
Draciel G
TM
®
*
Draciel G
TM
®
*
Endurance Type
Endurance Type
Type endurance
Type endurance
Tipo resistencia
Tipo resistencia
ELECTRONIC
49 Mhz
ÉLECTRONIQUE
ELECTRÓNICO
ENGINE GEAR RC Power Launcher with Radio Control Top
ENGINE GEAR™* SUPER-SPEED SYSTEM SYSTÈME MAXIVITESSE ENGINE GEAR™* SISTEMA MAXIVELOCIDAD ENGINE GEAR™*
Propulseur ENGINE GEAR avec toupie radiocommandée Propulsor ENGINE GEAR con trompo a control remoto
Turn the radio control top
to the right and secure
the launcher.
C
Grip the launcher firmly and pull
hard on the ripcord to launch
the radio control top.
BA
Turn the launcher
power switch to ON.
Set the metal part of the
launcher’s charge gate in
the depression as shown.
21 3
Please note:
• Charge the radio control top after the tip has stopped moving. Recharging
when a charge remains in the battery may lead to weakening of the battery.
4
The charge
light will go
out after about
80 seconds of
charging. This
means that
charging has
been completed.
• If the radio control top is accidentally removed from the charge
gate while it is charging, the charge light will continue to
flash until the entire 80 second charging sequence has been
completed. Be sure to
charge until the charge
light goes out.
BASIC OPERATION OF THE LAUNCHER:
Pull the trigger to make
the top move clockwise.
1 2
Move the trigger to
center to make the
top spin in place.
3 4
Continue to push the
trigger forward to
make the top move
counterclockwise.
• Pour une compétition de toupies BEYBLADE RC, les toupies BEYBLADE adverses (vendues séparément) doivent fonctionner sur
des fréquences autres que 49 MHz.
• Lis les instructions avant d’assembler et de jouer, et garde-les pour référence ultérieure.
• Jette immédiatement les sacs en plastique.
Les arènes BEYSTADIUM sont vendues séparément.
• Para una competencia de trompos BEYBLADE a control remoto, los demás trompos BEYBLADE (vendidos por separado) deben funcionar
con frecuencias distintas de 49 MHz.
• Lee las instrucciones antes de armar y de jugar, y guárdalas para referencia futura.
• Deshazte inmediatamente de las bolsas plásticas.
Los estadios BEYSTADIUM se venden por separado.
The BEYBLADE®* Power Launcher and top system allows control of a Radio Control BEYBLADE top. By spinning the internal compact
motor tip in the same direction as the top (right spin), the spin of the compact motor will add to the rotational force of the top! By
spinning in the opposite direction (left spin) at a rate greater than that of the top, the compact motor can reverse the spin direction of
the top! A second internal motor activates when you hit the ENGINE GEAR™* button, giving your top even more spin energy!
CBA
21 3 4
FONCTIONNEMENT DE BASE DU PROPULSEUR:
1 2 3 4
CBA
21 3 4
OPERACIONES BÁSICAS DEL PROPULSOR:
1 2 3 4
49 Mhz 49 Mhz
Peel and apply labels as shown.
Using a Phillips/crosshead
screwdriver (not included),
loosen screw securing battery
compartment remove door on
launcher and door to access
compartment (screw remains
attached to door). Insert 4 x 1.5V
“AA” or R6 size batteries. Close
compartment, and tighten screw
with screwdriver. See diagrams.
TO COMPLETE
ASSEMBLY:
Use a Phillips/cross
head screwdriver
(not included) to
attach launcher
assembly as shown
using the included
screws.
À l’aide d’un tournevis cruciforme
(non compris), desserre la vis
du couvercle du compatiment
des piles sur le propulseur.
Enlève le couvercle pour accéder
au compartiment (la vis reste
attachée au couvercle). Insère 4
piles AA ou R6 de 1,5 V. Referme
le compartiment et resserre la vis
avec le tournevis. Voir l’illustration.
Con un destornillador en cruz
(no incluido), afloja el tornillo
del compartimiento de las
pilas en el propulsor y quita la
tapa (el tornillo permanecerá
asido a la tapa). Introduzca 4
pilas AA o R6 (1,5 V). Cierra
el compartimiento y aprieta el
tornillo con el destornillador.
Mira la ilustración.
Applique les autocollants comme indiqué.
Coloca las etiquetas tal como se indica.
POUR COMPLÉTER
L’ASSEMBLAGE:
Utilise un tournevis
cruciforme (non
compris) pour
fixer le propulseur
à l’aide des vis
incluses comme
indiqué.
TERMINA DE
ARMAR:
Con un
destornillador en
cruz (no incluido)
une las partes del
propulsor como se
ilustra usando los
tornillos incluidos.
Mets l’interrupteur
du propulseur à ON
(marche).
Place la pièce de métal
de l’entrée de charge du
propulseur dans l’ouverture
comme indiqué.
La lumière
de charge
s’éteindra
après environ
80 secondes
t’indiquant que
la charge est
terminée.
Mueve el interruptor
del propulsor a ON
(encendido).
Coloca la parte en
metal de la entrada
del cargador en
el propulsor en la
depresión tal como
se ilustra.
La luz del
cargador
se apagará
después de 80
segundos de
haber cargado.
Esto quiere decir
que la carga ha
terminado.
À noter:
•
Charge la toupie radiocommandée lorsque la pointe a cessé de bouger. Recharger
lorsqu’une charge est toujours présente dans la pile peut affaiblir la pile.
• Si la toupie radiocommandée est accidentellement retirée de l’entrée de
charge lorsqu’elle est entrain de charger, la lumière de charge continuera
de clignoter pendant 80 secondes jusqu’à ce que la séquence de charge
soit terminée. Assure-toi de
charger jusqu’à ce que la
lumière de charge s’éteigne.
Favor notar:
•
Carga el trompo a control remoto después de que la punta se haya detenido.
No recargues cuando aun haya algo de carga en la pila pues esto la debilita.
• Si el trompo a control remoto es accidentalmente sacado de la
entrada del cargador mientras se está cargando, la luz del cargador
continuará destellando hasta que los 80 segundos hayan terminado.
Asegúrate de cargar
hasta que la luz
desaparezca.
Le propulseur et la toupie BEYBLADE radiocommandée te permettent de contrôler une toupie radiocommandée BEYBLADE. En faisant
tourner la pointe du moteur interne et compact dans la même direction que la toupie (rotation à droite), la rotation de la pointe du moteur
compact ajoutera une force additionnelle à la force de rotation de la toupie! En tournant dans la direction opposée (rotation à gauche) plus
rapidement que la toupie, le moteur compact peut inverser la direction de la rotation de la toupie! Un deuxième moteur interne s’active
lorsque tu appuies sur le bouton de l’ENGRENAGE DYNAMIQUE, te donnant encore plus de force de rotation!
Insère la tige cannelée à
travers le propulseur et fixe
la toupie radiocommandée.
Tourne la toupie
radiocommandée vers
la droite pour que le
propulseur soit bien en
place.
Tiens fermement le
propulseur et tire sur la tige
cannelée pour lancer la toupie
radiocommandée.
Desliza la varilla dentada
por el propulsor y une el
trompo a control remoto.
Gira el trompo a control
remoto hacia la derecha
para sujetarlo en el
propulsor.
Agarra el propulsor firmemente
y jala la varilla dentada para
lanzar tu trompo a control
remoto.
Tire sur la gâchette pour
faire bouger la toupie
vers la droite.
Bouge la gâchette
au centre pour faire
tourner la toupie sur
elle-même.
Continue de pousser
vers l’avant la
gâchette pour faire
tourner la toupie vers
la gauche.
Jala el gatillo para que el
trompo se mueva hacia
la derecha.
Mueve el gatillo hacia
el centro para que
el trompo gire en el
mismo sitio.
Continua moviendo
el gatillo hacia
delante para que el
trompo gire hacia la
izquierda.
Open the
launcher front
cover.
Attach the radio
control top to
the charge gate.
The charge light
will turn on.
Press and hold the button
while pushing or pulling the
trigger to activate the ENGINE
GEAR™* speed burst!
Abre la tapa
delantera del
propulsor.
Encaja el trompo
radiodirigido en
la toma. La luz
indicadora de
recarga pasará a
ON [encendido].
El Poderoso Propulsor BEYBLADE y el sistema del trompo te permite controlar el trompo a control remoto BEYBLADE. Girando el motor
compacto interno de la punta en la misma dirección que el trompo (giro hacia la derecha), el giro del motor compacto aumenta la fuerza
de rotación del trompo. Girando en dirección opuesta (giro hacia la izquierda) a una velocidad mayor que la del trompo, el motor compacto
invierte la dirección giratoria del trompo. Un segundo motor interno se activa cuando tocas el botón de ENGRANAJE DINÁMICO, dándole
más energía giratoria a tu trompo.
Ouvre le couvercle avant du
propulseur. Fixe la toupie
radiocommandée à l’entrée
de charge. Le voyant de
charge s’allumera.
Appuie sur le bouton et
maintiens-le enfoncé tout
en actionnant la gâchette pour
déclencher la poussée de vitesse
de l’ENGRENAGE DYNAMIQUE.
Presiona y mantén
presionado el botón
mientras mueves el gatillo para
activar el empuje de velocidad del
ENGRANAJE DINÁMICO.


Praat mee over dit product
Laat hier weten wat jij vindt van de Hasbro Beyblade Grevolution Draciel G. Als je een vraag hebt, lees dan eerst zorgvuldig de handleiding door. Een handleiding aanvragen kan via ons contactformulier.