Handleiding Kichler 15382BK Lamp

Handleiding voor je Kichler 15382BK Lamp nodig? Hieronder kun je de handleiding gratis bekijken en downloaden als PDF in het Nederlands en/of Engels. Dit product heeft 7 veelgestelde vragen, 0 comments en heeft 0 stemmen. Is dit niet de handleiding die je zoekt, neem dan contact met ons op.

Is je product kapot en biedt de handleiding geen oplossing meer? Dan kun je voor reparatie gratis terecht bij Repair Café.

Handleiding

Loading…

SAFETY INSTRUCTIONS
READ THIS FIRST
KEEP THESE INSTRUCTIONS
This xture is intended for installation in accordance with the National
Electric Code (NEC) and Local code specications. Failure to adhere to
these codes and instructions may result in serious injury and/or property
damage and will void the warranty.
1) WARNING: This xture is not to be installed within 10 feet (3M) of a pool,
spa or fountain.
2) This xture is to be used only with a power unit (transformer) rated a
maximum of 300 W (25 AMPS) 15 volts.
3) The #18 ga. xture wire is not intended for direct burial.
4) Direct burial rated wire is to be buried a minimum of 6” (152mm) beneath
the surface of the ground.
NOTE: If additional Direct Burial wire is needed, contact your local Kichler
®
landscape distributor.
• 8 GA wire can be purchased in length of 250’ (76 M), 15503-BK.
• 10 GA wire can be purchased in length of 250’ (76 M), 15504-BK.
• 12 GA wire can be purchased in lengths of 100’ (30 M), 15501-BK; 250’
(76 M), 15502-BK; 500’ (152M), 15505-BK; and 1000’ (304 M), 15506-BK.
5) Fixture shall not use a tungsten halogen lamp unless the xture is marked
for use with such lamps.
6) Wiring connections must be made with approved/listed wire connection
device(s) suitable for the application. Do not exceed manufacturers’ wiring
combination specications for size and quantity of conductors.
INSTRUCTIONS PERTAINING TO A RISK OF FIRE,OR INJURY TO
PERSONS
IMPORTANT SAFETY INSTRUCTIONS
Lighted lamp is HOT!
WARNING — To reduce the risk of FIRE OR INJURY TO PERSONS.
1) Turn off / unplug and allow to cool before replacing lamp.
2) Lamp gets HOT quickly! Contact only switch / plug when turning on.
3) Do not touch hot lens or cowl.
4) Do not remain in light if skin feels warm. (Light is intense, it may cause
“sunburn”.)
5) Do not look directly at lighted lamp.
6) Keep lamp away from materials that may burn.
7) Use only with wattage and lamp marked on xture.
8) Do not touch the inner glass envelope of the lamp at any time. Use a soft
cloth. Oil from skin may damage lamp.
9) Do not operate the xture with a damaged or missing lens.
CAUTION
WHEN INSTALLING KICHLER LANDSCAPE LIGHTING (LINE VOLTAGE OR LOW VOLTAGE),
CARE SHOULD BE TAKEN TO KEEP CLEAR OF POTENTIALLY COMBUSTIBLE MATERIALS.
WHEN MAINTAINING THE FIXTURES, BE SURE TO REMOVE LEAVES, PINE NEEDLES,
GRASS CLIPPINGS, MULCH, OR ANY DEBRIS THAT HAS ACCUMULATED ON THE LIGHT
BULB, LENS, OR BODY OF THE FIXTURE.
ASSEMBLY AND INSTALLATION
1) Determine desired location for mounting xture.
2) At desired location, hammer stake (A) into ground. To avoid damage to
stake, place a board on top of stake while hammering. If ground is hard
and stake is difcult to install, make a crosscut in ground using a at
shovel.
3) Clear away area in ground at wireway slot (B) in top of stake (A).
4) Install lamp (not supplied) to socket inside accent light. NOTE: Use
caution when installing. Hold lamp by outer housing. DO NOT touch glass
envelope inside. If this happens, clean lamp with denatured alcohol and a
lint free cloth.
5) Slip O-ring (C) over outside of cowl (D) and into channel (E) closest to the
back of the cowl.
6) Apply a light coating of provided “silicone lubricant to the O-ring.
NOTE: Packet contains enough lubricant for approximately 20-25 usages
and should be applied every time cowl is removed to aid in assembly and
disassembly.
7) Assemble cowl (D) to accent light making sure direction markers (H) are
aligned. Secure in place either using the provided thumbscrew (F) or the
vandal resistant screw.
NOTE: Vandal resistant screw requires a 3/32 hex key (not provided) for
installation or removal.
Date Issued: 1/27/12 IS-15382-US
Quic Disc
WIRING INSTRUCTIONS
Turn off power.
The full length of the 18 GA xture wire may be used to connect with the 10 GA or 12 GA cable provided the following conditions are met:
Wiring is to be protected by routing close to the xture or accessory or secured to a building structure such as house or deck.
18 GA xture wiring is to be cut off so that it is attached to the connector within 6 inches of the xture or building structure.
If it is necessary to make the connections underground, then no more than 6 inches of the 18 GA xture wire is to be buried.
The Quic Disc
connector is designed to install one xture and accommodates one 18 GA xture wire and one 10 GA or one 12 GA supply wire.
Place the 10 gauge supply wire across the area marked 10 GA on Quic Disc
or place the 12 gauge supply wire across the area marked 12 GA
on Quic Disc
.
Place the 18 gauge xture wire across the area marked 18 GA on the Quic Disc
. After the wires are in place, connecta the top of the Quic
Disc
to the base with supplied screw, making sure that the wires remain at in the bottom portion of the Quic Disc
, and the screw is tightened
all the way down.
The copper contacts will automatically pierce the wires’ insulation. Excess 18 GA xture wire that sticks out the end of the Quic Disc
is to be cut off.
Make no other wiring connections to the 18 GA xture wire.
D
E
H
B
A
C
J
G
H
F
8) Lay 12V cable into wireway slot (B) and screw xture into stake (A). When
at desired direction run locknut (J) down against stake (A).
9) Adjust angle of accent light by loosening screw (G).
10) TURN OFF POWER.
11) Make wire connections using supplied Quic Disc
following instructions
below, or using other approved wiring connection method (not supplied.)
* Additional lubricant can be obtained at most auto parts supply stores, (elec-
tric tune-up grease used to coat the inside of spark plug boots)
For warranty information please visit: http://www.landscapelighting.com/portal/warranty_page
Para informacion de la garantia por favor visite: www.landscapelighting.com/portal/warranty_page
Download de handleiding in het Nederlands en/of Engels (PDF, 0.32 MB)
(Denk aan het milieu en print deze handleiding alleen als dat echt noodzakelijk is)

Loading…

Meer over deze handleiding

We begrijpen dat het prettig is om een papieren handleiding te hebben voor je Kichler 15382BK Lamp. Je kunt de handleiding bij ons altijd downloaden en daarna zelf printen. Indien je graag een originele handleiding wilt hebben, raden we je aan contact op te nemen met Kichler. Zij kunnen wellicht nog voorzien in een originele handleiding. Zoek je de handleiding van Kichler 15382BK Lamp in een andere taal? Kies op de homepage je taal naar keuze en zoek daarna op het modelnummer om te zien of we deze beschikbaar hebben.

Specificaties

Merk Kichler
Model 15382BK
Categorie Lampen
Bestandstype PDF
Bestandsgrootte 0.32 MB

Alle handleidingen voor Kichler Lampen
Meer handleidingen voor Lampen

Veelgestelde vragen over Kichler 15382BK Lamp

Ons supportteam zoekt dagelijks naar nuttige productinformatie en antwoorden op veelgestelde vragen. Als er onverhoopt toch een onjuistheid tussen onze veelgestelde vragen staat, laat het ons dan weten via het contactformulier.

Is alle LED verlichting dimbaar? Geverifieerd

Nee, niet alle LED lampen zijn standaard dimbaar. Dit wordt aangegeven op de verpakking en evetueel op de lamp zelf.

Ik vind dit nuttig (578) Lees meer

Ik heb een nieuwe lichtbron in de lamp gedaan, maar deze gaat niet aan, waar kan dit door komen? Geverifieerd

Sommige lampen zijn gemaakt voor lichtbronnen van een specifiek wattage. Wanneer er een lichtbron in wordt gedaan die een hoger wattage vereist van de lamp kan leveren, dan kan het zijn dat het licht niet aangaat. Als de lamp een veel hoger wattage levert van waarvoor de lichtbron gemaakt is, kan de lichtbron doorbranden.

Ik vind dit nuttig (435) Lees meer

Waarom is de kleur van licht belangrijk? Geverifieerd

Er zijn grofweg twee soorten soort licht, warm licht en koud licht. Koud licht houdt je alerter en wakkerder. Warm licht werkt ontspannender. De warmte van licht wordt gemeten in Kelvin en staat aangegeven op de verpakking of de lamp zelf.

Ik vind dit nuttig (336) Lees meer

Wat is lumen? Geverifieerd

Lumen is een meeteenheid voor de totale hoeveelheid zichtbaar licht die een lichtbron naar alle kanten uitstraalt.

Ik vind dit nuttig (263) Lees meer

Welke fittingen zijn er? Geverifieerd

Wereldwijd worden vele soorten fittingen gebruiken, maar de meest gebruikte zijn die met de Edison schroefdraad, aangegeven met de letter E. In de meeste landen zijn fittingen E27 en E14 de standaard. In de Verenigde Staten zijn E26, E17, E12 en E10 de standaard.

Ik vind dit nuttig (204) Lees meer

Wat zegt het wattage over mijn lamp? Geverifieerd

Wattage is een meeteenheid voor het energieverbruik. Lampen met een hogere lichtopbrengst hebben een doorgaans hoger energieverbruik, maar voor het vergelijken van lichtopbrengst moet altijd gekeken worden naar de hoeveelheid lumen.

Ik vind dit nuttig (173) Lees meer

Wat is LED? Geverifieerd

LED staat voor light-emitting diode. Door in de juiste richting stroom door de halfgeleider te laten lopen ontstaat licht.

Ik vind dit nuttig (165) Lees meer

Beoordeling

Laat ons weten wat je van de Kichler 15382BK Lamp vindt door een beoordeling achter te laten. Wil je je ervaringen met dit product delen of een vraag stellen? Laat dan een bericht achter onderaan de pagina.
Bent u tevreden over de Kichler 15382BK Lamp?
Ja Nee
Beoordeel dit product als eerste
0 stemmen

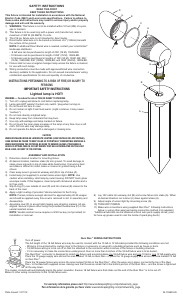
Praat mee over dit product

Laat hier weten wat jij vindt van de Kichler 15382BK Lamp. Als je een vraag hebt, lees dan eerst zorgvuldig de handleiding door. Een handleiding aanvragen kan via ons contactformulier.

Handleiding Kichler 15382BK Lamp

Gerelateerde producten

Gerelateerde categorieën

×
Download