English User Manual
READ ENTIRE MANUAL BEFORE OPERATION to ensure proper use and care of your
new Lezyne LED light. Trac laws mandang lighng vary from country to country.
Inform yourself about lighng laws in the country of use.
front only
rear only
Warnings
DO NOT LOOK DIRECTLY INTO LIGHT BEAM or shine into eyes of another.
DO NOT SUBMERGE UNDER WATER. Lezyne LED lights are water resistant under nor-
mal condions, but are not waterproof. If moisture gets inside light body, remove
tailcap and air-out unl completely dry.
DO NOT ATTEMPT TO REMOVE ELECTRONICS. Doing so will void warranty.
Lezyne USA Inc. and Lezyne Co., Ltd. do not accept any liability for injuries or other
damages resulng from the use of this product in any circumstances.
Warranty
In U.S. and U.K., Lezyne LED Lights carry a two (2) year warranty from the original
purchase date to the original owner (proof of purchase is required). Lezyne Baer-
ies carry a six (6) month warranty from the original purchase date. Lezyne warranes
cover any manufacturing defects in materials or workmanship. Issues not covered by
warranty include normal wear & tear, improper installaon, aempng to access or
modify electronics, damage or failure due to accident, misuse, abuse and/or neglect.
For warranty issues outside of the United States, contact the distributor/retailer
for your country or region directly. To nd a distributor near you, visit:
hp://lezyne.com/contact/distributors
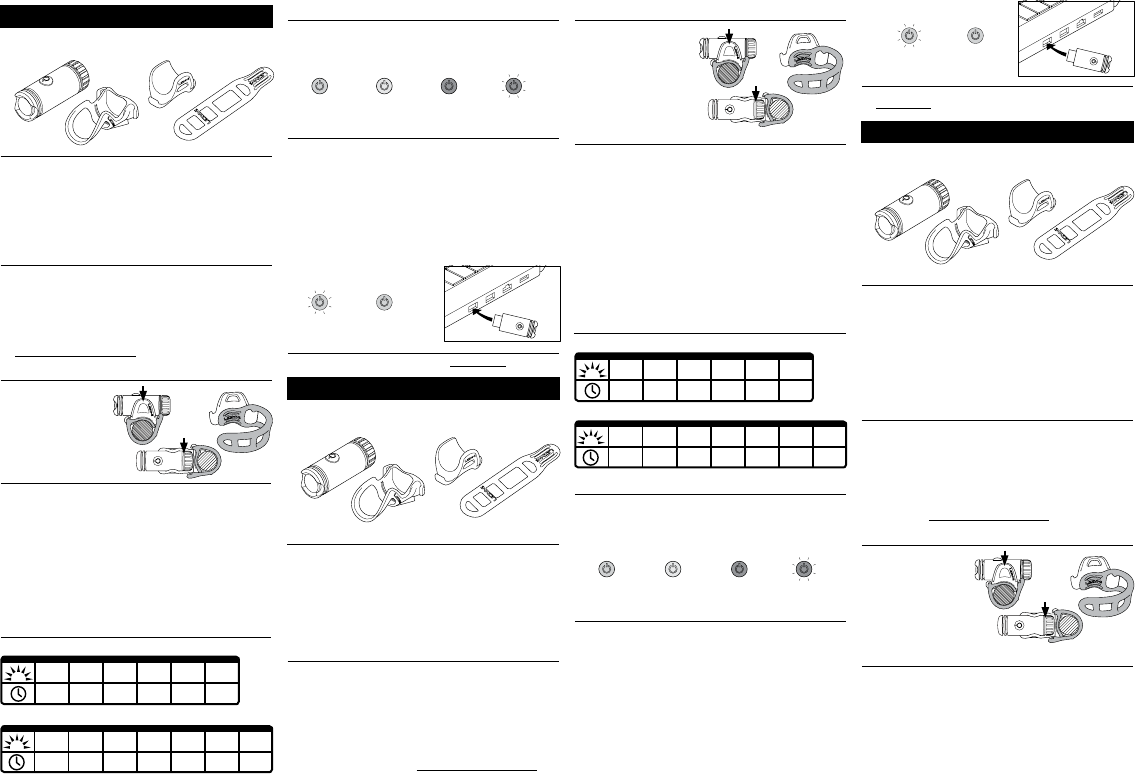
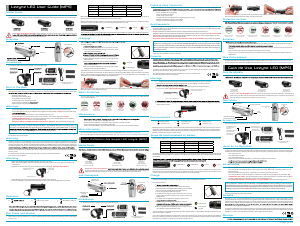
Mounting
FRONT: center light in clamp,
do not clamp by tailcap.
REAR: ensure tailcap groove
is fully engaged in clamp.
Operation
1. On/O: hold buon two (2) sec.
2. Mode cycle: click buon
3. Overdrive Race Mode/Dayme Flash: hold buon ve (5) sec.
OVERDRIVE RACE MODE (front only): With the light OFF, hold buon for ve (5) sec-
onds, unl light ashes. The light is now in Overdrive Race Mode where only Overdrive
and Economy outputs are selectable. The light will remain in Overdrive Race Mode
even when switched OFF. Repeat the step above to return to the normal mode set.
DAYTIME FLASH (rear only): With the light o, press and hold the power buon
for ve (5) seconds, unl the light ashes. The light will now enter a brighter ash
mode for dayme riding. Once turned o the light will return to normal.
THERMAL PROTECTION: If the operang temperature of the light is too high, the
light automacally lowers the lumen output.
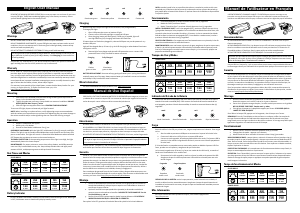
Run Times and Modes
FRONT:
FL1 STANDARD
OVERDRIVE ENDURO BLAST ECONOMY FLASH 1 FLASH 2
200
LUMENS
100
LUMENS
150
LUMENS
50
LUMENS
100
LUMENS
100
LUMENS
1:00
h : min
2:15
h : min
1:30
h : min
4:30
h : min
4:30
h : min
4:30
h : min
REAR:
FL1 STANDARD DAY TI M E 1 DAY TI M E 2 FLASH 1 FLASH 2 PULSE BLAST ECONOMY
70
LUMENS
70
LUMENS
30
LUMENS
30
LUMENS
30
LUMENS
30
LUMENS
5
LUMENS
3:15
h : min
3:15
h : min
8:00
h : min
8:00
h : min
8:00
h : min
4:00
h : min
24:00
h : min
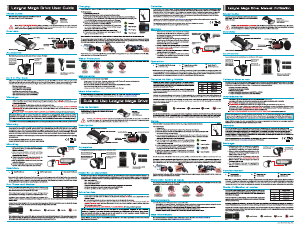
Battery Indicator
Green and red LEDs, located in buon, display current baery status while light is
ON. When light is OFF, click buon once to display current baery status for two
(2) seconds.
100% 50% 10% 5%
Illuminates green Illuminates yellow Illuminates red Flashes red
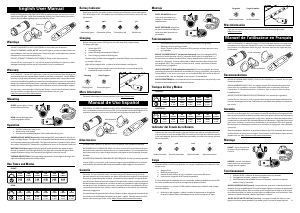
Charging
Before using your Lezyne LED Light for the rst me, fully charge baery.
To charge your light:
1. Switch light OFF
2. Unscrew tailcap
3. Insert USB plug into powered USB port
4. Once charging, buon will ash green
If buon does not ash when plugged in, selected USB port may not be powered—
try another USB port.
Light will be charged aer 3–4 hours or when buon is solid green.
5. Remove light from charger and reinstall tailcap—ensure tailcap is fully
installed for water resistance
Charging Fully Charged
Flashes green Illuminates green
More Information
For more informaon on Lezyne products, visit: hp://lezyne.com
Manual de Uso Español
POR FAVOR, LEA TODO EL MANUAL ANTES DE SU OPERACIÓN para asegurar un buen
uso y cuidado de su nueva luz Lezyne LED. Las normas de tránsito que regulan la ilu-
minación varían de un país a otro. Infórmese de las normas del país de uso.
sólo delantera
sólo posterior
Advertencias
NO MIRE DIRECTAMENTE AL RAYO DE LUZ ni lo apunte a los ojos de otra persona.
NO SUMERGA LA LUZ BAJO DEL AGUA. Las luces Lezyne LED son resistentes al agua
en condiciones normales de uso pero no son impermeables. Si la humedad entra
en el interior de la luz, rere la tapa posterior y deje que se airee hasta que se seque
del todo.
NO INTENTE RETIRAR LOS COMPONENTES ELECTRÓNICOS. Si lo hace, anulará la garana.
Lezyne USA Inc. y Lezyne Co., Ltd. no asume ninguna responsabilidad por las lesiones
u otros daños que resulten del uso de este producto bajo ningunas circunstancias.
Garantía
En los EE. UU y en el Reino Unido, las luces Lezyne LED enen dos (2) años de
garana desde la fecha de compra por parte del propietario original (es necesario
mostrar el comprobante de compra). Las baterías Lezyne enen una garana de
seis (6) meses desde la fecha de compra. Estas garanas cubren cualquier defecto
de fabricación en los materiales o la mano de obra. La garana NO cubre el desgaste
normal por el uso, instalación incorrecta, intento de acceso o modicación de los
componentes electrónicos, daños o averías debido a un accidente, uso indebido,
abuso y/o negligencia.
Para cuesones de garana fuera de los Estados Unidos, póngase directamente en
contacto con el distribuidor/vendedor de su país o región. Para encontrar su distri-
buidor más cercano, por favor visite: hp://lezyne.com/contact/distributors
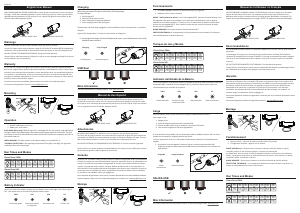
Montaje
PARTE DELANTERA: centre
la luz en la abrazadera, no
coloque la abrazadera en la
tapa posterior.
PARTE POSTERIOR: asegúrese
de que la ranura de la tapa pos-
terior está bien ajustada a la
abrazadera.
Funcionamiento
1. Encendido/Apagado: presione el botón durante dos (2) segundos.
2. Modo de ciclos: presione el botón
3. Modo “Overdrive Race”/Durante el Día: presione el botón durante cinco
(5) segundos.
MODO “OVERDRIVE RACE” (solamente delantera): con la luz apagada (OFF),
presione el botón durante cinco (5) segundos hasta que la luz parpadee. La
luz está ahora en Modo Overdrive Race, sólo se podrán seleccionar los modos
Overdrive y Economy. La luz se mantendrá en Modo Overdrive Race incluso una
vez apagada (OFF). Para cambiar a modo normal, vuelva a presionar el botón
durante cinco (5) segundos.
MODO DURANTE EL DÍA (solamente posterior): Con la luz apagada, presione y
mantenga presionado el botón de encendido por cinco (5) segundos, hasta que la
luz parpadeé. La luz ahora va a entrar en un modo de ash mas brillante para el
uso durante el día. Una vez apagada, la luz volverá a la normalidad.
PROTECCIÓN TÉRMICA: si la temperatura en funcionamiento es muy elevada, la luz
disminuirá automácamente la salida de lúmenes.
Tiempos de Uso y Modos
FRONTAL :
FL1 STANDARD
OVERDRIVE ENDURO BLAST ECONOMY FLASH 1 FLASH 2
200
LúMENES
100
LúMENES
150
LúMENES
50
LúMENES
100
LúMENES
100
LúMENES
1:00
h : min
2:15
h : min
1:30
h : min
4:30
h : min
4:30
h : min
4:30
h : min
POSTERIOR :
FL1 STANDARD DAY TI M E 1 DAY TI M E 2 FLASH 1 FLASH 2 PULSE BLAST ECONOMY
70
LúMENES
70
LúMENES
30
LúMENES
30
LúMENES
30
LúMENES
30
LúMENES
5
LúMENES
3:15
h : min
3:15
h : min
8:00
h : min
8:00
h : min
8:00
h : min
4:00
h : min
24:00
h : min
Indicador del Estado de la Batería
Cuenta con dos luces LED (verde y roja) en el botón que indican el estado de la bat-
ería cuando la luz está encendida (ON). Para conocer el estado de la batería cuando
la luz está apagada, presione el botón de encendido; el estado se mostrará durante
dos (2) segundos.
100% 50% 10% 5%
Verde iluminado Amarillo iluminado Rojo iluminado Rojo intermitente
Carga
Antes de ulizar la luz LED por primera vez, cargue completamente la batería. Para
cargar su luz:
1. Apague la luz
2. Rere la parte trasera
3. Inserte el cable USB en la luz y conéctelo a un puerto USB acvo.
4. Una vez esté cargando el LED verde parpadeará.
Si la luz del botón no parpadea una vez conectada, puede ser debido al puerto USB.
Por favor, pruebe con otro puerto y asegúrese de que esté acvo.
La luz se cargará en 3–4 horas. El LED verde le indicará que la batería está comple-
tamente cargada.
5. Rere la luz del cargador y vuelva a instalar la tapa posterior. Asegúrese
de que la tapa está bien colocada para una buena resistencia al agua.
Cargando Carga Completa
Verde intermitente
Verde iluminado
Más Información
Para más información sobre productos Lezyne, visite nuestra página web:
hp://lezyne.com
Manuel de l’utilisateur en Français
LIRE ENTIEREMENT LE MANUEL AVANT UTILISATION pour assurer un usage et un
entreen correct de votre lampe LED Lezyne. Les codes de la route concernant
les lumières sont diérents selon les pays. Informez-vous sur les règles du pays
d’ulisaon.
avant seulement
arrière seulement
Recommandations
NE PAS REGARDER DIRECTEMENT LE FAISCEAU LUMINEUX ni l’orienter vers les yeux
d’autres personnes.
NE PAS IMMERGER SOUS L’EAU. Les lampes Lezyne LED résistent aux projecons
d’eau dans les condions normales d’ulisaon mais ne sont pas étanches à
l’immersion. Si l’humidité pénètre à l’intérieur, ôter le capot arrière et sécher
complètement.
NE PAS TENTER DE DEMONTER L’ELECTRONIQUE. Ceci annulerait la garane.
Lezyne USA Inc./Lezyne Co., Ltd. ne pourra être tenue comme responsable des bles-
sures ou dommages causés par l’ulisaon de ce produit dans quelque circonstance
que ce soit.
Garantie
Aux USA et au Royaume Uni, les lampes Lezyne LED bénécient d’une garane de
deux (2) ans à parr de la date du premier achat (une preuve d’achat est nécessaire).
Les baeries Lezyne sont garanes six (6) mois à parr de la date du premier achat.
La garane Lezyne couvre les éventuels défauts de fabricaon. La garane ne couvre
pas l’usure normale, les mauvaises installaons, les tentaves d’accès à la pare
électronique, les dommages causés par un accident, la négligence, une ulisaon
incorrecte.
Pour les quesons relaves à la garane en dehors des USA, contactez directement
le distributeur de votre pays ou région. Pour trouver le distributeur le plus proche,
rendez-vous sur: hp://lezyne.com/contact/distributors
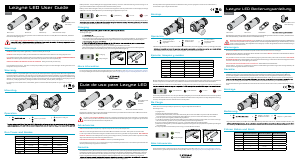
Montage
AVANT : clipser le centre de
la lampe, ne pas clipser par
l’arrière.
ARRIERE : assurer vous que le
capot arrière est enèrement
engagé dans le support.
Fonctionnement
1. Marche /Arrêt : enfoncer le bouton pendant deux (2) seconds.
2. Changement de mode : appuyer sur le bouton.
3. Mode Overdrive Race/Mode de sécurité Dayme: maintenir le bouton
enfoncé cinq (5) secondes.
MODE OVERDRIVE RACE (avant) : Lampe éteinte, maintenir le bouton enfoncé
pendant cinq (5) secondes jusqu’à ce que la lampe clignote. La lampe est maintenant
en Mode Overdrive Race. Dans ce mode, seules les posions Overdrive et Economy
sont séleconnables. La lampe va rester dans ce mode même une fois éteinte. Pour
repasser en Mode standard, répéter l’opéraon ci-dessus.
MODE DE SÉCURITÉ DAYTIME (arrière) : Lorsque la lampe est éteinte, tenir
appuyé le bouton power pendant 5 secondes jusqu’à ce que la lampe clignote. →


Praat mee over dit product
Laat hier weten wat jij vindt van de Lezyne Micro Drive (2014) Fietslamp. Als je een vraag hebt, lees dan eerst zorgvuldig de handleiding door. Een handleiding aanvragen kan via ons contactformulier.