NRENX11C
10-2005
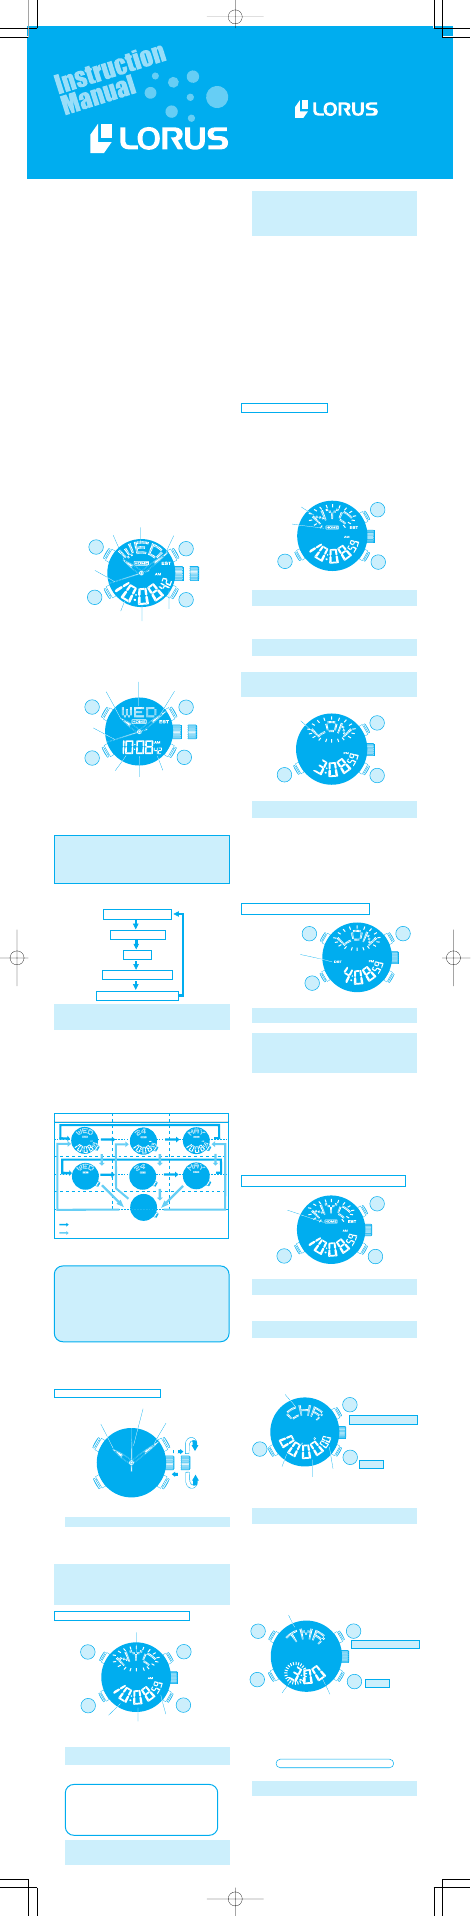
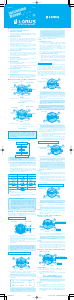
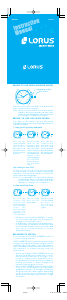
CAL. NX11, NX14 (RM9 SERIES)
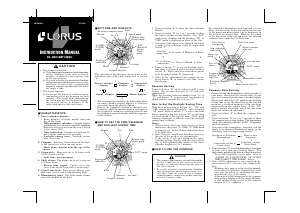
CROWN
Minute hand
Day
Minute
Hour
Second
hand
Hour hand
[Caliber NX11]
CROWN position a: normal position
b: extended position
(analogue time setting)
a b
Second
[Caliber NX14]
CROWN
Day
Minute hand
Hour
Second
hand
Hour hand
Minute
a b
Second
CROWN position a: normal position
b: extended position
(analogue time setting)
Day Date Month
Pressing "D"
Pressing and holding "D" for 2 to 3 seconds.
D
D
A
A
C
A
B
C
D
C
Start/Stop/Restart
Reset
Start/Stop/Restart
C
B
A D
D
C
D
A
A
A
D
C
Reset
D
CB
A
B
C
1 Pull out the crown when the second hand is
at the 12 o’clock position.
The second hand will stop on the spot.
2 Turn the crown to set the hour and minute
hands to the correct time.
3 Push the crown back in simultaneously with a
time signal.
To set the hands more accurately,
advance the minute hand four to five
minutes ahead of the correct time, and
then slowly move the hand back to the
correct time.
■ HOW TO SET THE TIME/CALENDAR
The analogue and digital displays are separately
illustrated in the following sections of this manual
for the purpose of explanation.
CROWN
Second hand
Minute handHour hand
With each press of “A,” the mode in the digital
display changes in the following order.
■ CHARACTERISTICS
1. Analogue & digital time displays
2. Automatic calendar
• The calendar automatically adjusts for odd
and even months including February of leap
years up to 2050.
3. World time function
• Time in the 77 cities and regions around the
world can be displayed. Among those 77
cities, the cities in some time zones with 30-
minute offsets from UTC are included.
• Daylight saving time can also be set.
• By presetting the “Home City,” you can easily
reset the display to the time in your “Home
City” after your return from abroad.
• The time zone abbreviations in the United
States are also displayed for applicable cities.
4. 24-hour stopwatch
• The stopwatch can measure up to 23 hours,
59 minutes and 59 seconds in 1/100-second
increments for the first 60 minutes and in 1-
second increments thereafter.
5. Countdown timer
• The timer can be set up to 9 hours and 59
minutes in 1-minute increments.
6. Regular alarm
• The regular alarm sounds once every 24 hours
at the designated time.
• You can preview the alarm sound by using the
sound demonstration function.
• The hourly time signal can also be set.
7. Single-time alarm
• The Single-time alarm sounds only once at a
designated time and it is disengaged
automatically.
8. Illuminating light (Electroluminescent panel)
• The built-in electroluminescent backlight
illuminates the display for approximately 3
seconds for easy viewing in darkness.
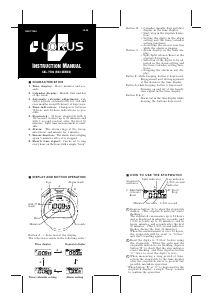
■ DISPLAYS AND CROWN OPERATION
NOTES
✥ Setting the second
To reset the second digits to “00,” press either
“C” or “D” in accordance with a time signal
while the second digits are flashing. If “C” or
“D” is pressed while the second digits count
any number between “30” and “59,” one
minute is added and the second digits are
immediately reset to “00.”
✥ Once the year, month and date have been
set, the day of the week is automatically set.
✥ 12-/24-hour indication setting
• When the 12-hour indication is selected,
“AM” indicator appears for the morning and
“PM” indicator appears from the afternoon.
• When setting the hour digits in the 12-hour
indication, check that the AM/PM is properly
set.
This watch is equipped with the world time
function which enables you to view the time in
the 77 cities and regions around the world.
By presetting the “Home City,” even if you set the
watch to display the time of the place you are
staying while traveling abroad, you can easily
and conveniently reset the watch to display the
time of your “Home City” after your return home.
For details, refer to “RETURNING TO THE “HOME
CITY” DISPLAY.”
1. Press and hold “A” for 2 to 3 seconds.
The city code currently selected will flash at
the top half.
2. Press “C” or “D” to select the city code which
represents the city you wish to set as your
“Home City.”
3. Press both “C” and “D” at the same time.
Beneath the city code which you have
selected, the “HOME” mark appears.
4. Press “A” to confirm the setting and return to
TIME/CALENDAR mode.
If you need to set the time, follow the
procedures from Step 2 in “DIGITAL TIME/
CALENDAR SETTING.”
1. Press and hold “C” for 2 to 3 seconds.
The city code whose time the watch is
currently showing will flash.
2. Press “C” or “D” to select the city code whose
local time you want to display on the watch.
3. Press “A” to confirm the setting and return to
the TIME/CALENDAR mode.
• In a case that the alarm is engaged, it will
sound at the designated time of the
currently selected city.
• If the watch is left untouched with the city
code flashing, it will automatically return to
the TIME/CALENDAR mode in 1 to 2 minutes.
1. Press and hold “C” for 2 to 3 seconds.
The city code whose time the watch is
currently showing will flash.
2. Press “B” to set the daylight saving time.
With each pressing of “B,” the daylight saving
time can be alternately set or cancelled.
For information on city codes and their time
zones, refer to “CITIES AND TIME
DIFFERENCES.”
3. Press “A” to confirm the setting and return to
the TIME/CALENDAR mode.
NOTES
• While the daylight saving time mark appears
on the display, the time is advanced by one
hour in all the cities.
• Daylight saving time can be set even for cities
and regions where daylight saving time is not
actually adopted.
• In a case that the alarm is engaged, it will
sound at the designated time of the current
time setting.
Daylight saving
time mark
1. Press and hold “C” for 2 to 3 seconds.
The city code whose time the watch is
currently showing will flash.
2. Press both “C” and “D” at the same time.
3. Press “A” to return to the TIME/CALENDAR
mode.
The display shows the time in your “Home
City.”
NOTES
• In a case that the alarm is engaged, the alarm
will sound at the designated time of your
“Home City” time.
■ HOW TO USE THE STOPWATCH
“HOME” mark
■ HOW TO USE THE WORLD TIME FUNCTION
1. Press “A” once to show the STOPWATCH mode.
2. Press “C” to start or stop the stopwatch.
Pressing “C” will alternately start or stop the
stopwatch.
3. Press “D” to reset to “00’00"oo.”
NOTES
✥ Even if the STOPWATCH mode is changed to a
different mode while the measurement is in
progress, it continues counting properly. After
the stopwatch is used, however, be sure to
stop it as the battery energy is consumed
enormously to shorten the battery life.
■ HOW TO USE THE COUNTDOWN TIMER
STOPWATCH mode mark
Second
Minute
1/100 second
Hour
Minute
1. Press and hold “A” for 2 to 3 seconds to show
the TIME/CALENDAR SETTING display.
The city code currently selected will flash at
the top half.
2. Press “B” to select the item to be adjusted
(flashing).
At this point, you can set your “Home City.”
Refer to “RETURNING TO THE “HOME CITY”
DISPLAY” for details.
TIMER mode mark
City code
Minute
Hour
Choice of display in the TIME/CALENDAR mode
• Pressing “D” in the TIME/CALENDAR mode will
change the calendar element shown at the
top half of the display in order of “day”, “date”
and “month”.
• Pressing and holding “D” for 2 to 3 seconds in
the TIME/CALENDAR mode will select the item
shown at the top and bottom halves of the
display. See the chart below.
When display returns to the TIME/
CALENDAR display, you will hear the
confirmation sound.
A
B
C
Second
“HOME” mark
DAYLIGHT SAVING TIME SETTING
RETURNING TO THE “HOME CITY” DISPLAY
ANALOGUE TIME SETTING
1
2
3
City code
City code
TIMER SETTING
1. Press “A” twice to show the TIMER mode.
2. Press and hold “A” for 2 to 3 seconds to show
the TIMER SETTING display.
3. Press “B” to select the item to be adjusted
(flashing).
4. Press “C” or “D” to set the flashing digits.
The flashing digits move quickly if “C” or “D”
is kept pressed.
5. Press “A” to confirm the timer setting.
NOTES
✥ If the timer time is set for “0:00,” the timer does
not function.
✥ If the watch is left untouched in the TIMER
SETTING display with the digits flashing, it will
automatically return to the TIMER mode in 1
to 2 minutes.
Hour « Minute
3. Press “C” or “D” to set the flashing item.
4. Press “A” to confirm the settings and return
to the TIME/CALENDAR mode.
* To set the city, select the city code
representing the city which is in the
same time zone as the city you are
wearing this watch. For information on
city codes and their time zones, refer to
“ CITIES AND TIME DIFFERENCES.”
• Choice of display is available only in the TIME/
CALENDAR display.
The caliber NX11 and NX14 have the
different designs of digital displays, but
their usages are the same. The following
sections of this manual will provide
explanation by using the caliber NX11 as
an example.
DIGITAL TIME/CALENDAR SETTING
“HOME CITY” SETTING
Note on unusual display:
If all the segments of the display light up in
the TIME/CALENDAR SETTING display with
the digits flashing, it is not a malfunction.
This happens when both “C” and “D” are
pressed simultaneously. In such a case,
press “A”, “C” or “D” to return to the TIME/
CALENDAR mode, and then set the time/
calendar again.
City *
Second
Minute
Hour
Year
Month
Date
12-/24-hour indication
‹
‹
‹
‹
‹‹
‹
‹
TIME/CALENDAR
SINGLE-TIME ALARM
REGULAR ALARM
TIMER
STOPWATCH
LORUSNX11 06.1.16, 3:37 PMPage 1 AdobePageMaker6.5J/PPC


Praat mee over dit product
Laat hier weten wat jij vindt van de Lorus NX11 Uurwerk. Als je een vraag hebt, lees dan eerst zorgvuldig de handleiding door. Een handleiding aanvragen kan via ons contactformulier.