
NREY704E
11-2005
CAL. Y704 (R23 SERIES)
■ CHARACTERISTICS
1. Time/Calendar Display
Hour, minute, second, month, date and the
day of the week
Automatic Calendar Function
The calendar adjusts automatically for odd
and even months including Februaries of
leap years.
Time Display Format
12-hour display format with AM/PM indicator
and 24-hour display format are available.
2. Stopwatch
The stopwatch can measure up to 9 hours
59 minutes and 59 seconds in 1/100-second
increments.The stopwatch features the
following functions.
• Standard measurement
• Accumulated Time measurement
• Lap time measurement
• Split time measurement
Maximum 99 lap/split times can be
displayed, among which the first 30 lap/split
times can be recorded.
Memory Recall Function
Each recorded lap/split times can be
recalled after measurement is finished.
3. Daily Alarm
The alarm can be set to sound on a 24-hour
basis.
4. Illuminating light
The built-in electroluminescent backlight
illuminates the display for viewing in darkness.
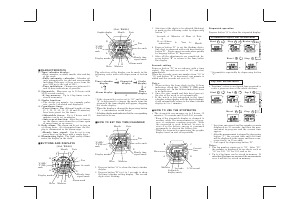
■ BUTTONS AND DISPLAYS
Time/Calendar Mode Lap Mode
Alarm Mode
Split Mode
Press Button C to select a display mode. The
display mode changes over in the following
order.
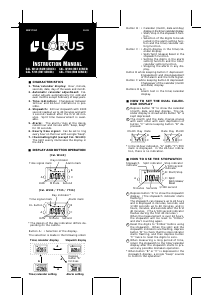
■ HOW TO SET THE TIME/CALENDAR
1. Press Button C to go to the Time/Calendar
Mode.
2. Press Button B for 2 seconds, the display
changes to the Time/Calendar Setting Mode.
The second numeral starts flashing, and the
year appears in place of the day of the
week.
3. Press Button A to select an item to be
adjusted. The item changes over in the
following order.
While the second numeral is flashing,
press Button D in accordance with a time
signal. The second numeral is reset to “00”
and starts counting immediately.
When the second numeral read any
number between 30 and 59, and Button
D is pressed, one minute is added.
Second setting
Month
Date
Second
Minute
Hour
AM/PM indicator for
12-hour display only
Day of the week
4. Use Button D to adjust each item.
✥ For the minute, hour, month, date and
year settings, each press of Button D
advances the displayed numeral by one.
Keep Button D pressed to advance the
numeral quickly.
✥ For the choice of time display format,
each press of Button D selects alternatively
12-hour display or 24-hour display.
✥ Press Button A to confirm the adjustment
of the selected item and move on to the
next item.
5. Upon completion of all necessary
adjustments, press Button B to return to the
Time/Calendar Mode.
✥ Under 12-hour display, an “AM” indicator
in the morning and a “PM” indicator from
the afternoon are displayed.
✥ Once year, month and date are set, the
day of the week is automatically set
accordingly.
■ HOW TO USE THE STOPWATCH
• The stopwatch can measure up to 9 hours,
59 minutes and 59 seconds in 1/100-second
increments. When the measurement is over
9 hours 59 minutes 99, the stopwatch will be
reset to “0:00’00”00” and start counting
again.
Standard Measurement
Standard time can be measured either in the
Lap Mode or in the Split Mode.
1. Press Button C to go to the Lap Mode or Split
Mode.
2. Press Button D to start and stop the
stopwatch.
3. Press Button A to reset the stopwatch.
Accumulated Elapsed Time Measurement
Accumulated Elapsed Time can be measured
either in the Lap Mode or in the Split Mode.
1. Press Button C to go to the Lap Mode or Split
Mode.
2. Press Button D to start, stop and restart the
stopwatch as many times as required.
3. Press Button A to reset the stopwatch
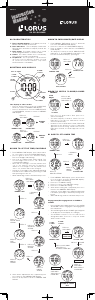
Lap/Split Time Measurement
Up to 99 lap/split times can be displayed,
among which the first 30 lap/split times can be
recorded during each measurement. In order
to recall the recorded lap times after
measurement, use Memory Recall Function
before resetting the stopwatch.
• Lap Time Measurement
1. Press Button C to go to the Lap Mode.
2. Press Button D to start the stopwatch.
3. Press Button A to check lap times. The lap
time and its lap number are displayed in the
upper low of the display, while the total
running time, which is still in progress, is
displayed in the lower low of the display.
4. Press Button D to stop the measurement.
✥ In order to check the recorded lap times,
refer to Memory Recall Function.
5. Press Button A to reset the stopwatch.
C
Lap
number
Lap time
Total running
time in progress
D
C
B
✥ When an item is selected for adjustment,
it starts flashing.
Second Minute
Hour
Year
MonthDate
12-/24-hour
display
‹
‹
‹
‹
‹‹
‹
D
A
D D
A
Start
Stop
Reset
DD
D
A
D
ResetStart
Stop
Restart
Stop
DA
A
D
StopStart Lap 1
Lap 2
Lap 3
A
A
Reset
Memory
Recall
Function
Up to Lap 99
LAP/RESET
LIGHT
MODE
START/STOP
RECALL
AM/PM
indicator
Day of the
week
Hour
Minute
Second
Month
Date
E
A
B C
D


Praat mee over dit product
Laat hier weten wat jij vindt van de Lorus Y704E Uurwerk. Als je een vraag hebt, lees dan eerst zorgvuldig de handleiding door. Een handleiding aanvragen kan via ons contactformulier.