How to stop the alarm while sounding
The alarm sounds for 10 seconds at the designat-
ed time. To stop it manually while sounding, press
any Button.
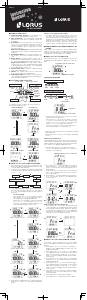
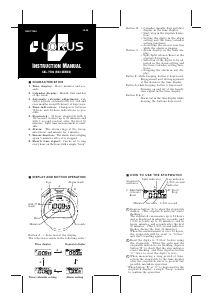
Press Button D five times to go to the SINGLE-TIME
AL ARM mo de. Th e SINGLE-TIME ALAR M mode
indicator appears on the display.
1. Press Button A for 2 seconds to change the dis
-
play to the SINGLE-TIME ALARM SETTING mode.
The minute digits start flashing.
2. Press Button B or C to set the minute digits.
One digit (flashing) is increased or decreased
with each press of Button B or C, respectively.
To move the digits quickly, keep the Button
pressed.
3. Press Button D to confirm the minute setting
and move on to the hour setting.
One digit (flashing) is increased or decreased
with each press of Button B or C, respectively.
To move the digits quickly, keep the Button
pressed.
4. Press Button D to confirm the hour setting and
move on to the year setting. The year digits
start flashing.
5. One digit (flashing) is increased or decreased
with each press of Button B or C, respectively.
To move the digits quickly, keep the Button
pressed.
6. Press Button D to confirm the year setting and
move on to the month setting. The month digits
start flashing.
7. One digit (flashing) is increased or decreased
with each press of Button B or C, respectively.
To move the digits quickly, keep the Button
pressed.
8. Press Button D to confirm the month setting
and move on to the date setting. The date
digits start flashing.
9. One digit (flashing) is increased or decreased
with each press of Button B or C, respectively.
To move the digits quickly, keep the Button
pressed.
10. Press Button A to complete the single time
alarm setting.
11. Press Button D to return to the TIME/CALENDAR
mode.
A
D
D
MIN UTE SE TTI NG
HOU R S ETT ING
DATE SET TIN G
D
YEA R S ETT ING
MON TH SET TIN G
D
D
Note: The alarm can be set only in one time zone.
Engagement/disengagement of daily alarm
With each press of Button B in the DAiLY ALARM
mode, the alarm can be alternately engaged or
disengaged. The ALARM signal appears or disap-
pears on the display accordingly.
How to stop the alarm while sounding
The alarm sounds for 10 seconds at the designat-
ed time. To stop it manually while sounding, press
any Button.
Engagement/disengagement of single-time
alarm
With each press of Button B in the SINGLE-TIM
ALARM mode, the alarm can be alternately en-
gaged or disengaged. The ALARM signal appears
or disappears on the display accordingly.
A
The miniature battery SEIKO CR2016, Maxell
CR2016 or SONY CR2016 which powers your
watch should last approximately 2 years. How-
ever, because it is inserted at the factory, the
actual life of the battery once in your possession
may be less than 2 years.
Be sure to replace the battery to prevent any
possible malfunction as soon as it runs down. To
replace the battery we recommend taking the
watch to a local watch repair shop.
Note: If the alarm is used for more than 20 sec-
onds a day and/or the illuminating light
for more than 8 seconds a day, the bat-
tery life may be less than the specified
period.
■
B ATTERY C H A N G E
■
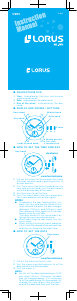
H O W T O S E T S E C O N D T I M E Z O N E
Press Button D six times to go to the SECOND TIME
ZONE mode.
1. Press Button C to select the city code.
2. If the daylight saving time is effective in the se
-
lected city, press Button B to show the daylight
saving time. The daylight saving time (“ DST”)
mark will appear.
Press Button D to return to the TIME/CALENDAR
mode.
■
H O W T O U S E E L B A C K L I G H T
In any mode press Button A to illuminate the dis-
play for about 4 seconds.
Note:
1. The backlight of the watch employs an elec-
tro-luminescent (EL) light, which tends to lose
illuminating power after very long use.
2. The illumination provided by backlight may
be hard to see when viewed under direct
sunlight.
Loc al cit y
■
C A R E O F Y O U R L O R U S WAT C H
T h i s w a t c h co n t a i n s p r e c i s e e l e c t r o n i c
components. Never attempt to open the case
or remove the back cover.
• BATTERY
CAUTION
Do not expose the old battery to fire
or recharge it. Keep it at a place be-
yond the reach of children. If a child
swallows it, consult a doctor immedi-
ately.
• WATER RESISTANT
Condi ti on
of us e
Accid en ta l
conta ct
with wa te r,
such as
splas he s
and r ai n
Swimm in g
and t ak in g
a sho we r
Skin di v-
ing
Scuba
divin g
Indication
on the dial/
case back
No
Indic at io n
* If your watch is 200 M/20 BAR, 100 M/10 BAR
or 50 M/5 BAR water resistant, it is so indicat-
ed on the dial/case back.
• Do not operate the buttons when the watch is
wet.
• If the watch is exposed to salt water, rinse it
in fresh water and then wipe it thoroughly
dry.
• Should you find an y water or condensa
-
tion inside the watch, immediately have it
checked. Water can corrode electric parts
inside the case.
NO NO NO
YES YES NO NO
YES YES NO
NO
NO
NO
YES
WATE R RE-
SISTA NT
WATE R RE-
SISTA NT
(50M/ 5 BA R
)
WATE R RE-
SISTA NT
10 0M /1 0 BA R
or a bo ve
(
NO
(
Caution:
Leather straps are not water resistant except so
indicated, even if the watch head is water resist-
ant.
• ALLERGIC REACTION
Because the case and band touch the skin di-
rectly, it is important to clean them regularly. If
not, shirt sleeves may be stained and those with
delicate skin may develop a rash. Please wear
the watch with some play to avoid any possible
allergic reaction. If you develop a rash on your
wrist, stop wearing and consult a physician.
• MAGNETISM
Your watch will be adversely affected by strong
magnetism.Keep it away from close contact
with magnetic objects.
• SHOCKS AND VIBRATIONS
Your watch may be worn for normal sports ac-
tivities, but be careful not to drop it or hit it on
hard surfaces.
• TEMPERATURE
Your watch is preadjusted so that constant ac-
curacy may be insured at normal temperature.
• CLEANING
Use only a soft cloth and clean water for clean-
ing your watch. Never use chemicals, as the
waterproof gasket will corrode.
■
S E RVICE
When y our LOR US watch r equires rep air or
servicing, please see the enclosed WARRANTY/
P r in t ed in Ch i na
City code
H11
HNL
ANC
LAX
DEN
CHI
NYC
CCS
RIO
H02
H01
GMT
LON
PAR
CAI
JED
DXB
KHI
DAC
RKK
HKG
TYO
SYD
NOU
WLG
-11
-10
-9
-8
-7
-6
-5
-4
-3
-2
-1
0
0
1
2
3
4
5
6
7
8
9
10
11
12
Time
differences
City
Pago Pago
Honolulu, Patete
Anchorage, Nome
Los Angeles, San Francisco,
Las Vegas, Vancouver, Seattle
Denver, Edmonton
Chicago, Mexico City, Houston,
New Orleans, Winnipeg
New York, Washington, D.C.,
Montreal, Lima, Havana, Boston
Santiago
Rio de Janeiro, Buenos Aires,
Brasilia, Montevideo, São Paulo
Praia
London, Dublin, Reykjavik,
Casablanca, Lisbon
Paris,
Vienna, Brussels, Berlin,
Madrid, Rome, Milan, Algiers,
Hamburg, Frankfurt, Stockholm
Cairo, Athens, Helsinki,
Istanbul, Beirut, Damascus
Jeddah, Moscow, Baghdad,
Nairobi, Kuwait, Riyadh
Dubai, Abu Dhabi, Muscat
Karachi, Male
Dacca, Colombo
Bangkok, Hanoi, Jakarta,
Phnom Penh, Vientiane
Hong Kong, Beijing, Singapore,
Manila, Taipei, Kuala Lumpur, Perth
Tokyo, Seoul, Pyongyang
Sydney, Guam, Melbourne, Rabaul
Nouméa, Port Villa
Wellington, Auckland,
Christchurch, Nauru Island
Sec ond ti me zon e
Loc al tim e
Tim e a nd
dat e o f
Sec ond ti me
zon e
Note: The alarm can be set only in one time zone.
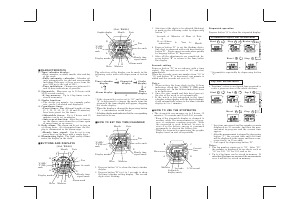
MIN UTE SE TTI NG
ALA RM
NUMB ER SE TT ING
■
H O W T O U S E S I N G L E - T I M E A L A R M
A
D
D
HOU R S ETT ING
A
D
■
H O W T O U S E D A I LY A L A R M
Press Button D four times to go to the ALARM
mode. The DAILY ALARM mode indicator appears
on the display.
1. Press Button A for 2 seconds to change the
display to the DAILY ALARM SETTING mode. The
hour digits start flashing.
2. One digit (flashing) is increased or decreased
with each press of Button B or C, respectively.
To move the digits quickly, keep the Button
pressed.
3. Press Button D to confirm the hour setting and
move on to the minute setting. The minute dig-
its start flashing.
4. Press Button B or C to set the minute digits.
One digit (flashing) is increased or decreased
with each press of Button B or C, respectively.
To move the digits quickly, keep the Button
pressed.
5. Press Button D to confirm the minute setting
and move on to the alarm number setting.
The alarm number starts flashing.
6. Press Button B or C to select the alarm number.
7. Press Button A to complete the alarm setting.
TIMER OPERATION
1. Press Button B in the TIMER mode to start the
countdown timer.
2. Press Button B to stop the countdown timer.
3. To reset the timer, press Button C.
Press Button D to return to the TIME/CALENDAR
mode.


Praat mee over dit product
Laat hier weten wat jij vindt van de Lorus Z010 Uurwerk. Als je een vraag hebt, lees dan eerst zorgvuldig de handleiding door. Een handleiding aanvragen kan via ons contactformulier.